Human Asteroids Makes You A Vector Triangle Ship

asteroids

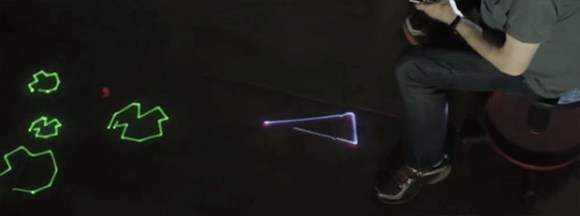
In 1979, [Nolan Bushnell] released Asteroids to the world. Now, he’s playing the game again, only this time with the help of a laser projector and a Kinect that turns anyone sitting on a stool – in this case [Nolan] himself – into everyone’s favorite vector spaceship. It’s a project for Steam Carnival, a project by [Brent Bushnell] and [Eric Gradman] that hopes to bring a modern electronic carnival to your town.

The reimagined Asteroids game was created with a laser projector to display the asteroids and ship on a floor. A Kinect tracks the user sitting and rolling on a stool while a smart phone is the triangular spaceship’s ‘fire’ button. The game is played in a 150 square foot arena, and is able to put anyone behind the cockpit of an asteroid mining triangle.

[Brent] and [Eric] hope to bring their steam carnival to LA and San Francisco next spring, but if they exceed their funding goals, they might be convinced to bring their show east of the Mississippi. We’d love to try it out by hiding behind the score like the original Asteroids and wasting several hours.

Continue reading “Human Asteroids Makes You A Vector Triangle Ship”

HP16500B Logic Analyzer Controlled With RS-232 And More

hp16500b-logic-analyzer

We’re pretty spoiled these days in that hobby electronics has made a lot of cool tools available on a budget. It’s hard to think of a better example than a logic analyzer, which you can get for a day or two of pay. Consumer-level devices just didn’t exist until a few years ago. [Jouko S] has this HP16500B industrial grade logic analyzer in his shop. It’s from the early 1990’s and it’s got a ton of features. Grabbing a still functional yet super-old model used to be the only way for hobbyists. But one thing you won’t find on it is the ability to connect it to your USB port to get screen captures. Younger readers might not recognize the slot at the top for magnetic media called a floppy disk which is the in-built way of recording your sessions. He set out to find an easier way to get color screen captures and ended up adding RS-232 control to the old hardware.

There is a 25-pin port on the back of the old hulk. But it is a female connector and he didn’t have the adapters on hand to make it work with his serial-to-USB converter. During development he used a breadboard and solder-tail connector to patch into the necessary signals. This was all hooked up to a Raspberry Pi which he planned to dedicate to the system. It worked, and he was able to use an interactive terminal for the rest of his sleuthing. With much trial and error he figured out the commands, and wrote some Python code for the Pi side of the equation. He can now pull color screenshots with ease thanks to the utilities available in the Python Imaging Module.

Programming A Through-hole ARM Microcontroller

NXP

The age of ARM microcontrollers for the electronics hobbyist is upon us, and luckily there are a few breadboard-friendly microcontrollers available in a DIP package. One of these chips is NXP’s LPC810M021FN8 – a tiny little 8-pin DIP with 4 kB of Flash, 1 kB of SRAM, and has a clock fast enough for some really cool stuff. [Joao] needed a way to program one of these microcontrollers and came up with an easy method using only a USB/UART adapter.

The key to this build is the fact the LPC810 doesn’t need any additional components to operate; the internal oscillator means the chip will run at 30 MHz with only a power and ground attached. To program the chip, [Joao] attached the Tx and Rx lines of the chip to a USB/UART adapter (at 3.3 V, of course), and uploaded some code with Flashmagic.

We’ve seen these DIP-sized ARM chips before, but [Joao]’s method of using off-the-shelf tools to write a blinking LED program means it’s a piece of cake to start working with these very cool and very powerful microcontrollers.

Build Your Own Backyard Pizza Oven

backyard-pizza-oven

Don’t heat up your house this summer, build your own backyard pizza oven instead. We love to using our garden produce, homemade dough, and fresh farmer’s market mozzarella to whip up a tasty pie in the summer. But it can be tricky to cook it on the grill and we hate heating up the oven when it’s hot out. This could be a perfect solution.

The footprint of the oven used to be a flower bed in [Furiousbal’s] yard. He removed the soil and side walls, laid down a bed of pea gravel, then started building the brick base for the oven. The base is insulated by encasing beer bottles in a bed of clay which he harvested locally. Fire brick then makes the floor of the cooking area as well as the arched opening. To support the clay during construction he built a dome of wet sand and covered it with damp newspaper. The clay is built up in layers before removing the sand from the inside. The final step (not shown above) is to build a little shelter to ensure the elements don’t wash away your hard work.

Of course you need to build your own fire inside to use it. If that’s too much work perhaps you should try solar cooking?

[via Reddit]

Help us decide, should this project gone on LIFE.hackaday?

Reflow Soldering Improved With Carbon Dioxide

co2_reflow-oven

This is exactly what it looks like. [Oleg] calls it soldering in inert atmosphere, but it’s just a toaster oven reflow hack dropped into a container full of carbon dioxide.

Why go to this trouble? It’s all about solder wetting. This is the ability of the molten solder paste to flow into all of the tinned areas of a board. [Oleg] talks about the shelf life of hot air leveled PCB tinning, which is about six months. After this the tin has oxidized. It will certainly not be as bad as bare copper would have, but it can lead to bad solder joints if your PCBs are more than about six months off the production line. This is one of the reasons to use solder flux. The acid eats away at the oxidized layer, exposing tin that will have better wetting.

But there is another way. Soldering in the absence of oxygen will also help the wetting process. CO2 is heavier than air, so placing the reflow oven in a plastic container will allow you to purge air from the space. CO2 canisters are cheap and easy to acquire. If you keg your own homebrew beer you already own one!

If you’ve got everything but the reflow oven just look around for a few examples of how to build your own.

Charlotte, The Hexapod With 3D Vision

spider

Charlotte’s chassis comes from as a kit, but the stock electronics are based on an Arduino – not something for a robot that needs to run computer vision apps. [Kevin] ended up using a Raspi for the controller and gave Charlotte eyes with an Asus XTION. Edit: or a PrimeSense sensor These sensors are structured light depth cameras just like the kinect, only about smaller, lighter, and have a better color output.

Hardware is only one half of the equation, so [Kevin] tossed the Arduino-based stock electronics and replaced them with a Raspberry Pi. This allowed him to hone his C++ skills and add one very cool peripheral – the XTION depth camera.

To the surprise of many, we’re sure, [Kevin] is running OpenNI on his Raspberry Pi, allowing Charlotte to take readings from her depth camera and keep from colliding into any objects. The Raspberry Pi is overclocked, of course, and the CPU usage is hovering around 90%, but if you’re looking for a project that uses a depth sensor with a Pi, there you go.

Continue reading “Charlotte, The Hexapod With 3D Vision”

Programming Microcontrollers With A Raspi

rasduino

The advent of the Arduino brought the world of microcontrollers to hobbyists, students, and artist the world over. Right now we’re in the midst of a new expansion in hobbyist electronics with the Raspberry Pi, but we can’t expect everyone to stay in the comfortable, complex, and power-hungry world of Linux forever, can we? Eventually all those tinkerers will want to program a microcontroller, and if they already have a Raspberry Pi, why not use that?

[Kevin] wanted to turn his Raspi into an AVR development workstation, without using any external programmers. He decided to use the Raspi’s SPI port to talk to an AVR microcontroller and was able to make the electrical connections with just a few bits of wire an a handful of resistors.

For the software, [Kevin] added support for SPI to avrdude, available on his git. Theoretically, this should work with any AVR microcontroller with the most popular ATMegas and ATtinys we’ve come to love. It doesn’t support the very weird chips that use TPI programming, but it’s still extremely useful.