Print Your Own Adjustable Lenses

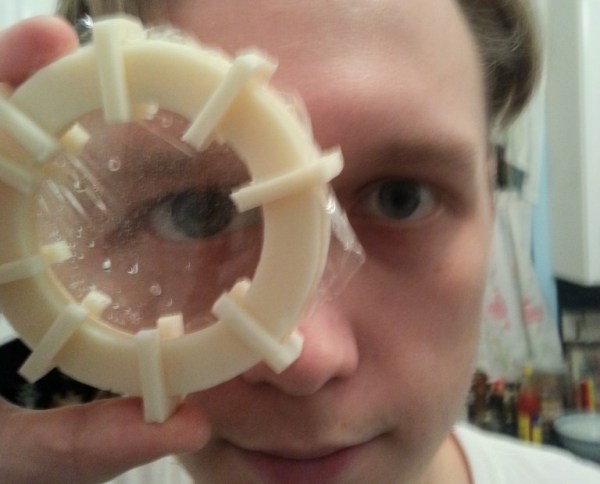
[Christopher] is really going the distance with his liquid-filled 3D printed lens project. The idea is to create a bladder out of two pieces of clear plastic. It can then be filled with liquid at a variable level of pressure to curve the plastic and create an adjustable lens. He was inspired by the TED talk (which we swear we already covered but couldn’t find the post) given by [Josh Silver] on adjustable eyeglass lenses.

Don’t miss the video after the break. [Christopher] shows off the assembly process for one lens. Two 3D printed frames are pressure fit together to hold one piece of plastic wrap. Two of those assemblies are then joined with JB weld and some 3D printed clips that help to hold it. A piece of shrink tubing is used as a hose to connect a syringe to the bladder. By filling the lens assembly with water he’s able to adjust how it refracts light.

Continue reading “Print Your Own Adjustable Lenses”

Everything You Need To Build A Light-cured Resin 3D Printer

dlp-projector-resin-printer

[Rachel Levine] was one of the mechanical engineers on the team at the Rochester Institute of Technology who built this resin-based 3D printer. She wrote in to show off the fantastic work they’ve been doing. Their project website is daunting to take in at first, which shouldn’t be all that surprising since the concepts used here are fairly advanced. But give yourself a few minutes of blind clicking and you’ll begin to grasp the scope of this fantastic piece of engineering. The bad news is you’re not going to whip the thing together in a weekend. The good news is that if you’re determined to build one this should give you the lion’s share of the background you’ll need to make it happen.

The rig pulls a printed object up from the ooze on the build platform. They’re using resin that is cured with visible light. That’s why you see the level in the foreground; the bath needs to be a uniformed thickness so that it solidifies correctly when the light hits it from the underside. The build table is made of glass sandwiched between gaskets where it comes in contact with the frame, keeping the liquid in place while letting the DLP projector shine through. Check out the fast-motion build video after the break to see how each layer is exposed to light, then pulled upward to make room for the next. We estimate the build was around two hours of real-time and you can see that a technician replaces the extracted resin at regular intervals during the process.

DLP Projector based printers have been gaining in popularity. Check out this roundup of several offerings from last year.

Continue reading “Everything You Need To Build A Light-cured Resin 3D Printer”

Scratch-built Bottle Cap Coffee Table Pulses To The Music

scratch-build-bottlecap-coffe-table

This isn’t a thrift-store coffee table modified as a craft project. [Dandujmich] built it from the ground-up using framing lumber, bottle caps, plastic resin, and some electronics for bling.

The first step was to see if he had enough caps on hand for the project. It’s hard to grasp how many were used just by looking at it, but the gallery description tells us there’s about 1700 which went into the design! From there he grabbed some 2x4s and began construction. The table legs started with two end assemblies built by doweling the legs to the end cross pieces. From there he cut a rabbit on the side rails and screwed them to the leg assemblies from the inside.

The tabletop includes a frame with a recessed area deep enough to keep the caps below the surface. After spending about ten hours super gluing all of the caps in place he mixed and poured two gallons of the resin to arrive at a glass-like finish. The final touch is some custom hardware which pulses two rows of embedded LEDs to music being played in the room. The video after the break isn’t fantastic, but it gives you some idea of how that light rig works.

Continue reading “Scratch-built Bottle Cap Coffee Table Pulses To The Music”

Time-lapse Dolly Uses Some Stock Parts And A Bit Of Machining Work

linear-carriage-for-time-lapse-photography

[Ben] just finished building this time-lapse dolly and decided to share his experience. We think he struck just the right balance of diy and commercially available materials to create a rig that is stable yet relatively inexpensive.

The project was inspired by Project Chronos. It gives a lot of details about the drive electronics and code used, but there are some gaps in the instructions for building the track itself. [Ben] forged ahead, purchasing linear bearings and a double-guide rail from IGUS. He didn’t mention the price on that item but we found 1000mm of the stuff (about 40 inches) for under $75 so it’s not outrageous. The part he couldn’t get for a reasonable price was precision thread bar. He ended going with regular threaded rod and a couple of nuts combined with a spring mechanism to keep the sled steady. That seems to work just fine. You can see the rod bouncing a bit in the clip after the break but it doesn’t harm the stability of the captured images.

The end stops including the one to which the stepper motor is mounted are his own work. It sounds like they required a bit more fabrication work than he was planning on but we figure if you don’t challenge your skill set you never get any better.

Continue reading “Time-lapse Dolly Uses Some Stock Parts And A Bit Of Machining Work”

Quick And Easy Rocket Stove

[Simon], a gardener in the United Kingdom, created this super cheap and easy to build rocket stove. The great thing about this little guy is that the methods and materials used to create it are so basic, anyone should be able to quickly make their own for just a few bucks. If nothing else, this is a good introductory project for people wanting to experiment with these stoves.

The only materials required are a metal 5 gallon cooking oil drum, a few scrap pieces of chimney liner pipe, and some sand. That’s it.

[Simon] cut off the top of the oil drum and made a hole in the front to fit the pipe. He then trimmed the scrap pieces of pipe to form a 90 degree elbow and positioned that in place inside the drum.  Sand poured around the pipe acted as the insulator. Finally, he cut and flattened a scrap piece of pipe to use as a front loading tray for the wood.

Simple as that. Party on.

[via The Flying Tortoise]

24V Relay Driver Circuit

driving-24v-relays

[Glitch] got his hands on a slew of relays which are meant for use in industrial equipment. They are designed to operate at 24V. He wanted to use these with common microcontrollers and instead of buying a driver he designed and built his own.

There’s a few things to consider with a project like this. You need a power source, a way to level convert the driver pins, and some protection in case something goes wrong with the circuit. Looking at the board above should give you some idea of what’s going on. There’s a big transformer taking up half of the footprint. This steps down mains voltage to something a 7824 regulator can handle. That’s a 24V linear regulator which is fed by a bridge rectifier along with some smoothing capacitors. With the source taken care of [Glitch] uses an optoisolator for both protection and level conversion. After working the bugs out of the design he was able to control the relay using 3.3V, 5V, or 12V.

Oreo Separators Episode 2 Chucks Food At Your Face

Here’s a portable, well-built Oreo separator that still manages to border on ridiculous. Instead of just ditching the creme filling, it dispenses the cookie and the creme separately. Ostensibly the two creators like different things. One enjoys the cookies while the other only likes the creme. Of this division was born the professional-looking snack divider.

Unlike the hatchet-based system shown off in the first episode this machine has a hopper into which several Oreos may be loaded. The demo cookie is like none we’ve seen before because the top portion is pushed off as if it took no effort at all. The creme is then softened with a stream of hot air before the gooey creme is blasted into the other creators face. Some of it may even have entered his mouth. The final step ejects the remaining chocolate cookie by launching it straight up into the air.

Our favorite part of the video after the break is the “DO NOT ATTEMPT” subtitle that flashes on the screen whenever the apparatus is launching food into the guys’ mouths.

Continue reading “Oreo Separators Episode 2 Chucks Food At Your Face”