Very Dumb Security For A WiFi Thermostat

We have finally figured out what the Internet of Things actually is. It turns out, it’s just connecting a relay to the Internet. Not a bad idea if you’re building a smart, Internet-connected thermostat, but you have no idea how bad the security can be for some of these devices. The Heatmiser WiFi thermostat is probably the worst of the current round of smart home devices, allowing anyone with even a tiny amount of skill to control one of these thermostats over the Internet.

The Heatmiser is a fairly standard thermostat, able to connect to an 802.11b network and controllable through iOS, Android, and browser apps. Setting this up on your home network requires you to forward port 80 (for browser access) and port 8068 (for iOS/Android access). A username, password, and PIN is required to change the settings on the device, but the default credentials of user: admin, password: admin, and PIN: 1234 are allowed. If you’re on the same network as one of these devices, these credentials can be seen by looking at the source of the webpage hosted on the thermostat.

if you connect to this thermostat with a browser, you’re vulnerable to cross-site request forgery. If you use the Android or iOS apps to access the device with the custom protocol on port 8068, things are even worse: there is no rate limiting for the PIN, and with only four digits and no username required, it’s possible to unlock this thermostat by trying all 10,000 possible PINs in about an hour.

There are about a half-dozen more ways to bypass the security on the Heatmiser thermostat, but the most damning is the fact there is no way to update the firmware without renting a programmer from Heatmiser and taking the device apart. Combine this fact with the huge amount security holes, and you have tens of thousands of installed devices that will remain unpatched. Absolutely astonishing, but a great example of how not to build an Internet connected device.

Content Centric Networking And A Tour Of (Xerox) PARC

You may be used to seeing rack mounted equipment with wires going everywhere. But there’s nothing ordinary about what’s going on here. [Elecia White] and [Dick Sillman] are posing with the backbone servers they’ve been designing to take networking into the era that surpasses IPv6. That’s right, this is the stuff of the future, a concept called Content Centric Networking.

Join me after the break for more about CCN, and also a recap of my tour of PARC. This is the legendary Palo Alto Research Company campus where a multitude of inventions (like the computer mouse, Ethernet, you know… small stuff) sprang into being.

Continue reading “Content Centric Networking And A Tour Of (Xerox) PARC”

A Nixie Clock With Neon Bulb Logic

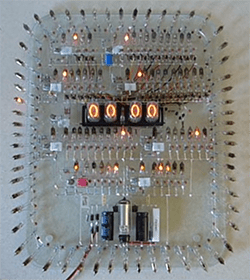
This is an oldie, but oh, man is this ever good. It’s a Nixie clock made without a microcontroller. In fact, there aren’t any logic chips in this circuit, either. As far as we can tell, the logic in this clock is made with resistors, diodes, caps, and neon tubes.

The design of this is covered in the creator’s webpage. This clock was inspired by a few circuits found in a 1967 book Electronic Counting Circuits by J.B. Dance. The theory of these circuits rely on the different voltages required to light a neon lamp (the striking voltage) versus the voltage required to stay lit (the maintaining voltage). If you’re exceptionally clever with some diodes and resistors, you can create a counting circuit with these lamps, and since it’s pretty easy to get the mains frequency, a neon logic clock starts looking like a relatively easy project.

This clock, like a lot of the author’s other work, is built dead bug style, and everything looks phenomenal. It looks like this clock is mounted to a plastic plate; a good thing, because something of this size would be very, very fragile.

Video below, thanks [jp] for sending this one in.

Continue reading “A Nixie Clock With Neon Bulb Logic”

Adding A Digital Back To A Sweet Old Camera

[Eugene] wanted to use his vintage Leica M4 as a digital camera, and he had a Canon EOS 350D digital camera sitting around unused. So he Frankensteined them together and added a digital back to the Leica’s optical frontend.

It sounds simple, right? All you’d need to do is chop off the back from the EOS 350D, grind the digital sensor unit down to fit into exactly the right spot on the film plane, glue it onto an extra Leica M4 back door, and you’re set. Just a little bit of extremely precise hackery. But it’s not even that simple.

Along the way [Eugene] reverse-engineered the EOS 350D’s shutter and mirror box signals (using a Salae Logic probe), and then replicated these signals when the Leica shutter was tripped by wedging an Arduino MiniPro into an old Leica motor-winder case. The Arduino listens for the Leica’s bulb-flash signal to tell when the camera fires, and then sends along the right codes to the EOS back. Sweet.

There are still a few outstanding details. The shutter speed is limited by the latency in getting the signal from the Leica to the 350D back, so he’s stuck at shutter speeds longer than 1/8th of a second. Additionally, the Canon’s anti-IR filter didn’t fit, but he has a new one ordered. These quibbles aside, it’s a beautiful hack so far.

What makes a beautiful piece of work even more beautiful? Sharing the source code and schematics. They’re both available at his Github.

Of course, if you don’t mind completely gutting the camera, you could always convert your old Leica into a point and shoot.

The LPT DAC

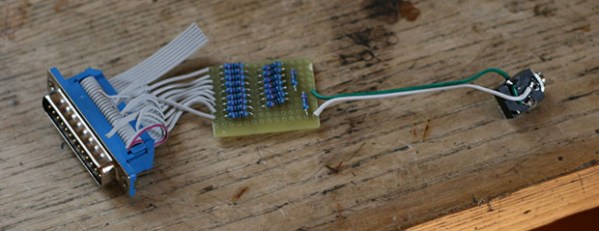
About 30 years ago, before every computer had CD quality audio built in, audio cards and chips were technological marvels. MIDI chips, FM synthesis, and synths on a chip reigned supreme but one little device – just a handful of resistors – sounded fantastic. it was the Covox Speech Thing, a simple resistor ladder wired up to the parallel port of a computer that would output 8-bit audio to an external amplifier. [FK] recently built his own Covox (Czech, Google translatrix) with just 18 resistors, and the results sound fantastic.

Instead of fancy chips, the original Covox Speech Thing used the 8 bit parallel port on a PC. Back in the olden days, this was the fastest way to get digital data out of a computer, but since it was digital only, a DAC was required to turn this into audio. A simple resistor ladder was sufficient, and this hardware was eventually supported by the old DOS games from Sierra and Id.

[FK] has a demo of this LPT DAC available here, but we’re not thinking that link will last long. If anyone has a better link, leave a note in the comments and we’ll update this post. Thanks [beavel] for sending this in.

CNC Sound Enclosure for Living Room

Sound Isolation Box Makes Living Room Based CNC Routing Tolerable

CNC Machines can be loud, especially if they are equipped with a high-speed router spindle. Unfortunately, such a loud racket could be a problem for the apartment dwellers out there. Fear Not! [Petteri] has come up with a solution. It’s a sound isolation enclosure for his mini CNC Router that doubles as furniture. It keeps the sound and dust in while pumping out some cool parts….. in his living room.

What may just look like a box with an upholstered top actually had a lot of thought put into the design. The front MDF panel folds down to lay flat on the floor so that the user can kneel on it to access the machine without putting unnecessary stress on the door hinges. The top also is hinged to allow some top-down access or permit a quick peek on the status of a job. All of the internal corners of the box were caulked to be air tight, even a little air passageway would allow sound and dust to escape. Two-centimeter thick sound insulation lines the entire interior of the box and the two access lids have rubber sealing strips to ensure an air tight seal when closed.

With stepper motors, the spindle motor and control electronics all running inside an enclosed box, there is some concern over heat build up. [Petteri] hasn’t had any problems with that so far but he still installed an over-temp power cutoff made from a GFCI outlet and a thermostat temperature switch. This unit will cut the mains power if the temperature gets over 50º C by intentionally tripping the GFCI outlet. None of the internal parts will ignite under 300º C, so there is quite a safety buffer.

Although the isolation box came out pretty good, [Petteri] admits there is room for improvement; when cutting wood or aluminum, the noise level is kind of annoying. If he had to do it again, he would use thicker MDF, 20mm instead of 5mm. However, during general use while cutting plastic, the router is still quieter than his dishwasher.

Video below.

Continue reading “Sound Isolation Box Makes Living Room Based CNC Routing Tolerable”

THP Semifinalist: OSHWatch

No, it’s not a finely crafted wrist accessory from Cupertino, but [Jared]’s OSHWatch, but you’re actually able to build this watch thanks to an open design and reasonable, hand-solderable layout.

Built around a case found on DealExtreme that looks suspiciously similar to enclosures meant to hold an iPod Nano, [Jared]’s smartwatch includes a 128×128 RGB OLED display, magnetometer, accelerometer, Bluetooth 4.0 transceiver, and a lithium-ion charger and regulator circuit. Everything is controlled with a PIC24, which should mean this watch has enough processing power to handle anything a watch should handle.

As for the UI and what this watch actually does [Jared] is repurposing a few Android graphics for this watch. Right now, the watch can display the time (natch), upcoming appointments on his schedule, accelerometer and magnetometer data, and debug data from the CPU. It’s very, very well put together, and repurposing an existing watch enclosure is a really slick idea. Videos below.


SpaceWrencherThe project featured in this post is a quarterfinalist in The Hackaday Prize.

Continue reading “THP Semifinalist: OSHWatch”