Hijacking Chromecast With The Rickmote Controller

rick-astelyWith a simple $35 dongle that plugs right into your TV, it’s possible to enjoy your favorite TV shows, YouTube channels, and everything else Chromecast has to offer. Being a WiFi enabled device, it’s also possible to hijack a Chromecast, forcing your neighbors to watch [Rick Astley] say he’s never going to give you up.

The rickmote, as this horrible device is called, runs on a Raspberry Pi and does a lot of WiFi shennaigans to highjack a Chromecast. First, all the wireless networks within range of the rickmote are deauthenticated. When this happens, Chromecast devices generally freak out and try to automatically reconfigure themselves and accept commands from anyone within proximity. The rickmote is more than happy to provide these commands to any Chromecast device, in the form of the hit song from 1987 and 2008.

Video demo of the rickmote below, along with a talk from ToorCon describing how the hijacking actually works.

Continue reading “Hijacking Chromecast With The Rickmote Controller”

Clay 3D Printer Keeps It Simple

Clay 3D Printer

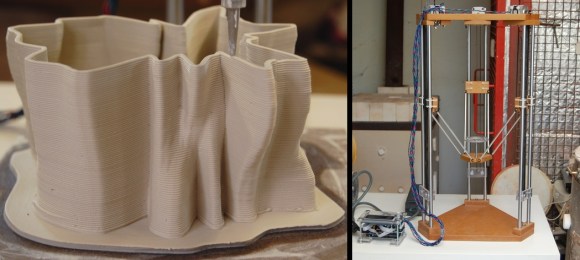
Artist [Jonathan] has built a 3D printer specifically for printing in clay. The part count is kept to a minimum and the printer was designed to be made with basic tools and beginner skills. The intent was to not require access to a plastic 3D printer in order to build this printer. Although this build’s goal was clay printing, the extruder could certainly be swapped out for a typical plastic printer version.

This Delta uses quite a bit of MDF. The top and bottom plates are MDF, as are the bearing carriages and extruder mount plate. 12mm rods are solely responsible for the support between the top and bottoms plates as well providing a surface for the LM12UU linear bearings. These bearings are zip tied to the MDF bearing carriages. The 6 arms that support the extruder mount plate are made from aluminum tubing and Traxxas RC car rod-ends. NEMA17 motors and GT2 belts and pulleys are the method used to move the machine around.

Getting the clay to dispense was a tricky task. Parts scavenged from a pneumatic dispensing gun was used. If you are unfamiliar with this type of tool, think: Power Caulk Gun. Clay is fed into the re-fillable syringes and an air compressor provides the 30 psi required to force the clay out of the nozzle. The pressure alone controls the rate of clay flow so it is a little finicky to get the extrusion rate correct. Depending on the size of the final sculpture, 1 to 2mm diameter nozzles could be used. For larger work, 1mm layer height works well. For the smaller pieces, 0.5mm is the preferred layer height.

Continue reading “Clay 3D Printer Keeps It Simple”

Building A True Unix Keyboard

keyboard

compact keyboards that do away with a third of the keys you would usually find on a normal-sized keyboard are all the rage now, but for [jonhiggs], they weren’t good enough. There is a long tradition of Unix shortcuts these compact keyboards don’t pay attention to – CTRL-A being the Home key, and CTRL-D being the Page Down key. To fix this horrible oversight of Unix history, [jon] tore apart one of these compact keyboards, rewired the switch matrix, and made his own perfect keyboard.

The keyboard [jon] is using is a Filco Minila, a very nice and high quality keyboard in its own right.  After mapping out the switch matrix, [jon] wired all the switches up to a Teensy 2.0 loaded up with the TMK firmware. This is a pretty standard way of building a custom keyboard, and [jon] could have just cut a switch plate and installed panel-mount switches and wired up the matrix and diodes point to point. The case for the keyboard is constructed out of Lego.

Because this is a true, modern Unix keyboard, [jon] needed to connect this keyboard to a box running his *nix of choice. He’s doing this in the most future-retro way possible, with an Amazon EC2 instance. This project isn’t done yet, and [jon] is hoping to add an ARM dev board, an iPad Retina display, battery, and SSD, turning this into a completely homebrew laptop designed around [jon]’s needs.

Aquarium with variable LEDs

18-Channel PWM Aquarium Lights Provide Habitat-Like Life For Fish

Whether you want to keep your fish happy or just need a good light show, this aquarium light fits the bill. It is the second iteration, but [William] calls it v1. That’s because v0 — which used a few loops of LED strips — never really met his requirements.

This build uses just six LEDs, each a 30 Watt RGB monster! To source about 350 mA for each, and to control brightness with 18-channels of pulse width modulation, he had to plan very carefully. This meant a proper aluminum project box and a beefy, fan-cooled power supply.

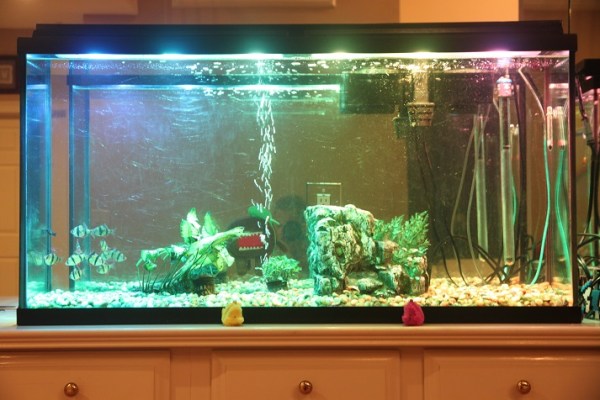
The driver board is his own design, and he etched a huge board to hold all of the components. Everything is driven by an Arduino Mega, which has 16 hardware PWM channels; two short of what he needed. Because of this he had to spend a bit of time figuring out how best to bit-bang the signals. But he’s putting them to good use, with fish-pleasing modes like “sunset” or the “passing rainbow” pattern which is shown in the image above.

If you need something a little less traditional why not house your fish in a computer case, complete with LED marquee for displaying data.

The Tree Of 40 Fruit

[Sam Van Aken] is working on a long-term project which literally will bear fruit. Forty different kinds, in fact. The Tree of 40 Fruit is a single tree, carefully grafted to produce 40 different varieties of fruit. Growing up on a farm, [Sam] was always fascinated by the grafting process – how one living plant could be attached to another.

In 2008, [Sam] was working as a successful artist and professor in New York when he learned a 200-year-old state-run orchard was about to be demolished. The stone fruit orchard was not only a grove a trees, but a living history of man’s breeding of fruit. Many unique varieties of stone fruit – such as heirloom peaches, plums, cherries, and apricots –  only existed in this orchard.

[Sam] bought the orchard and began to document the characteristics of the trees. Color, bloom date, and harvest date were all noted in [Sam’s] books. He then had the idea for a single tree which would bear multiple types of fruit. By using grafting techniques such as chip grafting, [Sam] was able to join the varieties of stone fruit tree. The process was very slow going. Grafts performed one year must survive through the winter before they grow the following spring.

Throughout the process, [Sam] kept careful diagrams of each graft. He planned the tree out so the fruit harvest wouldn’t be boring. Anyone who has a fruit tree tends to give away lots of fruit – because after a couple of weeks, they’re sick of eating one crop themselves! With [Sam’s] tree, It’s possible to have a nectarine with breakfast, a plum with lunch, and snack on almonds before dinner,  all from the same tree. The real beauty is in the spring. [Sam’s] tree blossoms into an amazing array of pinks, purples and whites. A living sculpture created by an artist with a bit of help from Mother Nature.

Click past the break for [Sam’s] TED talk.

Continue reading “The Tree Of 40 Fruit”

Cloning Tektronix Application Modules

Tektronix’s MSO2000 line of oscilloscopes are great tools, and with the addition of a few ‘application modules’, can do some pretty interesting tasks: decoding serial protocols, embedded protocols like I2C and SPI, and automotive protocols like CAN and LIN. While testing out his MSO2012B, [jm] really liked the (limited time) demo of the I2C decoder, but figured it wasn’t worth the $500 price the application module sells for. No matter, because it’s just some data on a cheap 24c08 EEPROM, and with a little bit of PCB design <<removed because of DMCA takedown>>

The application module Tektronix are selling is simply just a small EEPROM loaded up with an <<removed because of DMCA takedown>>. By writing this value to a $0.25 EEPROM, [jm] can enable two applications. The only problem was getting his scope to read the EEPROM: a problem easily solved with a custom board.

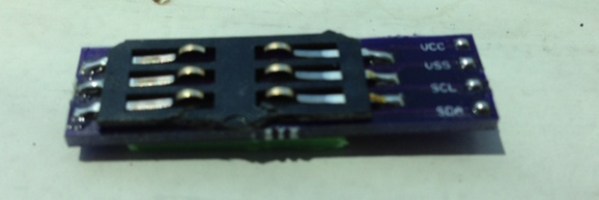
The board [jm] designed <<removed because of DMCA takedown>>, with the only additional components needed being an EEPROM, a set of contacts for reading a SIM card, and a little bit of plastic glued onto the back of the board for proper spacing.

UPDATE: Learn about the DMCA Takedown Notice that prompted this post to be altered: http://hackaday.com/2014/08/05/hardware-security-and-a-dmca-takedown-notice/

A Better Google Glass For $60 (This One Folds)

glassFor [Tony]’s entry for The Hackaday Prize, he’s doing something we’ve all seen before – a head mounted display, connected to a Bluetooth module, displaying information from a smartphone. What we haven’t seen before is a cheap version of this tech, and a version of Google Glass that folds – you know, like every other pair of glasses on the planet – edges this project over from ‘interesting’ to ‘nearly practical’.

For the display, [Tony] is using a 0.96″ OLED connected to an Arduino Nano. This screen is directed into the wearer’s eye with a series of optics that, along with every other part of the frame, was 3D printed on a Solidoodle 2. The frame itself not only folds along the temples, but also along the bridge, making this HMD surprisingly compact when folded up.

Everything displayed on this head mounted display is controlled by  either an Android phone or a Bluetooth connection to a desktop. Using relatively simple display means [Tony] is limited to text and extremely simple graphics, but this is more than enough for some very interesting applications; reading SMS messages and checking email is easy, and doesn’t overpower the ‘duino.


SpaceWrencherThe project featured in this post is an entry in The Hackaday Prize. Build something awesome and win a trip to space or hundreds of other prizes.