Robot arm is Soft

Soft And Squishy Silicone Robotics

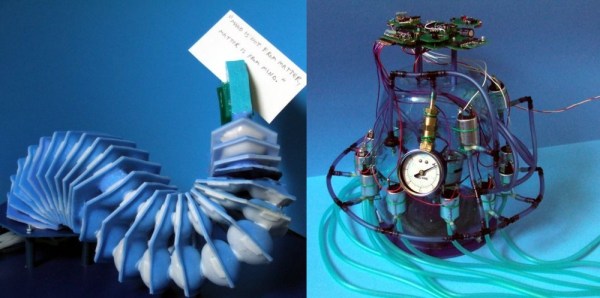
This robot arm and gripper is made almost entirely out of silicone. Casting the parts by hand, [Mike] assembled this working, remote controlled robot arm gripper.

We’ll let that sink in for a minute. He turned an oversized tooth-paste tube of silicone caulking… into a pneumatic robotic arm. Holy cow. We’ve seen lots of soft robotics before, but this is some really cool stuff!

You see, [Mike] is actually planning on building an inexpensive prosthetic robot hand using this technology. This was merely a test to see how well he could make silicone based air muscles — we’d say it was pretty successful! Each silicone disk in this robotic appendage has four sealed pockets inside of it. When air flows in through them, they inflate, causing the entire appendage to stretch on one side. With four of these, and varying amounts of pressure, it’s possible to move the appendage in any direction!

Continue reading “Soft And Squishy Silicone Robotics”

We Just Gave Away $1000 To A Voter

Last week we issued a challenge to everyone on Hackaday: vote in the Hackaday Prize Community Voting, and someone is going to with a $1000 gift card for the Hackaday Store. How is this going to work? I’m going to find a random person on Hackaday.io, and if they have voted, they win a thousand dollar gift card. If they have not voted, I pick a random person from the set of people who have voted. Too complex? Here’s the video:

The winner of the $1000 Hackaday Prize gift card is [Nolan Moore]. He voted for the most Amazingly Engineered project, and the bits aligned to award him a great gift for participating. The other guy? The other guy should have voted.

A NEW ROUND

Thought this would stop when we finally gave away a thousand dollar gift card? Nope. Right now there’s a new round of community voting. The theme is ‘Best Documented’. All you have to do is choose the project presented to you that is Best Documented. We’re going to let this round stew for a while but on July 17th, at around 2200 UTC, I’m going pick a random person on Hackaday.io. If that person has voted, they get a $1000 gift card. The next time I do this, there won’t be a guaranteed winner; we’re only giving out a gift card if the random person selected has voted. There will, like the other rounds of community voting, be a few consolation prizes distributed to people who have voted if no one snatches the big prize.

So what do you have to do for a chance at winning a $1000 gift card? Click here and vote. Do it now.

CD launcher

Fully-Automatic CD Launcher Looks Dangerously Fun

When [JZSlenker] was challenged to find a creative way to destroy a bunch of compact discs that were burned incorrectly, he did not disappoint. He came up with a rather simple but fun contraption that launches the CD’s at high speeds and with a fast rate of fire. He doesn’t share many details about how this machine was built, but the 18 second video makes it pretty obvious how it works.

The CD gun is built mainly from a piece of plywood. This provides a flat base with which to mount the other components. A stack of compact discs is held in place by what appears to be a metal cage that was welded together. An inexpensive angle grinder is used as the propulsion mechanism. The grinding wheel is mounted just in front of the stack of CD’s in a vertical orientation. The wheel must be placed just high enough above the plywood base for a CD to fit in between the wheel and the base. This design is remarkably similar to the Sticker Gun which our own [Brian Benchoff] is building.

Some type of linear actuator is used as the firing mechanism. The actuator is hooked up to a thin piece of metal, cut into an L shape. It almost looks like a reaper tool. When a button is pressed, the actuator fires instantly. This pushes the metal hammer into the CD on the bottom of the stack. The CD is pressed forward into the grinder wheel which then shoots the CD into the air. Based on the below video, it looks like [JZSlenker] is able to fire at a rate of about three CD’s per second with this rig.

This has got to be a super-villain weapon for an upcoming movie, right? Maybe AOL-man?

Continue reading “Fully-Automatic CD Launcher Looks Dangerously Fun”

Retrotechtacular: The Omega Navigational System

In 1971, the United States Navy launched the Omega navigational system for submarines and surface ships. The system used radio frequencies and phase difference calculations to determine global position. A network of eight (VLF) transmitter sites spread around the globe made up the system, which required the cooperation of six other nations.

Omega’s fix accuracy was somewhere between one and two nautical miles. Her eight transmitter stations were positioned around the Earth such that any single point on the planet could receive a usable signal from at least five stations. All of the transmitters were synchronized to a Cesium clock and emitted signals on a time-shared schedule.

LOP-thumb
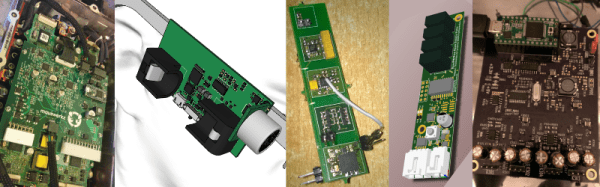
A ship’s receiving equipment performed navigation by comparing the phase difference between detected signals. This calculation was based around “lanes” that served to divvy up the distance between stations into equal divisions. A grid of these lanes formed by eight stations’ worth of overlapping signals provides intersecting lines of position (LOP) that give the sailor his fix.

In order for the lane numbers to have meaning, the sailor has to dial in his starting lane number in port based on the maps. He would then select the pair of stations nearest him, which were designated with the letters A to H. He would consult the skywave correction tables and make small adjustments for atmospheric conditions and other variances. Finally, he would set his lane number manually and set sail.

Continue reading “Retrotechtacular: The Omega Navigational System”

50 Winners Using Freescale Parts

For the last few weeks we’ve been celebrating builds that use parts from our manufacturer sponsors of the 2015 Hackaday Prize. Today we are happy to announce 50 winners who used Freescale parts in their builds. Making the cut is one thing, but rising to the top is another. These builds show off some amazing work from those who entered them. In addition to the prizes which we’ll be sending out, we’d like these projects to receive the recognition they deserve. Please take the time to click through to the projects, explore what has been accomplished, and leave congratulations a comment on the project page.

Still Time to Win!

We’re far from the end of the line. We’ll be giving roughly $17,000 more in prizes before the entry round closes in the middle of August. Enter your build now for a chance in these weekly contests! This week we’re looking for things that move in our Wings, Wheels, and Propellers Contest.

One voter will win $1000 from the Hackaday Store this week as well! Anyone is welcome to vote in Astronaut or Not.  The drawing is this afternoon, Vote Now!

Continue reading “50 Winners Using Freescale Parts”

3 Hours Until Collabatorium

This is your 90-minute warning. This week’s Collabatorium begins in just 1.5 hours and you’re invited. To join in just click the “Request to join this project” found on the left sidebar of the Hacker Channel page.

Once you’ve joined you can open up the Group Messaging for that project, one of the many awesome collaboration features on Hackaday.io. Starting at 1700 UTC we’ll launch the Collabatorium to celebrate, discuss, encourage, and find partners for 2015 Hackaday Prize Entries. This edition of the live event is hosted by [Sophi Kravitz] and [Jasmine Brackett].

vote-shortWhile we have your attention, here’s another reminder to head on over and Vote in Astronaut or Not. Each week we draw a random hacker number for a $1000 giveaway, but only if you have voted!. The next drawing is TODAY so get at least one vote in right away to qualify.

The 2015 Hackaday Prize is sponsored by:

Insane 33 Port USB Charger

Like it or not, Hackers gonna hack. And when your hackerspace has someone who looks like Doc Brown from Back to the Future, the builds can get a bit weird, like this Hack42 FestivalCharger.

The Hack42 hackerspace in Arnhem, The Netherlands had collected a large number of TP-Link 5V USB chargers – but all of them had the North American NEMA plug (flat, 2 pin) which wouldn’t fit the Schuko sockets prevalent in The Netherlands. [Simon “MacSimski” Claessen] decided to whip out his giant soldering iron and use it to solder two long pieces of welding filler metal rods to 33 of the chargers, effectively wiring them up in parallel. He did apply his obvious skill and experience to good use. For one, the diameter of the filler metal rods he used were just about the right size to fit in the Shucko Schuko socket. And the gap between the two turned out to be the right distance too, thus creating a sort of Schucko Schuko plug. All that was needed to power up all the chargers was to connect a socket extension to the FestivalCharger. The unit was built to allow crowds of festival-goers to charge their phones and battery-powered gadgets simultaneously. To make sure the visitors didn’t get electrocuted, he used a piece of PVC pipe to cover up the exposed pins and keep it all safe.

Thanks to Hack42 member [Dennis van Zuijlekom] for sending in this tip.