Ghost Guitar Plays Hendrix

Purple Haze all in my brain,
lately guitars they don’t seem the same,
[Josh] is playin’ funny but I don’t know why
‘scuse me while he electrifies.

[Josh] wanted to experiment with playing a guitar by different means. We’ve seen a few guitar hacks that use servos to play, and Arduino-based guitars that replace the strings with membrane potentiometers, but he decided to try a different approach. He’s using a permanent magnet and the electromagnetic effect to play the string.

Purple Haze all around,
all those amps are runnin’ up or down.
Are my strings all goin’ left or right?
Whatever it is, electromagnetism is pushin’ me outta sight.

To do this, he put a large permanent magnet next to the string and ran an alternating current through the string itself. When the current and the magnetic field interact, the string is pushed, like the bearing of a motor.  When the current goes the other way, the string is pushed in the opposite direction. Because he is using an alternating current (driven through a MOSFET tied into a frequency generator), he was able to control the frequency of this, and find the frequencies that made the string resonate, including the harmonics that give guitars their unique sound. It’s a pretty neat hack, but don’t forget that he is dealing with quite a lot of juice: if you were to inadvertantly touch the string and ground it to earth, there is enough current in the circuit to kill you.

Yeah, [Josh’s] hack is all about the right hand rule,
I know that he’s no hacking fool,
you’ve got my E string resonating, resonating so fine
just don’t touch it, or you’ll end your time
Help me, yeah, Purple Haze!

(with apologies to the ghost of [Jimi Hendrix], guitar hacker supreme)

Continue reading “Ghost Guitar Plays Hendrix”

The Biohacking Movement And Open Source Insulin

In March of 2014, I knew my eight year old daughter was sick. Once borderline overweight, she was now skeletally thin and fading away from us. A pre-dawn ambulance ride to the hospital gave us the devastating news – our daughter had Type 1 diabetes, and would be dependent on insulin injections for the rest of her life.

This news hit me particularly hard. I’ve always been a preparedness-minded kind of guy, and I’ve worked to free myself and my family from as many of the systems of support as possible. As I sat in the dark of the Pediatric ICU watching my daughter slowly come back to us, I contemplated how tied to the medical system I had just become. She was going to need a constant supply of expensive insulin, doled out by a medical insurance system that doesn’t understand that a 90-day supply of life-saving medicine is a joke to a guy who stocks a year supply of toilet paper. Plus I had recently read an apocalyptic novel where a father watches his 12-year old diabetic daughter slip into a coma as the last of her now-unobtainable insulin went bad in an off-grid world. I swore to myself that I’d never let this happen, and set about trying to find ways to make my own insulin, just in case.

Continue reading “The Biohacking Movement And Open Source Insulin”

One Way To Recharge Alkaline Batteries

It says it right on the side of every alkaline battery – do not attempt to recharge. By which of course the manufacturer means don’t try to force electrons back into the cell. But [Cody] figured he could work around that safety warning chemically, by replacing the guts of an alkaline dry cell.

The batteries in question were certainly old, gnarly looking, and pretty dead – [Cody] barely got a reading on his multimeter. As you can see after the break, he cleaned off the exterior corrosion and did a quick teardown of the dry cells, removing the remains of the zinc anode, now in the form of zinc oxide paste looking very much like what you’d slather on your nose before a day at the beach. He filled the resulting cavity with a putty of zinc dust, freshened up the electrolyte charge with a squirt of 20% potassium hydroxide, sealed up the cell with a little silicone caulking, and put the recycled cell to the test. Result: 1.27 volts. Not too shabby.

Continue reading “One Way To Recharge Alkaline Batteries”

An Internet Speedometer With A Dekatron

[Sprite_tm], like most of us, is fascinated with the earlier ways of counting and controlling electrons. At a hacker convention, he found an old Dekatron tube hooked up to a simple spinner circuit. The prescription for this neon infatuation was to build something with a Dekatron, but making another spinner circuit would be a shame. Instead, he decided to do something useful and ended up building an Internet Speedometer with this vintage display tube.

Like all antique tubes, the Dekatron requires about 400V to glow. After a bit of Googling, [Sprite] found a project that drives a Dekatron with an AVR with the help of a boost converter. Borrowing the idea of controlling a boost converter with a microcontroller, [Sprite] built a circuit with the Internet’s favorite Internet of Things thing – the ESP8266 – that requires only a 12 volt wall wart and a handful of parts.

Controlling the rotating glow of a Dekatron is only half of the build; this device is an Internet speedometer, too. To read out his Internet speed, [Sprite] is using a managed switch that allows SNMP to read the number of incoming and outgoing octets on a network interface. By writing a simple SNMP client for the ESP8266, the device can read how clogged the Intertubes are, both incoming and outgoing.

With an acrylic case fresh out of the laser cutter and a remarkably good job at bending acrylic with a heat gun, [Sprite] has a tiny device that tells him how much Internet he’s currently using. He has a video of it running a speedtest, you can check that video out below.

Continue reading “An Internet Speedometer With A Dekatron”

Hackaday Prize Entry: SnapVCC

While it’s the easiest way to lay out a simple circuit for prototyping, breadboards are a pain. They are the ultimate kludge; they work well enough, but no one will ever say that a solderless breadboard is the most elegant solution.

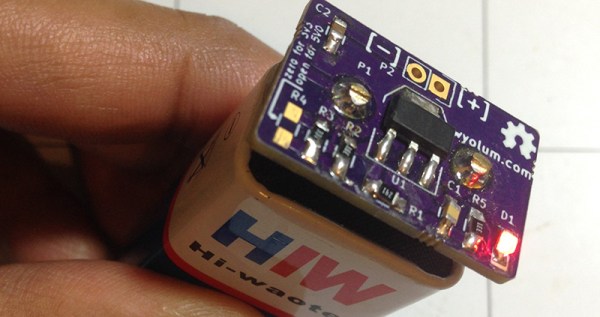
[Mahesh] isn’t completely fixing the problems of solderless breadboards, but he has come up with a better way to supply power to breadboards. It’s a project called snapVCC, and it turns a 9 volt battery into a regulated 3.3 or 5 volt supply.

The idea behind snapVCC is simple enough; just add a circuit board to the top of a nine volt and add a voltage regulator. [Mahesh] is using an LM317 adjustable regulator, with a switch to change the output voltage from 3.3 to 5 volts. An LED indicates the output active, and another switch disconnects the battery from the circuit. Yes, it’s very simple and very useful, confounding everyone who is wondering why this project didn’t already exist.

The 2015 Hackaday Prize is sponsored by:

Rescuing a Drone with a Drone

Operation Drone Rescue

When [Harrison Howes] lost his Syma X5C drone on a neighbor’s roof, he thought all hope was lost. There was no easy access to get up there, and the neighbor wasn’t interested in him attempting a rescue. Months past, and [Harrison] got a new quad. And not just any quad — a DJI Phantom 3 Professional. It was time to attempt an aerial rescue operation!

Using some old coat hangers and some green painter’s tape for visibility, [Harrison] crafted two hooks to hang below the Phantom. He also tilted the FPV module straight down for maximum visibility of the rescue.

Set to the soundtrack of No Time for Caution by Hans Zimmer (from Intersteller), watch our hero deftly air lift his old quad off the roof and back to safety.

Continue reading “Operation Drone Rescue”

NES Reborn As Nexus Player And NES

Anyone who has a Raspberry Pi and an old Nintendo has had the same thought. “Maybe I could shove the Pi in here?” This ran through [Adam’s] head, but instead of doing the same old Raspberry Pi build he decided to put a Nexus Player inside of this old video game console, with great success. Not only does it bring the power of a modern media player, it still works as an NES.

If you haven’t seen the Nexus Player yet, it’s Google’s venture into the low-cost home media center craze. It has some of the same features of the original Chromecast, but runs Android and is generally much more powerful. Knowing this, [Adam] realized it would surpass the capabilities of the Pi and would even be able to run NES emulators.

[Adam] went a little beyond a simple case mod. He used a custom PCB and an Arduino Pro Micro to interface the original controllers to the Nexus Player. 3D printed brackets make sure everything fits inside the NES case perfectly, rather than using zip ties and hot glue. He then details how to install all of the peripherals and how to set up the Player to run your favorite game ROMs. The end result is exceptionally professional, and brings to mind some other classic case mods we’ve seen before.