World Maker Faire 2015: Automatic Photo Collage

We’re on the ground here at the 6th Annual World Maker Faire in Queens, New York. This year the Faire is even bigger, extending out from the New York Hall of Science towards Flushing Meadows Corona Park.
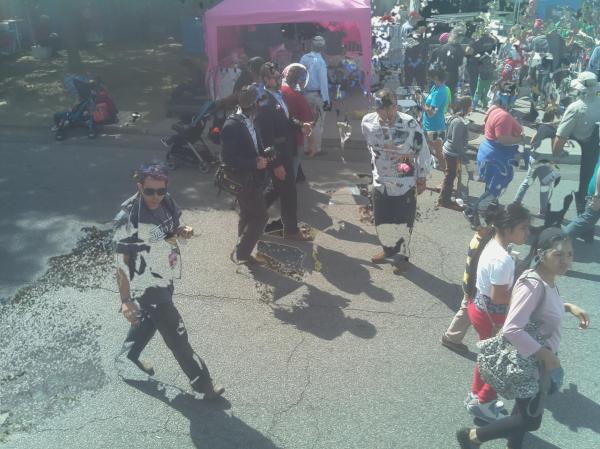
Just itommy
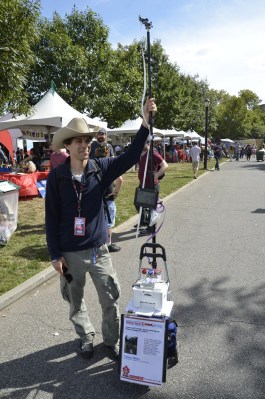
nside the gates, we ran into [Tommy Mintz] who was showing off his improved portable automated digital photo collage (IP-ADC). Tommy has connected a Raspberry Pi and its camera on a long extension cable. The camera resides high up on a monopod, giving it a bird’s eye view of the area. The Pi first captures a background image, then grabs shots of things that change within the scene. The resulting collages range from hilarious to the surreal. The entire system is mounted on a cart and powered by batteries.

[Tommy] hooked us up with the WiFi password, so we were able to download photos directly from the IP-ADC. Less technologically inclined folks would be able to grab physical prints from the on-board Epson photo printer.

We’ll be reporting what we see here at the faire, so drop us a tweet @hackaday if you want us to stop by!

Hackaday’s Omaha Mini Maker Faire Roundup

The 2nd annual Omaha Mini Maker Faire wasn’t our first rodeo, but it was nonetheless a bit surprising . Before we even made it inside to pay our admission to the Omaha Children’s Museum, I took the opportunity to pet a Transylvanian Naked Neck chicken at one of the outdoor booths. The amiable fowl lives at City Sprouts, an Omaha community farming collective in its 20th year of operation. There seemed to be a theme of bootstrappy sustainability among the makers this year, and that’s great to see.

Just a few feet away sat a mustard-colored 1975 Chevy pickup with a food garden growing in its bed. This is Omaha’s truck farm, an initiative that seeks to educate the city’s kids in the ways of eating locally and growing food at home.  On a carnivorous note, [Chad] from Cure Cooking showed my companion and me the correct way to dry-cure meats using time-honored methods.

Continue reading “Hackaday’s Omaha Mini Maker Faire Roundup”

Foam And Antistatic Bag Bring Vintage Compaq Keyboard Back To Life

After winning an online auction for an 1980s vintage Compaq Portable PC, [leadacid44] discovered why it only cost him $5USD – the keyboard was shot. Not willing to accept having forked out $45USD to ship a brick, he tore into the ancient machine and came up with a found-material solution to the wonky keyboard.

[leadacid44]’s very detailed writeup of the fix for his Compaq includes a thorough examination of the guts of the machine. He got it to boot to MS-DOS 5.0 off of a 20MB ISA hard drive card and began probing the keyboard problem. It turns out the Compaq keyboard has much in common with a modern touchscreen, in that it’s a capacitive keyboard. Unfortunately the foam disks used as springs under each key cap had degraded over the last 30 years, so [leadacid44] began a quest to replace them. After much experimentation and a few false starts, he created a sandwich of transparency film, closed-cell polyethylene foam, and a Mylar antistatic bag. Many discs were punched out with a leather punch and tediously placed in the body of each key switch, and the quick brown fox was soon jumping flawlessly over the lazy dog.

We’ve seen some fixes to these lovable luggables before, like this dumpster queen that became a Hackaday Retro submission. At least [leadacid44]s machine didn’t release the Magic Blue Smoke like that one did.

Lego 3D printer

Printing Chocolate With A LEGO 3D Printer

Some people think the future will include a 3D printer in every home. We think if LEGO started producing these as kits we’d get pretty close. Introducing the home-made LEGO 3D printer… with a chocolate extruder.

[Gosse Adema] has been working on his LEGO based 3D printer for a while now, and it’s gotten pretty good. It’s basically a repackaged Prusa i3, but that doesn’t make it any less impressive. It uses real NEMA 17 steppers mounted with LEGO Technic — the Mindstorms motors just don’t quite cut it… not yet anyway.

During his build, a colleague pointed out that back in 2005 Instructables had a remix contest, which included a 3D printer made out of LEGO. The original hacker, [Saul], issued a challenge at the end of his Instructable hoping someone else would build a better chocolate LEGO 3D printer… Well it’s only been 10 years, but [Gosse] did it!

Continue reading “Printing Chocolate With A LEGO 3D Printer”

Air Rocket Launch Pad UI Entertains Eager Kids

Last spring [Mike] built a foam rocket launchpad which was a hit with the kids in his neighborhood. But the launch system was merely a couple of buttons so the early enthusiasm quickly wore off. He went back to the drawing board to make improvements and really hit the jackpot!

The original launch system had one button for building up air pressure with a second big red button of doom for launching the rocket. The problem was a complete lack of user feedback; all the kids could do is guess how long they needed to hold the button to achieve the highest launch. This revision adds flashing LEDs to hold the attention of the wee ones but to also function as a gauge for the new pressure control system. The visually fascinating control board also includes a removable key to prevent accidental launches.

The particulars of this are as you’d expect: it’s a bunch of plumbing to manage the air pressure, an Arduino to control it all, and additional electronics in between to make them work together.

We’re especially impressed by the leap in features and quality from the first version to this one. It’s a testament to the power of quick proofs-of-concept before committing to a more involved build. Great work [Mike]!

We’ve seen rocket launchers for adults and some neat mission control panels but [Mike’s] kid friendly launch controller really is out of this world (sorry, couldn’t resist). You’ll find a video demo of this launcher after the break.

Continue reading “Air Rocket Launch Pad UI Entertains Eager Kids”

Hackaday Prize Semifinalist: Individualized Breathing Apparatus

Preterm infants frequently require ventilator support while they’re in the neonatal ICU, and this is usually done with a CPAP machine. The machine to infant interface is called a nasal cannula, a bit of plastic that connects an infant’s nose to the machine. Because there aren’t that many sizes of nasal cannula available, and preemies come in all sizes, there are inevitable problems. Ill-fitting nasal cannula can reduce the effectiveness of a CPAP, and can even cause significant damage to an infant’s septum.

For his Hackaday Prize entry, [Ben] is tackling this problem head on. He’s working on creating individualized nasal cannula for newborns using 3D modeling and printing, allowing nasal cannula of all shapes and sizes to be created in a matter of hours.

To create these customized cannula, [Ben] is 3D scanning an infant mannequin head to gather enough data to import it into a Processing sketch. A custom cannula is then created and printed with flexible 3D printer filament. In theory, it should work, apart from the considerations involved in building a medical device.

As for why custom plastic tubes matter, [Ben] works at the only NICU in Western Australia. Even though he only sees 8-10 CPAP ‘pressure injuries’ in his unit each year, these kids are extremely fragile and some parents have expressed a desire for something that isn’t as uncomfortable for their newborn than the off-the-shelf solution. Customizing these cannula from a quick 3D scan is a great way to do that, and a perfect example of the Hackaday Prize theme of ‘build something that matters.’

The 2015 Hackaday Prize is sponsored by:

STM32 JavaScript Peeks And Pokes

A lot of people find scripting languages very productive and we’ve seen quite a few chips now supporting what you normally think of as a scripting language. These high-level abstraction languages are great, until they aren’t. When you need to go under the abstraction and do something complex or you need every cycle of performance, you might have to break your normal tools.

The Espruino is an ARM processor (an STM32) that has JavaScript on board. However, [Gordon Williams] shows how you can use peeks and pokes to access the hardware directly when the need arises. The names derive from another popular abstraction’s escape hatch. The old BASIC languages allowed direct memory access using keywords peek and poke. [Gordon] shows some examples of accessing the timer for PWM, and even looks at the STM32 reference manual to show how he knew where to peek and poke to begin with.

Continue reading “STM32 JavaScript Peeks And Pokes”