Documenting Poorly Documented LED Strips

While [Drew] was in China for the Dangerous Prototypes Hacker Camp, he picked up some very bright, very shiny, and very cheap LED strips. They’re 5 meter “5050” 12V strips with 20 LEDs per meter for about $15 a spool. A good deal, you might think until you look at the datasheet for the controller. If you want an example of how not to document something, this is it.

A normal person would balk at the documentation, whereas [Drew] decided to play around with these strips. He figured out how to control them, and his efforts will surely help hundreds in search of bright, shiny, glowy things.

You are expected to tell the difference between 'GMODE', 'OMODE' and 'CMODE' in this pinout.
You are expected to tell the difference between ‘GMODE’, ‘OMODE’ and ‘CMODE’ in this pinout.

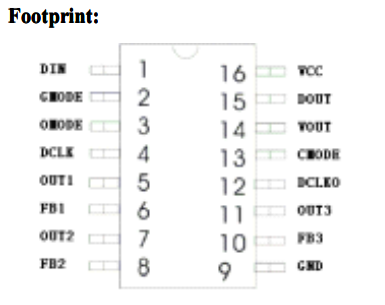
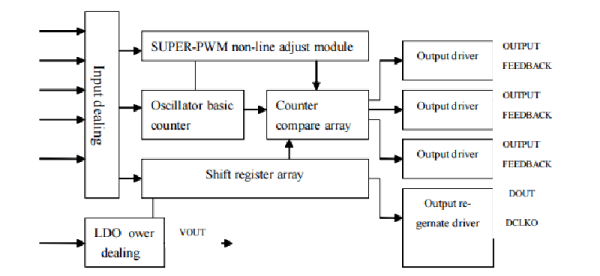
The datasheet for the LPD6803 controller in this strip – available from Adafruit here – is hilarious. The chip takes in clocked data in the order of Green, Red, and Blue. If anyone can explain why it’s not RGB, please do so. Choice phrasing includes, “VOUT is saturation voltage of the output polar to the grand” and “it is important to which later chip built-in PLL regernate circuit can work in gear.” Apparently the word ‘color’ means ‘gray’ in whatever dialect this datasheet was translated into.

Despite this Hackaday-quality grammar, [Drew] somehow figured out how to control this LED strip. He ended up driving it with an LPC1768 Mbed microcontroller and made a demo program with a few simple animations. You can see a video of that below.

Continue reading “Documenting Poorly Documented LED Strips”

Da Vinci Cryptex

A Replica Of Da Vinci’s Cryptex

What makes this beautifully crafted, hand-made Da Vinci Cryptex even more impressive is that a high school student made it.

Shared with r/DIY a few days ago, the creator [SandNpolish] got tons of positive feedback — and so he should. Made out of solid brass and tigerwood, the level of detail he put into it is incredible. From the carved lions face on an antler bone, being used as an end cap for the cryptex, to the other end, a piece of Damascus steel. The whole thing is gorgeous. He made almost everything by hand, making use of a lathe to shape the cylinders, and a milling machine to notch the inner teeth of the lock. The entire gallery of images is a pleasure to scroll through to see the project from start to finish.

We’ve seen lots of cryptex combination locks over the years here at Hack a Day — from something as simple as a paper-craft cryptex, to one made out of PVC pipe, and of course, even a 3D printed one. But all of them seem to be missing the fun part — as portrayed in the Da Vinci Code — where’s the vinegar and papyrus damn it!

Robot Guitar Rocks Out

Robotic Player Guitar Rocks Out On Its Own

Back in 1988 [Ben Reardon] walked through the Japanese pavilion at the World Expo held in Brisbane, Australia. He saw a robot playing a classical guitar, and was in awe. Later in his life, he decided to learn guitar, and always thought back to that robot. After going to SIGGRAPH 2014 and being inspired by all the creative makers out there, he realized the technology was here — to build his own Robot Guitar.

He started small though — with a prototype robotic Tambourine. It helped flush out some of the ideas for coding that he would eventually employ on the Robot Guitar. The guitar features both an Arduino and a Raspberry Pi, along with six RC servos — one for each string. The biggest challenge with the project was getting the servos mounted just right — stiff, but with adjustment so each pick could be tuned for identical timing. He ended up using aluminum extrusion to mount the servos, three per side in order to leave space for the picks.

Once the mechanical portion was done — onto the coding…

In the end, it ended up being only 460 lines of code. Python and a bit of Bash for the Raspberry Pi — and of course a few sketches for the Arduino. But enough talking about it — let’s hear it!

Continue reading “Robotic Player Guitar Rocks Out On Its Own”

Cultivating The Fungus Amongus

A while ago, [Kyle] built an automated mushroom cultivator. This build featured a sealed room to keep contaminants out and enough air filtering and environmental controls to produce a larger yield of legal, edible mushrooms than would otherwise normally be possible.

Now, he’s at it again. He’s expanded the hardware of his build with a proper, grounded electrical box for his rig, added more relays, implemented PID for his temperature and humidity controller, and greatly expanded the web interface for his fungiculture setup.

Like the previous versions of his setup, this grow chamber is controlled by a Raspberry Pi with a camera and WiFi module. Instead of the old plastic enclosure, [Kyle] is stepping things up with a proper electrical enclosure, more relays, more humidity and temperature sensors, and a vastly improved software stack. Inside the enclosure are eight relays for heaters and humidifiers. The DHT22 sensors around the enclosure are read by the Pi, and with a proper PID control scheme, controlling both the temperature and humidity is simply a matter of setting a number and letting the machine do all the work.

The fungi of [Kyle]’s labor include some beautiful pink and white oyster mushrooms, although with a setup like this there’s not much fungiculture he can’t do.

bridge duplicator

Homemade 3D Carving Duplicator

[Frank] is a guitar builder and has to make a quantity of acoustic guitar bridges that wouldn’t make sense to do manually by hand each time. He wanted a way of duplicating bridges quickly and precisely but he didn’t want to go to a CNC machine. Instead, he build a 3D duplicating machine.

The machine has 3 perpendicular axes, just like a milling machine. Mounted to the Z Axis is an air powered spindle that can reach 40,000 RPM. All 3 axes are moved by the operators hands. Normally, free-hand cutting something like this would be very difficult. [Frank’s] solved this in his machine by using a stylus that is offset from the cutting bit. The stylus is the same effective length and diameter of the cutting bit and is guided over a finished bridge pattern. While the stylus is tracing the pattern, the spindle and bit are removing material from a bridge blank. The stylus is continually moved over the entire pattern bridge until the spindle is finished carving out a new bridge out of the blank.

To aid in lifting the heavy Z Axis and spindle, [Frank] added a counter balance to make tracing the pattern extremely easy. Once the new bridge is carved, it only requires minor sanding to remove the tool marks before being installed on a guitar! [Frank] admits his linear bearings and rails are very rigid but also very expensive. If you’re interested in a less-expensive 3D duplicator, check out this project.

A VU-meter Indicator For A Commodore 1530 Datasette

For present-day owners of vintage Commodore computers, keeping data and programs safe and backed up is top priority. Disk drive storage was more common in the US, whereas in Europe, the audio cassette was the preferred medium of storage.

The Datasette device was what allowed interfacing the cassettes to the computer. Tape head alignment was critical to successfully writing and reading data to the cassette. Some models of the Datasette came with a small hole above the keys, to allow access to the adjustment screw of the tape head azimuth position. Tweaking this while looking at a signal meter could help you improve the signal from a bad cassette and prevent load errors. [Jani] tried a commercial solution called “Load-IT” which had a LED bargraph, but it couldn’t help much dealing with tapes with very bad signals. So he built a signal strength meter for his Datasette. He calls it the VU-sette since it uses an analog style meter quite similar to the VU-meters found in many audio equipment.

The hardware is simple and uses commonly available parts. The analog meter is extracted from a Battery Checker sourced from eBay. An op-amp drives the analog meter, and another transistor drives a separate speaker. This can be used to listen in on the cassette, if the speaker is enabled via a push button. [Jani] first breadboarded and tested the circuit before ordering out prototype boards.

To test performance, [Jani] used FinalTAP, a tool for examining, cleaning and restoring digitized data cassette tapes (TAP files) for the Commodore 64 computer. The “LOAD-IT” version worked well with tapes that were in fairly good condition. But his VU-sette version allowed him to adjust the head more precisely and get out a much better read from bad tapes. While on the subject, check out this nice 7-segment bubble LED digital counter for the 1530.

Continue reading “A VU-meter Indicator For A Commodore 1530 Datasette”

Overengineering Beer Pong

If there’s one game that deserves to be overengineered with hundreds of LEDs, sensors, and electronic modules, it’s beer pong. [Jeff] has created the most ostentatious beer pong table we’ve ever seen. It’s just shy of playing beer pong on a single gigantic LED display, and boy, does it look good.

The table includes a 32×12 grid of LEDs in the center of the table, with 10 pods for Solo cups at each end of the table. These pods have 20 RGB LEDs each and infrared sensors that react to a cup being placed on them. The outer edge of the table has 12 LED rings for spectators, giving this beer pong table 1122 total LEDs on 608 individual channels.

With that many LEDs, how to drive all of them becomes very important. There’s a very large custom board in this table with a PIC24 microcontroller, TLC5955 PWM drivers, and enough IDC headers to seriously reconsider using IDC headers.

Put enough LEDs on something and it’s bound to be cool, but [Jeff] is taking this several steps further with some interesting features. There’s a Bluetooth module for controlling the table with a phone, a VU meter to give the table some audio-based visualizations, and air baths for cleaning the balls; drop a ball down the ‘in’ hole, and it pops out the ‘out’ hole, good as new. If you’ve ever wondered how much effort can go into building a beer pong table, there you go. Video below.

Continue reading “Overengineering Beer Pong”