IoT Power Strip Lets You Control All Your Holiday Lights

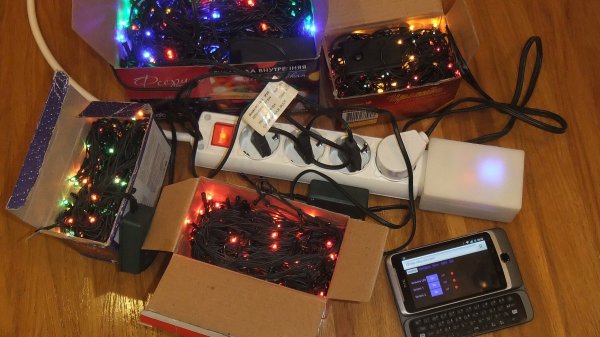
As IoT devices become more prevalent in the consumer world, how long will it be before it’s cheaper to buy one, than to make one? Definitely not yet, which means if you want your very own IoT power strip — you’ll have to make your own. Good thing it’s not that hard!

[Dev-Lab] came up with this project which allows him to control several outlets with his phone. What we really like about it is that he designed a 3D printed housing that fits on the end of the power-strip. This keeps all messy wires out of sight, and it looks like it was designed to be there!

The beauty with an IoT device like this is that it doesn’t require any infrastructure besides a WiFi enabled device with an HTTP browser — the ESP8266 module means no server is necessary. An Arduino was used in the project just because it was quick an easy to do. But it really boils down to being a glorified pin expander. This could very easily be fixed by upgrading from an ESP01 to and ESP03 module to get more IO broken out on the carrier board. If you do this, let us know!

Continue reading “IoT Power Strip Lets You Control All Your Holiday Lights”

A Better Expanding Table

About a year ago, [Scott] completed what is probably one of the finest builds ever shown on a YouTube channel. It was an expanding wooden table, a build inspired by a fantastically expensive expanding table that was itself inspired by a creation by a mad woodworker in the early 1800s. Although [Scott]’s table is a very well-engineered build, there were a few things he wasn’t happy with. Over the past few months he’s been refining the design and has come up with the final iteration – and plans – for a wooden mechanical expanding table.

Late last year, [Scott] had about 450 hours of design and build time in his table, and by the time he got to the proof of concept stage, he simply ran out of steam. Another year brings renewed enthusiasm, and over the past month or so he’s been working on much-needed improvements to his expanding table that included a skirt for the side of the table, and improvements to the mechanics.

The expanding table is rather thick with three layers of tabletop stacked on top of each other, and those exposed mechanical linkages should be hidden. This means a skirt, and that requires a huge wooden ring. [Scott] built a ring 5 1/2″ deep, about an inch and a half thick, and has the same diameter of the table itself. This means cutting up a lot of plywood, and stacking, gluing, sanding, and routing the entire thing into a perfectly round shape.

The other upgrades were really about the fit and finish of the internal mechanics of the table. Screws were changed out, additional brackets were crafted, and the mounts for the internal ‘star’ was upgraded.

After all that work, is the table done? No, not quite; the skirt could use a veneer, proper legs need to be built, and the entire thing could use a finish. Still, this is the most complete homebuilt expanding table ever conceived, and [Scott] has the plans for his table available for anyone who would want to replicate his work.

Continue reading “A Better Expanding Table”

Eagle To KiCad Made Easy

One barrier for those wanting to switch over from Eagle to KiCad has been the lack of a way to convert existing projects from one to the other. An Eagle to KiCad ULP exists, but it only converts the schematic, albeit with errors and hence not too helpful. And for quite some time, KiCad has been able to open Eagle .brd layout files. But without a netlist to read and check for errors, that’s not too useful either.

[Lachlan] has written a comprehensive set of Eagle to KiCad ULP scripts to convert schematics, symbols and footprints. Board conversion is still done using KiCad’s built in converter, since it works quite well, and we were able to successfully convert two projects from Eagle. The entire process took only about 10 to 15 minutes of clean up after running the scripts.

The five scripts and one include file run sequentially once the first one is run. [Lachlan]’s scripts will convert Eagle multi sheet .sch to KiCad multi sheets, place global and local net labels for multi sheets, convert multi part symbols, build KiCad footprint modules and symbol libraries from Eagle libraries, create a project directory to store all the converted files, and perform basic error checking. The Eagle 6.xx PCB files can be directly imported to KiCad. The scripts also convert Via’s to Pads, which helps with KiCad’s flood fill, when Via’s have no connections — this part requires some manual intervention and post processing.

PSoC VGA On A $10 Development Board

We’ve always found the Cypress PSoC an interesting beast. It’s a CPU with functional blocks that you can configure to build various I/O devices, including incorporating FPGA logic using Verilog. [MiguelVP] has an excellent multi-part project that produces VGA output from a PSoC. So far it just generates a fixed pattern, but a frame buffer is in the works, and there is plenty of detail about how to configure the PSoC for the task.

Although the PSoC has some analog capability, [MiguelVP] uses a cheap R2R DAC and VGA connector to interface to the VGA monitor. You can get the same PSoC board the project uses for about $10. The software, unfortunately, is Windows-only, so be prepared to fire up a virtual machine if you run Linux or Mac. Our own [Bil Herd] did a video introduction to PSoC that you can watch after the break.

Continue reading “PSoC VGA On A $10 Development Board”

Christmas Bauble Is Neither Spherical Nor Runs Arduino

[Jordan Wills] was tasked by his company, Silicon Labs, to build some Christmas Baubles to give away to co-workers. While the commissioned units were designed to be simple battery and LED affairs, he decided to make one of his own with bells and whistles. His Mario themed Christmas Ornament uses a Silicon Labs FM972 micro controller, capacitive sensing, PWM controlled 8 bit audio, and blinky lights.

The interesting part is some of the construction techniques that he used. The finger-joint style cube is built from circuit boards. Electrical connections between panels were routed using solder wicking copper braid. That’s a interesting trick which we’ll keep in mind along with some of our favorite creative structural uses of PCB.

The top of the cube has four LED’s which light up the Mario “Question Mark” symbols on the four sides of the cube while the base contains all of the electronics. The outside of the base piece was a large copper plane to act as the capacitive sensing element. This meant all electronics needed to be surface mounted with tracks laid out on one side – which posed some layout challenges. Adding the Capacitive sense function was a cinch thanks to support from the in-house design team. PWM output from the micro controller takes care of audio, and the output is routed through a buffer to boost the signal. A bandpass filter then cleans up the PWM output before feeding it to the speaker.

Continue reading “Christmas Bauble Is Neither Spherical Nor Runs Arduino”

Build Some Entertainment For Young Holiday Guests

Need a good excuse to duck out on the family over the holidays and spend a few hours in your shop? [Jens] has just the thing. He built a color-mixing toy that looks great and we’d bet you have everything on-hand necessary to build your own version.

The body of the toy is an old router case. Who doesn’t have a couple might-be-broken-but-I-kept-it-anyway routers sitting around? Spray painted red, it looks fantastic! The plastic shell hosts 6 RGB LEDs, 3 toggle switches, and 2 buttons. [Jens] demonstrates the different features in the demo video below. They include a mode to teach counting in Binary, color mixing using the color knobs, and a few others.

Everything is driven by an Arduino Pro Mini. The lights are APA106 LEDs; a 4-pin through-hole package version of the WS2812 pixels. You could easily substitute these for the surface mount varieties if you just hot glue them to the underside of the holes in the panel. We’d love to see some alternate arrangements for LEDs and a couple more push buttons for DIY Simon Says.

Continue reading “Build Some Entertainment For Young Holiday Guests”

A Nerdy Xmas Tree

Celebrating his first Christmas with his three-year-old daughter after separating with his wife, [Alec] decided to finally get a tree. He’s not religious or anything, but it’s a fun holiday for kids, so he decided to get in the spirit. But he had to make his own LED ornaments.

He started out buying a plastic Christmas tree and immediately regretted his decision. So he returned it and got a live Norfolk pine tree instead — one that if you keep it in a pot, will last year round as a houseplant. Didn’t have to deal with the plastic-vs-murder dilemma many people celebrating Christmas have to deal with.

His first step was wiring up the tree with DC power to allow him to connect his future ornaments. For now, he’s only made three — but the intention is as his daughter gets older (and hopefully likes tinkering), will make new ones with him in the years to come!

Continue reading “A Nerdy Xmas Tree”