A lot of people can bake a cake. Sort of. Most of us can bake a cake if we have a cake mix. Making a cake from scratch is a different proposition. Sure, you know it is possible, but in real life, most of us just get a box of cake mix. The Raspberry Pi isn’t a cake (or even a pie), but you could make the same observation about it. You know the Raspberry Pi is just an ARM computer, you could program it without running an available operating system, but realistically you won’t. This is what makes it fun to watch those that are taking on this challenge.
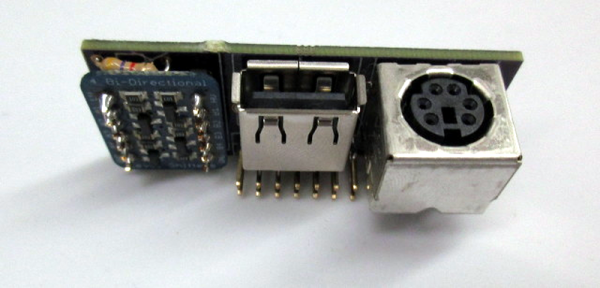
[Deater] is writing his own Pi operating system and he faced a daunting problem: keyboard input. Usually, you plug a USB keyboard into the Pi (or a hub connected to the Pi). But this only works because of the Linux USB stack and drivers exist. That’s a lot of code to get working just to get simple keyboard input working for testing and debugging. That’s why [Deater] created a PS/2 keyboard interface for the Pi.
Even if you aren’t writing your own OS, you might find it useful to use a PS/2 keyboard to free up a USB port, or maybe you want to connect that beautiful Model-M keyboard without a USB adapter. The PS/2 keyboard uses a relatively simple clock and data protocol that is well-understood. The only real issue is converting the 5V PS/2 signals to 3.3V for the Pi (and vice versa, of course).
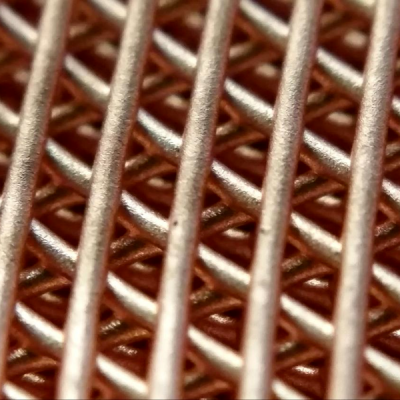
Laser sintering works by laying down a thin layer of metal powder and then hitting it with a strong enough laser to sinter the particles together. (Sintering sticks the grains together without getting the metal hot enough to melt it.) The rapid local heating and cooling required to build up 3D objects expands and cools the metal, and can result in stresses inside the resulting object.
The Northwestern team still lays down layers of powder, but glues the layers together with a quick-drying polymer instead of fusing them with a laser. Once the full model is printed, they then sinter it in one piece in an oven.
3D-printed copper lattice. Credit: Ramille Shah and David Dunand
The advantages of adding this extra step are higher printing speed — squirting the liquid out of syringe heads can be faster than fusing metal particles with a laser — and increased structural integrity because the whole model is heated and cooled at one time. A fringe benefit is that the model is still a bit flexible before firing, opening up possibilities for printing a flat model and then bending it into shape before sintering.
And if that weren’t enough, the team figured that they’d add a third step to the procedure to allow it to be used with rust (iron oxide) as the starting powder. They print the rust and polymer model, then un-rust the iron using hydrogen, and then fire it as before. Why rust? Do you know anything cheaper to use as a raw material?
What do you think? The basic idea may even be DIYable — glue metal particles together and heat them up enough to stick. Not in my microwave oven, though. We’d love to see a more energy-efficient 3D metal printer.
A proper smartwatch can cost quite a bit of money. However, there are some cheap Bluetooth-connected watches that offer basic functions like show your incoming calls, dial numbers and display the state of your phone battery. Not much, but these watches often sell for under $20, so you shouldn’t expect too much.
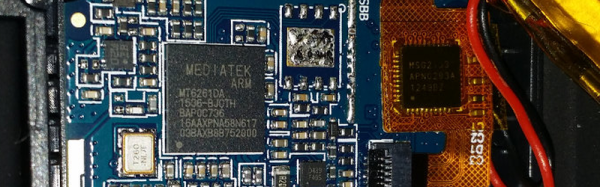
Because they’re so cheap, [Lee] bought one of these (a U8Plus) and within an hour he had the case opened up and his camera ready. As you might expect, the biggest piece within was the rechargeable battery. A MediaTek MT6261 system on a chip provides the smart part of the watch.
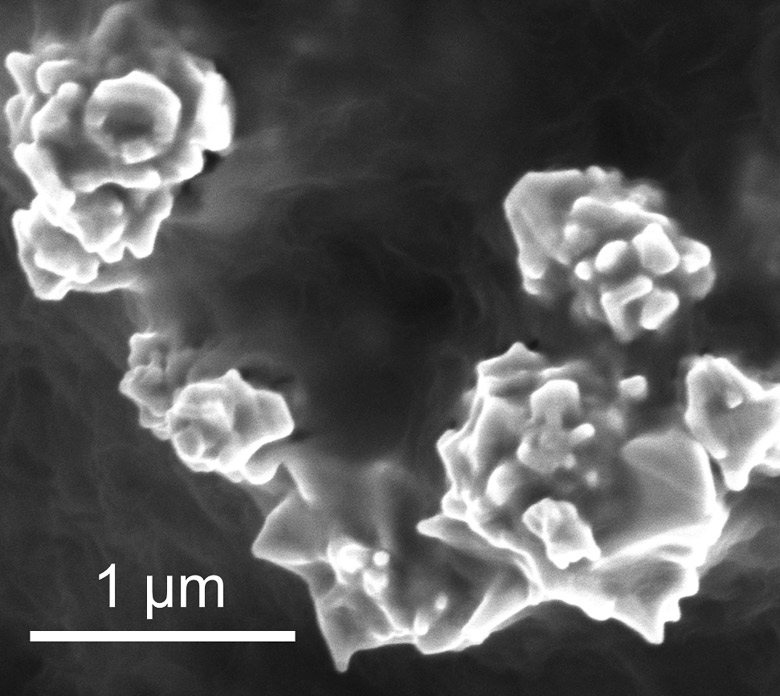
Lithium-ion batteries typically contain two electrodes and an electrolyte. Shorting or overcharging the battery makes it generate heat. If the temperature reaches about 300 degrees Fahrenheit (150 degrees Celsius), the electrolyte can catch fire and explode.
There have been several attempts to make safer lithium-ion cells, but often these safety measures render them unusable after overheating. Stanford University researchers have a new method to protect from overheating cells that uses–what else–nanotechnology graphene. The trick is a thin film of polyethylene that contains tiny nickel spikes coated with graphene (see electron micrograph to the right).
Microchip is a leading manufacturer of microcontrollers, most famously the PIC series of micros that can be found in any and every type of electronic device. Atmel, likewise, also has a large portfolio of microcontrollers and memory devices that are found in every type of electronic device. Engineers, hackers, and electronic hobbyists are frequently sided with Microchip’s PIC line or Atmel’s AVR line of microcontrollers. It’s the closest thing we have to a holy war in electronics.
1986: The US and Russia signed arms agreements, Argentina won the world cup, and Star Trek IV: The Voyage Home hit the theaters. Trekkies and the general public alike enjoyed the film. Some astute hams though, noticed a strange phenomenon about halfway through the film. During a pivotal scene, Scotty attempts to beam Chekov and Uhura off the Enterprise, but has trouble with interference. The interference can be heard over the ubiquitous Star Trek comm link. To many it may sound like random radio noise. To the trained ear of a [Harold Price, NK6K] though, it sounded a heck of a lot like packet radio transmissions.
[Bob] didn’t own his own Cray 2 of course, this particular computer was property of the National Security Agency (NSA). He received permission to test Frequency Shift Keyed (FSK) decoder algorithms. Can you guess what his test dataset was?
The signal required a lot of cleanup: The original receiver was tuned 900 Hz below the transmission frequency. There also was a ton of noise. To make matters worse, Scotty kept speaking over the audio. Thankfully, AX.25 is a forgiving protocol. [Bob] persevered and was able to obtain some usable data. The signal turned out to be [Bill Harrigill, WA8ZCN] sending a Receive Ready (RR) packet to N6AEZ on 20 meters. An RR packet indicates that [Bill’s] station had received all previous packets and was ready for more. [Bob] called to [Bill], who was able to verify that it was probably him transmitting in the 1985 or 1986, around the time the sound editors would have been looking for effects.
That’s a pretty amazing accomplishment, especially considering it was 1989. Today, we carry supercomputers around in our pockets. The Cray 2 is roughly equivalent to an iPhone 4 in processing power. Modern laptop and desktop machines easily out class Seymour Cray’s machine. We also have software like GNU Radio, which is designed to decode data. Our challenge to you, the best readers in the world, is to replicate [Bob McGwier’s] work, and share your results.
Perhaps the tolerances on today’s hobbyist machines just aren’t good enough for you, or perhaps the work area is just too cramped. Either way, there are times when an off-the-shelf solution just wont fit your needs, and you resolve to build your own CNC machine. Fortunately, none of us are alone in this endeavor because hobbyists have been building their own automation equipment for years. Whether you’re talking building the machine, generating the G-code, or interpreting that G-code into motor signal pulses, the DIY CNC community has evolved a sophisticated set of tools aimed at getting the job done. I thought I’d take a tour of some of the hobbyist’s tools that hallmark 2016 as the best year yet to build your CNC machine.
Hardware
In the last few years, affordable extruded profiles and brackets have made leaps and bounds to satisfy a hungry DIY 3D printer community. Beyond 3D printers, these beams and brackets are a good start for some of our needs in the world of linear motion control. Here’s a quick look at a few components off-the-shelf.
Makerslide Extruded Profiles
Unless you’ve discovered a deal on eBay or AliExpress, building up a machine from precision linear rails can be a pricey ordeal. Linear rails offer us a rigid, wiggle-free guide for motion along a single axis, but in some cases, the cost needed for hobbyists to afford this precision is outside their budget. [Barton Dring] took the idea of guided linear motion and launched a custom extruded rail that enables bearings to slide freely along an axis. Dubbed Makerslide, this extruded rail features a groove embedded directly into the extrusion and aims to be compatible with most other 20-mm extruded profiles like those from Misumi and Rexroth.
On a similar note, the folks at OpenBuilds took [Barton’s] concept in a slightly different direction. For many of us who have already committed to extrusions from one vendor and have our closets gushing with excess tubes, Open Rail is an extruded v-groove attachment that enables bearing-mounted plates to slide freely just like the extrusions of Makerslide. Unlike Makerslide, however, almost any 20-mm extrusion can be retrofitted with Open Rail, rather than requiring a specialized extrusion.
OpenBuilds Linear Actuator Kits
CNC machines encompass a wide variety of machine designs that spans far beyond this article’s scope. For conventional machines, however, a single motor drives a motion along a single axis. To add direction in a separate dimension, we can sometimes chain together two of the same linear motion units. The folks at OpenBuilds have taken this principle to heart offering single-axis systems as kits. With some creativity and forethought, users can develop a number of automated solutions based on the principle of appending multiple axes. Of course, the folks at OpenBuilds haven’t stumbled upon a never-before-seen solution. Misumi, Rexroth, and other professional automation equipment companies have been selling linear motion systems for years; however, their price range easily leaps beyond the 10K mark.
Not an End-All, but a Solid Start
Despite the design flexibility, neither Makerslide nor OpenBuilds is the all-encompassing solution for every CNC endeavor. Specifically, for rigid machines that can chew through steel, a structure built from bolted aluminum extrusions will be far less rigid than professional machines of a similar scale. Nevertheless, for machines that don’t experience heavy loads, like a 3D printer, a laser cutter, or even some small routers, both Makerslide and OpenBuilds offer an excellent starting point.
Software
With our hands full of stepper motors, extruded profiles, and belts, it’s time to start exploring a software solution to drive it all. While there are plenty of machine-specific solutions, I thought I’d highlight two that are flexible enough to be tuned to a custom machine.
G-code Interpreters
G-code interpreters do just that: they accept input commands in G-code (be it directly from a file or serially through a cable) and convert the commands to step and direction digital outputs with the right timings to produce the control signals for stepper motor drivers. In one sense, they’re the “brains” of the machine, taking the G-code “instruction set” and outputting behaviors that correspond to the input instructions.
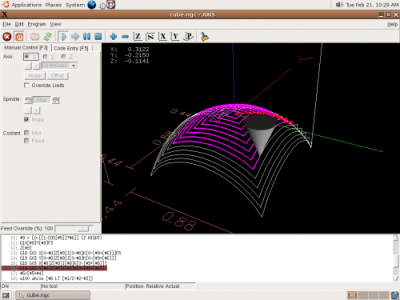
LinuxCNC
Image Credit: LinuxCNC Wiki
LinuxCNC spun out from a US-government-funded initiative to develop a motion control package for standards testing back in the 90s. Over time, it has evolved into a software package designed to turn a PC into a G-code interpreter, and it’s currently packaged as real-time Linux distribution. From your LinuxCNC-configured PC, you can simply connect your stepper motors, limit switches and other digital I/O devices to the PC’s parallel port which, in turn, outputs motor step and direction pulses to drive your physical hardware.
LinuxCNC isn’t just a G-code interpreter, though. The 15+ years of active development have given it a solid foundation which makes it one of the most adaptable software packages for developing custom machines. By enabling custom kinematics, users can drive non-Cartesian machines like SCARA arms. With a core operating system based on Debian Linux, users can link additional PC peripherals, like USB game controllers, to drive their machines. Some devoted software hackers have even fleshed out the current user interface to directly generate G-code for simple cuts, rather than simply run existing G-code.
Grbl
With over 7 years of active development, Grbl has proven itself to be simple, reliable G-code interpreter firmware for the Arduino Uno. Simply connect your motor controllers and limit switches to the Uno, and Grbl firmware handles the step and direction pulse timing for all 3 axes of your machine. Grbl doesn’t aim to be an all-encompassing interpreter like LinuxCNC, but in exchange it’s a far simpler solution that is relatively easy to set up and works for most, if not all, typical use-cases for a 3-axis machine.
Though Grbl drives the physical hardware, it still requires a serial interface to receive G-code instructions to execute. Fortunately, G-code-streaming packages exist: bCNC and UGS, which have been tested specifically with Grbl.
G-code Generators
Having a fancy CNC machine doesn’t say much if we can’t generate instructions to drive it to cut parts! We need a solution for generating G-code, and, once again, the open source software community has jumped in to provide several packages.
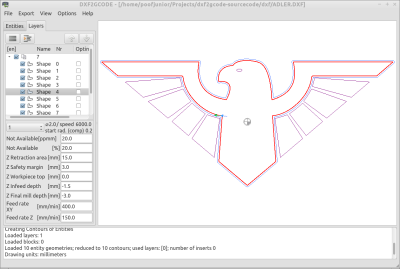
dxf2gcode
It’s not unlikely that many of your designs may boil down to a collection of flat plates with simple features on them. For 2D milling, dxf2gcode simplifies the process of generating G-code based on an original design file, in this case: a dxf. The project also features automatic cutter compensation done in software, a very handy feature that will generate an offset toolpath based on the diameter of the tool and the type of cut (pocket or outside edge).
gcmc
Image Credit: gcmc homepage
If you’ve ever tried writing G-code manually, you’ll quickly realize just how unreadable it is without having memorized the majority of the commands. GCMC is a front-end language aimed at producing human-readable machine routines. By abstracting away the unnecessary idiosyncrasies of the language, gcmc facilitates the generation of complex tool motions and patterns simply by tweaking a few parameters.
Doing the Research
Building your own CNC machine may just be your next labor of love, but unless you prefer to reinvent the wheel (and, hey, starting from first principles isn’t always a bad thing), it’s worth taking a look at the tomes of build logs, forum posts, and existing software from the gurus who have built CNCs before us. While I’ve highlighted a few of the more common tools in the land of hardware and software, this list is far from complete. So go forth! Do your research–and, of course, let us know what you find in the comments.


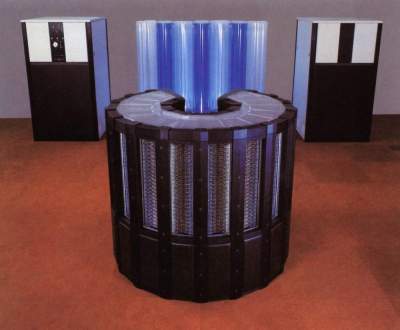 By 1989, the film was out on VHS and laser disc. With high quality audio available,
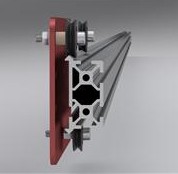 Unless you’ve discovered a deal on eBay or
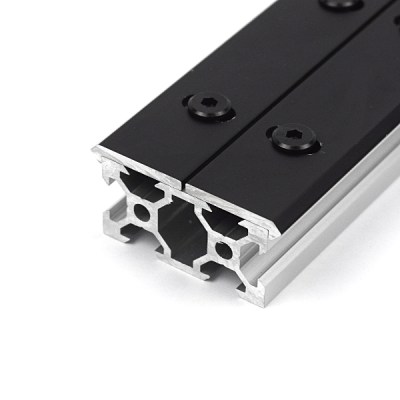
 It’s not unlikely that many of your designs may boil down to a collection of flat plates with simple features on them. For 2D milling, dxf2gcode simplifies the process of generating G-code based on an original design file, in this case: a dxf. The project also features automatic cutter compensation done in software, a very handy feature that will generate an offset toolpath based on the diameter of the tool and the type of cut (pocket or outside edge).