2022 Hackaday Prize: Save The World Wildcard Challenge Begins Now

Continuing the concept of saving planet Earth with gnarly, repeatable hacks, the fifth and final challenge of the 2022 Hackaday Prize is all about making the world better with smart and sustainable hardware. While the focus is still on saving the planet, this time, anything goes. Does your project not fit within the confines of a previous challenge? Here is your last chance to enter the 2022 Hackaday Prize: Start your entry today!

Go Wild!

We’ve already run contest rounds that focused on green power generation, recycling, hacking tech out of the landfills, and just finished up making our world more climate-resistant and connected. How else do you want to use your hacking powers to make the world a better place? Well, that’s up to you. This is the wildcard round, after all. If your project helps to keep this planet running for future generations, you can enter it here.

The Save the World Wildcard challenge starts right now and runs until October 16th. As with previous rounds, we’ll award one of ten $500 prizes to each finalist, and the best projects will have a chance at the overall 2022 Hackaday Prize. So get hacking!

2022 Hackaday Prize: Make Your World More Disaster Resistant, More Engaged

Following along with the 2022 Hackaday Prize theme on building a better world by doing what we all do best – hacking together solutions – the fourth round of the Prize focuses on making our local communities more resilient against and sensitive to severe weather and environmental disasters. Whether it’s an early warning system for wildfires or a distributed communication network that will keep working even when the cell phone service goes down, we’re challenging you to help make your world safer by reacting sooner and better. Get your project entered now!

Sensing

We love systems that help us monitor our environments, and not just for idle curiosity or citizen science. Sometimes it’s critical. We’ve seen monitors aimed at giving you a personal particulate air quality indicator, especially helpful for people with respiratory problems when downstream of a forest fire.

But even better is networking these together to generate an air quality map, or to log long-run trends over time and space. CanAirIO, for instance, has both a fixed and mobile unit that can help map out CO2 and particulate matter quality. Or maybe it’s not wildfires that invade your airspace, but rather pollution from car use. We’ve seen projects like that before too, and anything along these lines would make a great entry into this challenge round. Could you predict local air quality? Continue reading “2022 Hackaday Prize: Make Your World More Disaster Resistant, More Engaged”

Universal Bio-Electrical Signal Amplifier Makes Reading Body Signals Easy

The electrical signals emitted by the human body tell us a lot about what’s going on inside. But getting those signals inside your microcontroller is not straightforward: the voltages are too small for most ADCs, and the ever-present 50 or 60 Hz mains frequency makes it hard to discern subtle changes. Over at Upside Down Labs, [Deepak Kathri] developed a universal biosensor interface called the BioAmp EXG Pill to make all this a lot easier.

Its name refers to the fact that it can be used for several different bio-electrical sensing applications: ECG, EMG, EOG and EEG, which deal with signals coming from the heart, muscles, eyes and brain, respectively. To enable such flexibility, the board has connectors for two or three electrodes, as well as solder pads to mount resistors and capacitors to adjust the gain and bandwidth. An instrumentation amplifier increases the strength of the desired signal while rejecting noise and interference.

The form factor allows easy connection to electrodes on one side and a data acquisition system on the other. Measuring just 25.4 mm long and 10 mm wide, it should be easy to integrate into any type of biosensing gizmo you can come up with. [Deepak] has made several demo setups, showing him using the Pill with an Arduino to measure his heart rate, detect eye blinks, and even control a robot arm using his own arm muscles!

The EXG Pill is an evolution of an earlier EMG-only project. We’ve seen several great ECG and EEG projects before, but is the first time we’ve seen one amplifier that can do them all.

With A Big Enough Laser, The World Is Your Sensor

It’s difficult to tell with our dull human senses, but everything around us is vibrating. Sure it takes more energy to get big objects like bridges and houses humming compared to a telephone pole or mailbox, but make no mistake, they’ve all got a little buzz going on. With their new automated laser, the team behind VibroSight++ believes they can exploit this fact to make city-scale sensing far cheaper and easier than ever before.

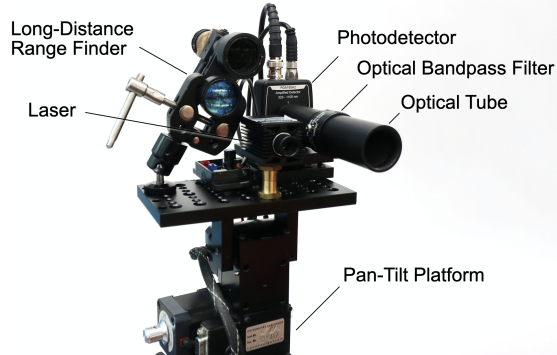
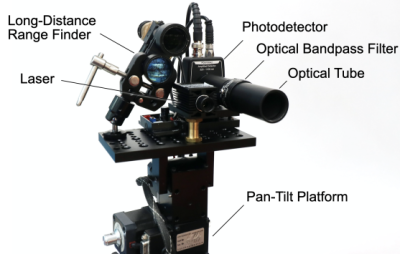
The key to the system is a turret mounted Class 3B infrared laser and photodetector that can systematically scan for and identity reflective surfaces within visual range. Now you might think that such a setup wouldn’t get much of a signal from the urban landscape, but as it so happens, the average city block is packed with retroreflectors. From street signs to road studs and license plates, the team estimates dense urban areas have approximately 7,000 reflectors per square kilometer. On top of those existing data points, additional reflectors could easily be added to particularly interesting devices that city planners might want to monitor.

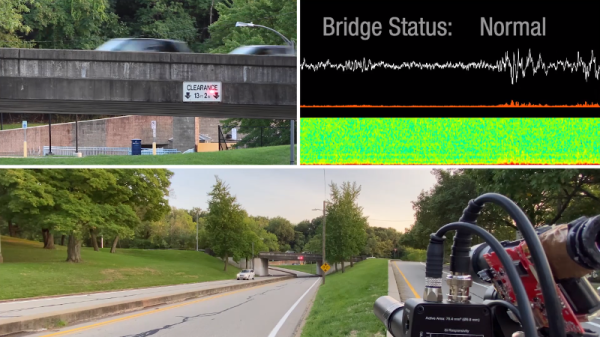
Once VibroSight++ has identified its targets, the next step is to bounce the laser off of them and detect the minute perturbations in the returned signal caused by vibrations in the reflector. In the video below you can see how this basic concept could be put to practical use in the field, from counting how many cars pass over a certain stretch of road to seeing how popular a specific mailbox is. There’s a whole world of information out there just waiting to be collected, all without having to install anything more exotic than the occasional piece of reflective tape.

If this technology seems oddly familiar, it’s probably because we covered the team’s earlier work that focused (no pun intended) on using reflected laser beams for home automation in 2018. Back then they were aiming a much smaller laser at blenders and refrigerators instead of license plates and street signs, but the concept is otherwise the same. While we’ll admit the technology does give off a distinctive Orwellian vibe, it’s hard not to be intrigued by the “Big Data” possibilities afforded by the team’s upgraded hardware and software.

Continue reading “With A Big Enough Laser, The World Is Your Sensor”

High Precision Analog IO With Digital Pins

Reading the temperature of your environment is pretty easy right? A quick search suggests the utterly ubiquitous DHT11, which speaks a well documented protocol and has libraries for every conceivable microcontroller and platform. Plug that into your Arduino and boom, temperature (and humidity!) readings. But the simple solution doesn’t hit every need, sometimes things need to get more esoteric.

The technique summarized by an image from Microchip Appnote AN685

For years we’ve been watching [Edward]’s heroic efforts to build accessible underwater sensing hardware. When we last heard from him he was working on improving the accuracy of his Arduino’s measurements of the humble NTC thermistor. Now the goal is the same but he has an even more surprising plan, throw the ADC out entirely and sample an analog thermistor using digital IO. It’s actually a pretty simple trick based on an intuitive observation, that microcontrollers are better at measuring time than voltage. 

The basic circuit

The circuit has a minimum of four components: a reference resistor, the thermistor, and a small capacitor with discharge resistor. To sense you configure a timer to count, and an edge interrupt to capture the value in the timer when its input toggles. One sensing cycle consists of discharging the cap through the discharge resistor, enabling the timer and interrupt, then charging it through the value to measure. The value captured from the timer will be correlated to how long it took the cap to charge above the logic-high threshold when the interrupt triggers. By comparing the time to charge through the reference against the time to charge through the thermistor you can calculate their relative resistance. And by performing a few calibration cycles at different temperatures ([Edward] suggests at least 10 degrees apart) you can anchor the measurement system to real temperature.

For all the gory details, including tips for how to save every last joule of energy, check out [Edward]’s post and the Microchip appnote AN685 he references. Besides this series [Edward]’s Cave Pearl Project has already yielded an impressive number of Hackday posts. For more great hardware writeups check out a general hardware build for a single sensing node, or the “temperature sensor” [Edward] made with no external parts at all!

An Epic Tale Of Thermistors: Tricks For Much Better Temperature Sensing

For years [Edward] has been building professional grade underwater sensing nodes at prices approachable for an interested individual without a government grant. An important component of these is temperature, and he has been on a quest to get the highest accuracy temperature readings from whatever parts hit that sweet optimum between cost and complexity. First there were traditional temperature sensor ICs, but after deploying numerous nodes [Edward] was running into the limit of their accuracy. Could he use clever code and circuitry to get better results? The short answer is yes, but the long answer is a many part series of posts starting in 2016 detailing [Edward]’s exploration to get there.

Orange is 12 bits, red is 24

The first step is a thermistor, a conceptually simple device: resistance varies with temperature (seriously, how much more simple can a sensor get?). You can measure them by tapping the center of a voltage divider the same way you’d measure any other resistance, but [Edward] had discarded this idea because the naive approach combined with his Arduino’s 10 bit ADC yielded resolution too poor to be worthwhile for his needs. But by using the right analog reference voltage and adjusting the voltage divider he could get a 20x improvement in resolution, down to 0.05°C in the relevant temperature range. This and more is the subject of the first post.

What comes next? Oversampling. Apparently fueled by a project featured on Hackaday back in 2015 [Edward] embarked on a journey to applying it to his thermistor problem. To quote [Edward] directly, to get “n extra bits of resolution, you need to read the ADC four to the power of n times”. Three bits gives about an order of magnitude better resolution. This effectively lets you resolve signals smaller than a single sample but only if there is some jitter in the signal you’re measuring. Reading the same analog line with no perturbation gives no benefit. The rest of the post deals with the process of artificially perturbing the signal, which turns out to be significantly complex, but the result is roughly 16 bit accuracy from a 10 bit ADC!

What’s the upside? High quality sensor readings from a few passives and a cheap Arduino. If that’s your jam check out this excellent series when designing your next sensing project!

Move Aside Mercury: Measuring Temperature Accurately With An RTD

Temperature is one of the most frequently measured physical quantities, and features prominently in many of our projects, from weather stations to 3D printers. Most commonly we’ll see thermistors, thermocouples, infrared sensors, or a dedicated IC used to measure temperature. It’s even possible to use only an ordinary diode, leading to some interesting techniques.

Often we only need to know the temperature within a degree Celsius or two, and any of these tools are fine. Until fairly recently, when we needed to know the temperature precisely, reliably, and over a wide range we used mercury thermometers. The devices themselves were marvels of instrumentation, but mercury is a hazardous substance, and since 2011 NIST will no longer calibrate mercury thermometers.

A typical Pt100 RTD probe

Luckily, resistance temperature detectors (RTDs) are an excellent alternative. These usually consist of very thin wires of pure platinum, and are identified by their resistance at 0 °C. For example, a Pt100 RTD has a resistance of 100 Ω at 0 °C.

An accuracy of +/- 0.15 °C at 0 °C is typical, but accuracies down to +/- 0.03 °C are available. The functional temperature range is typically quite high, with -70 °C to 200 °C being common, with some specialized probes working well over 900 °C.

It’s not uncommon for the lead wires on these probes to be a meter or more in length, and this can be a significant source of error. To account for this, you will see that RTD probes are sold in two, three, and four wire configurations. Two-wire configurations do not account for lead wire resistance, three-wire probes account for lead resistance but assume all lead wires have the same resistance, and four-wire configurations are most effective at eliminating this error.

In this article we’ll be using a 3-wire probe as it’s a good balance between cost, space, and accuracy. I found this detailed treatment of the differences between probe types useful in making this decision.

Continue reading “Move Aside Mercury: Measuring Temperature Accurately With An RTD”