Things Learned From Hot Wire Cutting A Droid’s Body

One of [Bithead]’s passions is making Star Wars droids, and in the process of building the outer shell for one of them he decided to use hot wire foam cutting and make his own tools. Having the necessary parts on hand and having seen some YouTube videos demonstrating the technique, [Bithead] dove right in. Things didn’t go exactly to plan but happily he decided to share what did and didn’t work, and in the end the results were serviceable.

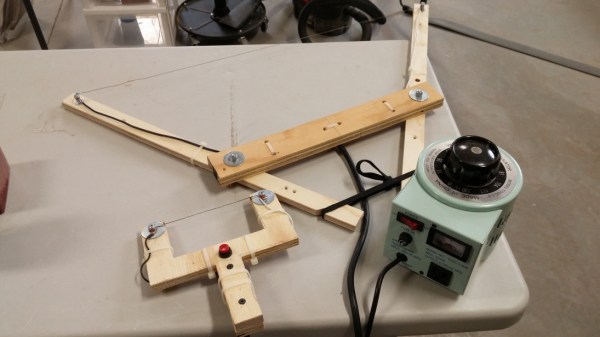
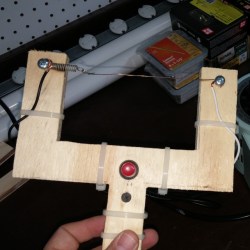
[Bithead] built two hot wire cutters with nichrome wire. The first was small, but the second was larger and incorporated some design refinements. He also got an important safety reminder when he first powered on with his power supply turned up too high; the wire instantly turned red and snapped with an audible bang. He belatedly realized he was foolishly wearing neither gloves nor eye protection.

When it came to use his self-made tools, one of the biggest discoveries was that not all foam is equal in the eyes of a hot wire cutter. This is one of those things that’s common knowledge to experienced people, but isn’t necessarily obvious to a newcomer. A hot wire cutter that made clean and effortless cuts in styrofoam did no such thing with the foam he was using to cast his droid’s outer shell. Still, he powered through it and got serviceable results. [Bithead]’s blog post may not have anything new to people who have worked with foam and hot wire cutters before, but if you’re new to such things you can use it to learn from his experiences. And speaking of improving experiences, [Bithead] most recently snazzed up the presentation of his R2-D2 build by getting tricky with how he hides his remote control.

Modding A Powdercoating Gun For Performance

In life, tools come in two varieties – good tools, and cheap tools. This is where the hacker steps in, to transform a cheap tool into more than the sum of its parts. [Josh] had problems with his Eastwood powdercoating gun. [Josh] decided to fix things with a couple of tasteful mods.

The problem with the gun was related to the delivery of powder to the workpiece. The stream was either too weak to coat properly, or too heavy, delivering a thick stream of powder. [Josh] surmised that with better airflow into the powder reservoir, the gun would deliver a properly mixed cloud of powder as required. By drilling a couple of small holes into the air feed into the reservoir, the powder stream was much less heavy and the gun’s performance was greatly improved.

[Josh] then decided to take things a step further, by fitting a tip from a more expensive gun to his Eastwood model. There were some challenges in getting it connected electrically, but nothing a little electrical tape couldn’t fix. While this did further improve results, it was a minor improvement compared to the air feed modifications.

Overall, [Josh] was able to take a poorly performing tool and transform it into something much more useful, just by drilling a couple of holes. Check out our Hacklet on quick tool hacks, or share your best work in the comments.

Super Simple Controller For Motorcycle LED Lights

For automobiles, especially motorcycles, auxiliary lighting that augments the headlights can be quite useful, particularly when you need to drive/ride through foggy conditions and poorly lit or unlit roads and dirt tracks. Most primary lighting on vehicles still relies on tungsten filament lamps which have very poor efficiency. The availability of cheap, high-efficiency LED modules helps add additional lighting to the vehicle without adding a lot of burden on the electrical supply. If you want to add brightness control, you need to either buy a dimmer module, or roll your own. [PatH] from WhiskeyTangoHotel choose the latter route, and built a super simple LED controller for his KLR650 bike.

He chose a commonly available 18 W light bar module containing six 3 W LEDs. He then decided to build a microcontroller based dimmer to offer 33%, 50% and 100% intensities. And since more code wasn’t going to cost him anything extra, he added breathing and strobe modes. The hardware is as barebones as possible, consisting of an Arduino Nano, linear regulator, power MOSFET and control switch, with a few discretes thrown in. The handlebar mounted control switch is a generic motorcycle accessory that has two push buttons (horn, headlight) and a slide switch (turn indicators). One cycles through the various brightness modes on the pushbutton, while the slide switch activates the Strobe function. A status indicator LED is wired up to the Nano and installed on the handlebar control switch. It provides coded flashes to indicate the selected mode.

It’s a pity that the “breathing” effect is covered under a patent, at least for the next couple of years, so be careful if you plan to use that mode while on the road. And the Strobe mode — please don’t use it — like, Ever. It’s possible to induce a seizure which won’t be nice for everyone involved. Unless you are in a dire emergency and need to attract someone’s attention for help.

Continue reading “Super Simple Controller For Motorcycle LED Lights”

Microchip ICD4 REview

[Mike] is an avid PIC developer and replaced his ICD3 debugger for an ICD4. He made a video with his impressions and you can see it below. [Mike] found the heavy aluminum case with a sexy LED attractive, but wondered why he was paying for that in a development tool. He was also unhappy that they replaced the ICD3 cable connections with new connectors. Finally, he wished for the pin out to be printed on the case.

On the other hand, the ICD4 will also do JTAG and handle the Atmel parts (which Microchip acquired). [Mike] opens the box and shows the inside of the device before actually using it for the intended task.

Continue reading “Microchip ICD4 REview”

Hardware For Deep Neural Networks

In case you didn’t make it to the ISCA (International Society for Computers and their Applications) session this year, you might be interested in a presentation by [Joel Emer] an MIT  professor and scientist for NVIDIA. Along with another MIT professor and two PhD students ([Vivienne Sze], [Yu-Hsin  Chen], and [Tien-Ju Yang]), [Emer’s] presentation covers hardware architectures for deep neural networks.

The presentation covers the background on deep neural networks and basic theory. Then it progresses to deep learning specifics. One interesting graph shows how neural networks are getting better at identifying objects in images every year and as of 2015 can do a better job than a human over a set of test images. However, the real key is using hardware to accelerate the performance of networks.

Hardware acceleration is important for several reasons. For one, many applications have lots of data associated. Also, training can involve many iterations which can take a long time.

Continue reading “Hardware For Deep Neural Networks”

Your Work Won’t Move With A Magnetic Drill Press Vise

Setting up your workpiece is often the hardest part of any machining operation. The goal is to secure the workpiece so it can’t move during machining in such a way that nothing gets in the way of the tooling. Magnetic chucks are a great choice for securely and flexibly holding down workpieces, as this simple shop-built electromagnetic vise shows.

It looks like [Make It Extreme] learned a thing or two about converting microwave oven transformers to electromagnets when they built a material handling crane for the shop. Their magnetic vise, designed for a drill press but probably a great choice for securing work to a milling machine, grinder, or even a CNC router, has a simple but sturdy steel frame. Two separate platforms slide on the bed of the vise, each containing two decapitated MOTs. Wired to mains power separately for selective control and potted in epoxy, the magnets really seem to do the job. The video below shows a very thick piece of steel plate cantilevered out over one magnet while having a hole cut; that’s a lot of down force, but the workpiece doesn’t move.

Like the idea of a shop-made vise but would rather go the old-fashioned way? Check out [Make It Extreme]’s laminated bench vise, which also makes an appearance in this video.

Continue reading “Your Work Won’t Move With A Magnetic Drill Press Vise”

Magnet Implants, Your Cyborg Primer

What would you do to gain a sixth sense? Some of us would submit to a minor surgical procedure where a magnet is implanted under the skin. While this isn’t the first time magnet implants have been mentioned here on Hackaday, [The Thought Emporium] did a phenomenal job of gathering the scattered data from blogs, forum posts, and personal experimentation into a short video which can be seen after the break.

As [The Thought Emporium] explains in more eloquent detail, a magnet under the skin allows the implantee to gain a permanent sense of strong magnetic fields. Implantation in a fingertip is most common because nerve density is high and probing is possible. Ear implants are the next most useful because oscillating magnetic fields can be translated to sound.

For some, this is merely a parlor trick. Lifting paper clips and messing with a compass are great fun. Can magnet implants be more than whimsical baubles?

Continue reading “Magnet Implants, Your Cyborg Primer”