Easy DIY Microfluidics

Microfluidics, the precise control and manipulation of small volumes of liquids, is heavily used in any field that does small-scale experiments with expensive reagents (We’re looking at you, natural sciences.) However, the process commonly used to create microfluidic devices is time and experience intensive. But, worry not: the Uppsala iGEM team has created Chipgineering: A manual for manufacturing a microfluidic chip.

Used while developing everything from inkjet print heads to micro-thermal technologies, microfluidic systems are generally useful. Specifically, Uppsala’s microfluidic device performs a simple biological procedure, a heat-shock transformation, as a proof of concept. Moreover, Uppsala uses commonly available materials: ready to pour PDMS (a biologically compatible silicon) and a 3D printed mold. Additionally, while the team used a resin 3D printer, there seems to be little reason that a fused deposition modeling (FDM) printer wouldn’t work just as well. Particularly interesting is how they sandwich their PDMS between two plates, potentially allowing easy removal and replacement of reagents without external mechanisms. And, to put the cherry on top, Uppsala’s well-illustrated documentation is a joy to read.

This isn’t the first time we’ve covered microfluidic devices, and if you’re still in the prototyping phase, these microfluidic LEGO-like blocks might be what you need. But, if you prefer macrofluidics, this waste shark that aims to clean our oceans might be more your style.

An Interactive Oasis At Burning Man

An oasis in the desert is the quintessential image of salvation for the wearied wayfarer. At Burning Man 2016, Grove — ten biofeedback tree sculptures — provided a similar, interactive respite from the festival. Each tree has over two thousand LEDs, dozens of feet of steel tube, two Teensy boards used by the custom breath sensors to create festival magic.

Grove works like this: at your approach — detected by dual IR sensors — a mechanical flower blooms, meant to prompt investigation. As you lean close, the breath sensors in the daffodil-like flower detect whether you’re inhaling or exhaling, translating the input into a dazzling pulse of LED light that snakes its way down the tree’s trunk and up to the bright, 3W LEDs on the tips of the branches.

Debugging and last minute soldering in the desert fixed a few issues, before setup — no project is without its hiccups. The entire grove was powered by solar-charged, deep-cycle batteries meant to least from sunset to sunrise — or close enough if somebody forgot to hook the batteries up to charge.

Continue reading “An Interactive Oasis At Burning Man”

Hackaday Prize Entry: Hot Logic

A few weeks ago, [Yann] was dumpster diving and found something of interest. Two vacuum tubes, an ECC83S and an EL84. This was obviously the droppings of a local guitarist, but [Yann] wanted to know if he could build something useful out of them. An amplifier is far too pedestrian, so he settled on a vacuum tube computer.

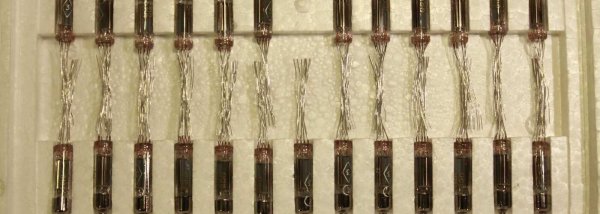
The normal pentodes and triodes you’ll find in a tube amp require a lot of support components like output transformers, tube sockets, and high voltage power supplies. This was a little too complicated for a tube computer, but after a little bit of searching, [Yann] found a better option for his MINIVAC — subminiature vacuum tubes. These require fewer support components, and can be found for very reasonable prices through the usual component suppliers. His entry for this year’s Hackaday Prize is Hot Logic. It’s a computer — or at least computer components — built out of these tubes.

The tubes in question are a few 1Ж29Б-В and 6Н21Б tubes, a vacuum pentode and dual triode, respectively. Add in a few diodes, and that meets the requirements for being sufficient to build a computer. As a neat little bonus, these tubes have requirements that are very easy to meet. The filament on the 1Ж29Б-В tube only needs 1.2 Volts.

These subminiature tubes are a little underappreciated in the world of audiophililia and DIY electronics. That’s a bit of a shame; these tubes are the most technologically advanced vacuum-based technology ever created. They were the heart and the brains of ballistic missiles, and if you look hard enough you source hundreds of them at very reasonable prices. A vacuum tube computer requires a lot of tubes, and if anyone will be able to build a vacuum tube computer it’s going to be [Yann] and his pile of Soviet surplus.

Mains Clocking A Microcontroller

[Lujji] is playing around with the STM8 microcontroller. In reviewing the official documentation for this chip, he read the external clock can be a sine wave, a triangle wave, or a square wave with a 50% duty cycle. The minimum CPU frequency is 0 Hz. [Lujji] doesn’t have a signal generator, and presumably, he’s all out of crystals. He does have mains AC, though, so why not clock a microcontroller with wall power?

Using mains power as a frequency standard is a concept a hundred years old. Synchronous motors turn at a rate proportional to the mains frequency, and this has been used in clocks for decades. If you’re really clever, you can clock digital circuits with mains AC, but we’ve never seen someone replace a tiny crystal in a microcontroller circuit with mains power.

After an experiment to prove the concept, [Lujji] went on to construct a circuit that wasn’t as dumb as connecting the microcontroller directly to a wall socket. The direct approach didn’t work that well anyway — the STM8 didn’t like low frequency clocks with slow edges. [Lujji] needed a clock with cleaner edges, and a 555 configured as a comparator fit the bill.

The completed circuit sends mains power through an optocoupler to drive a 555 configured as a comparator. The output is a clean 50Hz clock that is connected to the OSCIN pin on an STM8. This is now a chip running at 50Hz, and yes, it works. [Lujji] set up a circuit to write ‘Hello World’ on an old Nokia LCD. That took about three minutes. It works, though, even though it’s completely useless. Maybe this can be applied to some novel timekeeping similar to that one-instruction-per-day clock we looked earlier in the year.

An Even Smaller BeagleBone

The BeagleBone famously fits in an Altoids tin. Even though we now have BeagleBone Blacks, Blues, and Greens, the form factor for this curiously strong Linux board has remained unchanged, and able to fit inside a project box available at every cash register on the planet. There is another Altoids tin, though. The Altoid mini tin is just over 60×40 mm, and much too small to fit a normal size BeagleBone. [Michael Welling] has designed a new BeagleBone to fit this miniature project box. He’s calling it the Pocketbone, and it’s as small as the mints are strong.

The Pocketbone is based on the Octavo Systems OSD355x family, better known as the ‘BeagleBone on a chip’. This chip features a TI AM355x ARM Cortex A8, up to 1GB of DDR3 RAM, 114 GPIOs, 6 UARTs, 2 SPIs, 2x Gigabit Ethernet, and USB. It’s housed in a relatively large BGA package that makes routing easy, and as a proof of concept [Jason Kridner] built a PocketBone in Eagle.

[Michael]’s version of the Pocketbone is based on the earlier proof of concept, with a few handy additions. There’s an IO expansion header, provisions for a battery input, a few fixes to the USB, and all the parts are on one side of the board facilitating easier assembly. This version of the Pocketbone was created using KiCad, which will endear the project to the Open Source community.

Measuring Capacitors At The Birth Of Rock And Roll

The late 1950s [Bill Haley], [Elvis Presley], and [Little Richard] were building a new kind of music. Meanwhile, electronic hobbyists were building their own gear from Heathkit. A lot of that gear shows you how far we’ve come in less than a century. [Jeff Tranter’s] YouTube channel is a great way to look at a lot of old Heathkit gear, including this really interesting “direct reading capacity meter.” You can see the video, below.

Measuring capacitance these days is easy. Many digital multimeters have that function. However, those didn’t exist in the 1950s–at least, not in the way we know them. The CM-1 weighed 5 pounds, had several tubes, and cost what would equate to $250 in today’s prices. Unlike other instruments of the day, though, the capacitance was read directly off a large analog meter (hence, the name). You didn’t have to interpret readings using a nomograph or move a knob to balance a bridge and read the knob’s position.

Continue reading “Measuring Capacitors At The Birth Of Rock And Roll”

High Vacuum With Mercury And Glassware

If you want to build your own vacuum tubes, whether amplifying, Nixie or cathode-ray, you’re going to need a vacuum. It’s in the name, after all. For a few thousand bucks, you can probably pick up a used turbo-molecular pump. But how did they make high vacuums back in the day? How did Edison evacuate his light bulbs?

Strangely enough, you could do worse than turn to YouTube for the answer: [Cody] demonstrates building a Sprengel vacuum pump (video embedded below). As tipster [BrightBlueJim] wrote us, this project has everything: high vacuum, home-made torch glassware, and large quantities of toxic heavy metals. (Somehow [Jim] missed out on the high-voltage from the static electricity generated by sliding mercury down glass tubes for days on end.)

Continue reading “High Vacuum With Mercury And Glassware”