Motorized Mini Excavator Rises From Sheets Of Plywood

Fathers of Hackaday, we’ve got bad news — you’ve been out-fathered. Behold the mechanism of your undoing: a working miniature excavator, executed in plywood.

To be fair, the rules of the game have changed lately. Time was when a nipper would ask for the impossible, and we dads would never have to deliver. But with CNC routers, 3D-printing, and industrial-grade CAD software you can use for free, the possibility hurdle is getting ever shorter. Still, when his son put in this request, [Alex Lovegrove] really delivered. Everything on this excavator works, from tracks to boom to bucket. There are hundreds of parts, mostly machined from plywood but with a smattering of 3D-printed gears and brackets. The tracks and slew gear are powered by gear motors, while linear actuators stand in for hydraulic rams on the boom. The videos below show the machine under test and the unbearable cuteness of it being loved.

Hacker parents need not despair, of course. There’s plenty of room left for your imagination to run amok. For inspiration, check out this working railway system, or any of the several backyard roller coasters we’ve featured.

Continue reading “Motorized Mini Excavator Rises From Sheets Of Plywood”

Injection Molding IPhone Cases From Trash

We imagine you’ve heard this already, but waste plastic is a problem for the environment. We wrap nearly everything we buy, eat, or drink in plastic packaging, and yet very little of it ends up getting recycled. Worse, it doesn’t take a huge industrial process to melt down a lot of this plastic and reuse it, you can do it at home if you were so inclined. So why aren’t there more localized projects to turn all this plastic trash into usable items?

That the question that [Precious Plastic] asks, and by providing a centralized resource for individuals and communities looking to get into the plastic recycling game, they hope to put a dent in the worldwide plastic crisis. One of their latest projects is showing how plastic trash can be turned into functional iPhone cases with small-scale injection molding.

Pushing plastic into the mold

The video after the break goes into intricate detail about the process involved in creating the 3D CAD files necessary to make the injection molds. Even if you don’t plan on recycling milk jugs at home, the information and tips covered in the video are extremely helpful if you’ve ever contemplated having something injection molded. The video even demonstrates a neat feature in SolidWorks that lets you simulate how molten plastic will move through your mold to help check for problem areas.

Once you’ve designed your mold on the computer, you need to turn it into a physical object. If you’ve got a CNC capable of milling aluminum then you’re all set, but if not, you’ll need to outsource it. [Precious Plastic] found somebody to mill the molds through 3DHubs, though they mention in the video that asking around at local machine shops isn’t a bad idea either.

With the mold completed, all that’s left is to bolt the two sides together and inject the liquid plastic. Here [Precious Plastic] shows off a rather interesting approach where they attach the mold to a contraption that allows them to inject plastic with human power. Probably not something you’d want to do if you’re trying to make thousands of these cases, but it does show that you don’t necessarily need a high tech production facility to make good-looking injection molded parts.

This project reminds us of the tiles made of HDPE plastic with nothing more exotic than what you’d find in the average kitchen. Projects like these really drive home the idea that with the right hardware individuals can turn trash into usable products.

Continue reading “Injection Molding IPhone Cases From Trash”

Quantum Searching In Your Browser

If you’ve made it through the last two posts on quantum computing (QC), then you’ve seen the Quirk simulator, a little of IBM’s web-based offering, and how entanglement and superposition can do strange and possibly wonderful things. However, the superdense encoding I showed you didn’t really feel like a real computer algorithm. This time we will look at Grover’s algorithm which is often incorrectly billed as an “unstructured database search.” In reality, it is an algorithm for making a state — that is a set of qubits — match some desired state without simply setting the state.

By analogy, consider a web service where you guess a number. Most discussions of Grover’s algorithm will tell you that the service will only tell you if the number is correct or not. If the number was from 1 to 16, using traditional computing, you’d have to query the values one at a time to see which is correct. You might get lucky and hit the first time. Or it might take 16 times. With qubits you can get the same result in only four attempts. In fact, if you try more times, you might get the wrong answer. Of course, what you really get is an answer that is probably correct, because that how QC works.

Continue reading “Quantum Searching In Your Browser”

Friday Hack Chat: How Do You Collaborate With Hardware?

The world of Open Source software is built on collaboration. In one corner of the world, someone can fix a bug in a piece of software, and push it up to the gits. In another part of the world, someone else can put that fix into the next release, and soon everyone has newer, better software. The Internet, or the ability to rapidly transmit text and binary files, has made this all possible.

Hardware is another story. There’s a financial barrier to entry. Not only do you need a meter and a good iron, you’re probably going to need oscilloscopes, logic analyzers, and a bunch of other expensive tools. You’ll need to buy your BOM. If you’re using a PIC, it might be a good idea to buy the good compiler. Hardware is hard and expensive, and all those software devs who complain don’t know what they’re talking about. Collaborating on hardware is much more difficult than pushing some code up to the cloud.

For this week’s Hack Chat, we’re going to be talking about collaborating on hardware projects. This is a deep dive on how to make collaboration with physical objects work, and this week we’re going to be learning from some of the best.

Our guests for this week’s Hack Chat are Pete Dokter and Toni Klopfenstein of SparkFun Electronics. Pete is formerly the Director of Engineering at SparkFun and now the Brand Ambassador for SparkFun Electronics. He hosts the According to Pete video series expounding on various engineering principles and seriously needs a silverburst Les Paul and a Sunn Model T. Toni is currently the product development manager at SparkFun. She’s served on the Open Source Hardware Association Board and participates in the Open Hardware Summit yearly. In her free time, she spends fifty weeks out of the year finding dust in her art and electronics projects.

During this chat, we’re going to be discussing what makes a collaborative hardware project, how to make distributed development work for your team, and the limits of what you can do with several hardware engineers separated by thousands of miles. This is a hard problem, much harder than a distributed team of software engineers, and a fantastic discussion for all.

join-hack-chat

Our Hack Chats are live community events on the Hackaday.io Hack Chat group messaging. This Hack Chat is going down Friday, February 9th at noon, Pacific time. Time Zones got you down? Here’s a handy countdown timer!

Click that speech bubble to the left, and you’ll be taken directly to the Hack Chat group on Hackaday.io.

You don’t have to wait until Friday; join whenever you want and you can see what the community is talking about.

Discrete Pong Project Goes Big, Adds A Player

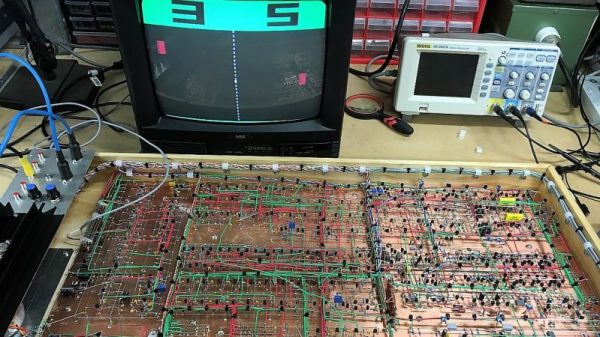
Some projects just take on a life of their own. What started as a pleasant diversion or a simple challenge becomes an obsession, and the next thing you know you’ve built a two-player color Pong game with audio completely from discrete components.

If this one seems familiar, it’s because we were dazzled by its first incarnation last year. As impressive as version 1.0 was, all the more so since it was built using the Manhattan method and seemingly over the course of a weekend, it did have its limitations. [GK] has been refining his design ever since and keeping accurate track of the process, to the tune of 22 pages on the EEVblog forum. We haven’t pored through it all yet, but the state of the project now is certainly worth a look. The original X-Y output to an oscilloscope was swapped out to composite video for a monitor, in both mono and color. This version also allows two people to play head-to-head instead of just battling the machine. It looks like [GK] had to add a couple of blocks worth of real estate to his Manhattan board to accommodate the changes, and he tidied the wiring significantly while he was at it.

It’s a project that keeps on giving, so feast your eyes and learn. We suspect [GK] doesn’t have any plans to finish this soon, but if he does, we can’t wait to see what’s next.

Thanks to [David Gustafik] for reminding us to check back on this one.

Locally Sourced: PLA Adhesive

When I first started getting into 3D printed projects that would require final assembly from multiple parts, I wanted to make sure I had an adhesive that would really hold up. I couldn’t imagine anything worse than spending 10’s of hours printing and assembling something, only to have it fall apart because my adhesive wasn’t up to the task. So I spent a lot of time trolling 3D printing message boards and communities trying to find the best way of gluing PLA. It should come as no surprise that, like everything else in the world, there are a ridiculous number of opinions on the subject.

If you’re printing with ABS, the general wisdom is that solvent welding with acetone is the best bet. You put some acetone on the printed parts, rub them together, and the plastic fuses together. This happens because the ABS melts slightly when exposed to the acetone, so they end up essentially melding into one piece. This sounded like exactly what I wanted, but unfortunately, acetone doesn’t have this same effect on PLA.

After some more research I found people suggesting Weld-On #16, an acrylic adhesive that will actually melt PLA. A little of this applied to the parts, they said, and you can solvent weld PLA just like acetone on ABS. Sure enough, the stuff works great and I’ve used it to put together nearly everything I’ve printed in PLA over the last few years. Only problem is, this stuff is a bit nasty, takes 24 hours to fully cure, and nobody has it locally.

So as an experiment I thought I’d take a look at a few adhesives sold at the local big box retailer and see if I couldn’t find something comparable. Do I need to keep ordering this nasty goop online every time, or can I pick something up off the shelf? More to the point, is solvent welding PLA really any better than just gluing it?

Continue reading “Locally Sourced: PLA Adhesive”

Debugging An Arduino With An Arduino

As every Hackaday reader knows, and tells us at every opportunity in the comments, adding an Arduino to your project instantly makes it twice as cool. But what if, in the course of adding an Arduino to your project, you run into a problem and need to debug the code? What if you could use a second Arduino to debug the first? That would bring your project up to two Arduinos, instantly making it four times as awesome as before you started! Who could say no to such exponential gains?

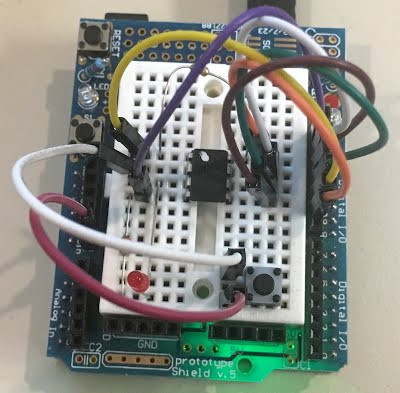
Debugging an ATTiny85

Not [Wayne Holder], that’s for sure. He writes in to let us know about a project he’s been working on for a while that allows you to debug the execution of code on an Arduino with a second Arduino. In fact, the target chip could even be another AVR series microcontroller such as a the ATTiny85. With his software you can single-step through the code, view and modify values in memory, set breakpoints, and even disassemble the code. Not everything is working fully yet, but what he has so far is very impressive.

The trick is exploiting a feature known as “debugWIRE” that’s included in many AVR microcontrollers. Unfortunately documentation on this feature is hard to come by, but with some work [Wayne] has managed to figure out how most of it works and create an Arduino Sketch that lets the user interact with the target chip using a simple menu system over the serial monitor, similar to the Bus Pirate.

[Wayne] goes into plenty of detail on his site and in the video included after the break, showing many of the functions he’s got working so far in his software against an ATTiny85. If you spend a lot of time working on AVR projects, this looks like something you might want to keep installed on an Arduino in your tool bag for the future.

Debugging microcontroller projects can be a huge time saver when your code starts running on real hardware, but often takes some hacking to get working.

Continue reading “Debugging An Arduino With An Arduino”