Better Than Original Pong Using Arduino

Games like Pong are legendary, not only in the sense that they are classic hours fun but also that they have a great potential for makers in stretching their learning legs. In an attempt at recreating the original paddle games like Pong and Tennis etc, [Grant Searle] has gone into the depths of emulating the AY-2-8500 chip using an Arduino.

For the uninitiated, the AY-3-8500 chip was the original game silicon that powered Ball & Paddle that could be played on the domestic television. Running at 2 MHz, it presented a 500 ns pixel width and operated to a maximum of 12 Volts. The equivalent of the AY-3-8500 is the TMS1965NLA manufactured by Texas Instruments for those who would be interested.

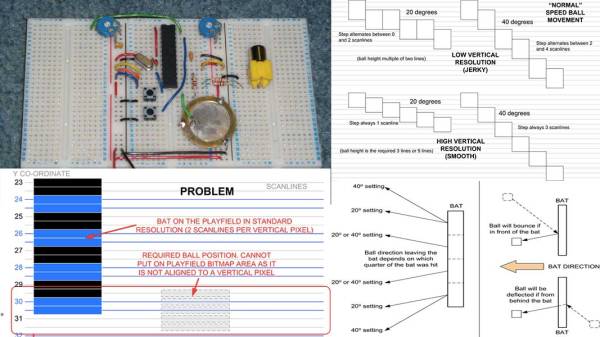
[Grant Searle] does a brilliant job of going into the details of the original chip as well as the PAL and NTSC versions of the device. This analysis will come in handy should anyone choose to make a better version. He talks about the intricacies of redrawing the screen for the static elements as well as the ball that bounces around the screen. The author presents details on ball traversal, resolution, 2K memory limit and its workarounds.

Then there are details on the sound and the breadboard version of the prototype that makes the whole write-up worth one’s time. If you don’t fancy the analog paddles and would rather use a wireless modern-day touch, check out Playing Pong with Micro:bits

Thanks [Keith O] for the tip.

No Signal For Your Radio-Controlled Watch? Just Make Your Own Transmitter

You can win any argument about the time when you have a radio controlled watch. Or, at least, you can if there’s any signal. [Henner Zeller] lives in a place where there is no reception of the DCF77 signal that his European wristwatch expects to receive. Consequently, he decided to make his own tiny transmitter, which emulates the DCF77 signal and allows the watch to synchronise.

A Raspberry Pi Zero W is the heart of the transmitter, and [Henner] manages to coax it into generating 77500.003Hz on a GPIO pin – close enough to the 77.5kHz carrier that DCF77 uses. The signal is AM, and transmits one bit/s, repeating every minute. A second GPIO performs the required attenuation, and a few loops of wire are sufficient for an antenna which only needs to work over a few inches. The Raspberry Pi syncs with NTP Stratum 1 servers, which gives the system time an accuracy of about ±50ms. The whole thing sits in a slick 3D printed case, which provides a stand for the watch to rest on at night; this means that every morning it’s synchronised and ready to go.

[Henner] also kindly took the time to implement the protocols for WWVB (US), MSF (UK) and JJY (Japan). This might be just as well, given that we recently wrote about the possibility of WWVB being switched off. Be sure to check the rules in your area before giving this a try.

We’ve seen WWVB emulators before, like this ATtiny45 build, but we love that this solution is an easy command line tool which supports many geographical locations.

A No-Fuss Rack Of Ham

With any hobby, it’s easy for things to get out of hand. Equipment can get scattered around the house, chargers lost in the car while cables languish in the shed… but it doesn’t have to be this way. With a go-bag or go-box, everything required is kept together in a ready-to-go condition. Heading out for a day of filming? Grab the go-bag and you’re all set. [oliverkrystal] wanted to apply this to a ham radio setup, and built this ham shack-in-a-box.

Wanting to use proven components and keep things rugged and usable, the build starts with a 6U-sized plastic rack mount case. This saves weight over plywood versions and is nice and tough. A combination of off-the-shelf rack mount parts and 3D printed pieces are brought together to make it all happen. [oliverkrystal]’s printed cable organisers are a particular treat, and something we think could help a lot of builds out there.

It all comes together as an impressive self-contained unit with two radios, an antenna tuner, in-built illumination and other useful features. No longer does one have to scramble around preparing gear for the weekend’s hamventures – grab the box and you’re ready to go!

Perhaps you don’t have a lot of ham gear, though? Try this setup to get going for less than $100.

ATX Adapter For The IBM PCJr Now Available

We’ve mentioned previously the challenges that come with maintaining vintage computers which in some cases are pushing 40 years old. Components, even high quality ones, eventually fail and need to be replaced. Now if it’s a fairly popular vintage machine, replacement parts usually aren’t too hard to come by. But what if you’re dealing with a machine that’s not just vintage, but was also such a commercial flop that parts are scarce?

Such is the life for anyone who owns one of the 500,000 IBM PCJrs that Big Blue managed to get out of the door during the year or so the product was on the market. As [AkBKukU] found, a replacement AC adapter for the odd-ball computer was going to cost more than what he paid for the thing, so he set to work on creating an adapter so he could use a modern ATX PSU on the machine. After a couple of months of ironing out the kinks, the design is finally ready for consumption.

In the end, the PCB design itself is quite simple. It’s really just a matter of switching around some pins from the standard ATX plug to the edge connector on the PCJr. There’s also a connector for powering a floppy drive, as well as headers for a fan and power switch.

[AkBKukU] has come up with two ways to use the adapter. You can either go with a standard ATX PSU, in which case it will need to sit outside the machine due to its size, or use a PicoPSU which allows you to keep the whole thing internal. If you don’t mind spending the cash, the PicoPSU method is a much cleaner installation that still provides plenty of power. Depending on which route you take, there are different 3D printed plates to adapt the computer’s rear panel to fit the new hardware.

All the files to build your own version are in the GitHub repository, and [AkBKukU] is doing some low volume runs of both kits and assembled adapter. If this project looks familiar, it’s because we reported on it back when it was still a hand-scratched PCB that didn’t always work as expected.

[Thanks to Gregg for the tip.]

Continue reading “ATX Adapter For The IBM PCJr Now Available”

DIY Switches For People Who Can’t Push Switches

An outstanding number of things most people take for granted present enormous hurdles for people with physical disabilities, including interaction with computers and other digital resources. Assistive technologies such as adaptive switches allow users who cannot use conventional buttons or other input devices to interact with digital devices, and while there are commercial offerings there is still plenty of room for projects like [Cassio Batista]’s DIY Low-cost Assistive Technology Switches.

[Cassio]’s project focuses on non-contact switches, such as proximity and puff-based activations. These are economical, DIY options aimed at improving accessibility for people who are unable to physically push even specialized switches. There are existing products in this space, but cost can be a barrier and DIY options that use familiar interfaces greatly improves accessibility.

Assistive technologies that give people the tools they need to have more control over their own lives in a positive, healthy way is one of the more vibrant and positive areas of open hardware development, and it’s not always clear where the challenges lie when creating solutions. An example of this is the winner of the 2015 Hackaday Prize, the Eyedrivomatic, which allows one to interface the steering of an electric wheelchair to a gaze tracking system while permanently altering neither device; a necessity because users often do not own their hardware.

Behind The Scenes Of A Hacker Conference

If you’ve been to a few hacker camps then you’re aware they are not the products of giant corporate entities but volunteer run community groups. You may even have volunteered yourself, and done all sorts of interesting tasks that go towards the running of the camp. But few of you will have been on the orga team of a camp, the people who put in the hard work of making it happen from start to finish. Julius ter Pelkwijk has, and at the 2018 Electromagnetic Field camp in the UK he gave us an insight into the experience.

Of course, Julius isn’t a member of the EMF orga, instead the camp that gave him the experience was last year’s SHA2017 in the Netherlands. This was over twice the size of EMF 2018, on the Dutch polder at Scoutinglandgoed Zeewolde, a scout camp in a forest next to a dyke, and while from our perspective it was a huge success, it was fascinating to pull back the curtain and hear from the other side of the event.

Continue reading “Behind The Scenes Of A Hacker Conference”

Direction Finding And Passive Radar With RTL-SDR

To say that the RTL-SDR project revolutionized hacker’s capabilities in the RF spectrum would be something of an understatement. It used to be that the bar, in terms of both knowledge and hardware, was so high that only those truly dedicated were able to explore the radio spectrum. But today anyone with $20 can pick up an RTL-SDR device, combine it with a wide array of open source software, and gain access to a previously invisible world.

That being said, RTL-SDR is usually considered an “Economy Ticket” to the world of RF. It gets your foot in the door, but experienced RF hackers are quick to point out you’ll need higher-end hardware if you want to start doing more complex experiments. But the KerberosSDR may soon change the perception of RTL-SDR derived hardware. Combining four R820T2 SDRs on a custom designed board, it allows for low-cost access to high concept technologies such as radio direction finding, passive radar, and beam forming. If you get bored with that, you can always just use it as you would four separate RTL-SDR dongles, perfect for applications that require monitoring multiple frequencies such as receiving trunked radio.

KerberosSDR (which was previously known as HydraSDR) is a collaborative effort between the Othernet engineering team and the folks over at RTL-SDR.com, who earlier in the year put out a call for an experienced developer to come onboard specifically for this project. Tamás Peto, a PhD student at Budapest University of Technology and Economics, answered the call and has put together a system which the team plans on releasing as open source so the whole community can benefit from it. In the videos after the break, you can see demonstrations of the direction finding and passive radar capabilities using an in-development version of KerberosSDR.

As for the hardware, it’s a combination of the RTL-SDR radios with an onboard GPIO-controlled wide band noise source for calibration, as well as an integrated USB hub so it only takes up one port. Everything is wrapped up in a shielded metal enclosure, and the team is currently experimenting with a header on the KerberosSDR PCB that would let you plug it directly into a Raspberry Pi or Tinkerboard.

The team hopes to start final hardware production within the next few months, and in the meantime has set up a mailing list so interested parties can stay in the loop and be informed when preorders start.

If you can’t wait until then, we’ve got a detailed write-up on DIY experiments with passive radar using RTL-SDR hardware, and you can always use your browser if you want to get your radio direction finding fix.

Continue reading “Direction Finding And Passive Radar With RTL-SDR”