Silicon Bugs In The FTDI FT232R, And A Tidy RF VCO Project

[Scott Harden] wrote in to tell us of some success he’s having using the FT232 chip to speak SPI directly from his laptop to a AD98850 digital signal generator. At least that was his destination. But as so often in life, more than half the fun was getting there, finding some still-unsolved silicon bugs, and (after simply swapping chips for one that works) potting it with hot glue, putting it in a nice box, and putting it up on the shelf.

In principle, the FTDI FT232 series of chips has a bit-bang mode that allows you to control the individual pins from a fairly simple API on your target computer, using their drivers and without installing anything on basically any platform. We wrote this feature up way back in 2009, and [Scott] was asking himself why he doesn’t see more hacks taking advantage of bit-bang mode.

“Square” waves

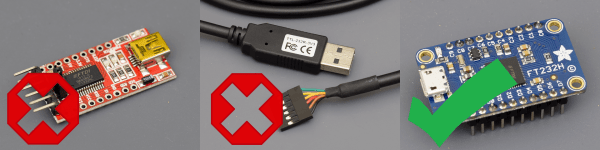
Then he answered his own question the hard way, by spending hours “debugging” his code until he stumbled on the FTDI errata note (PDF), where they admit that bit-bang mode doesn’t get timings right at all on the FT232R and FT232RL parts. FTDI has made claims that they fixed the bug in subsequent chip revisions, but the community has not been able to confirm it. If you want to use bit-bang mode, which is plenty cool, steer clear of the FT232R chips — the ones found in the ever-popular FTDI cables and many adapter dongles.

The good news here is twofold. First, now you know. Second, bit-bang mode is tremendously useful and it works with other chips from the vendor. Particularly, the FT232H and FT230X chips work just fine, among others. And [Scott] got his command-line controlled digital VCO up and running. All’s well that ends well?

We’ll wrap up with questions for the comment section. Do other manufacturers’ cheap USB-serial chips have an easily accessible bit-bang mode? Are any of you using USB bit-bang anyway? If so, what for?

Move Over Aluminum: Cast Iron For The Home Foundry

When it comes to choice of metals that can be melted in the home foundry, it’s a little like [Henry Ford]’s famous quip: you can melt any metal you want, as long as it’s aluminum. Not that there’s anything wrong with that; there’s a lot you can accomplish by casting aluminum. But imagine what you could accomplish by recycling cast iron instead.

It looks like [luckygen1001] knows a thing or two about slinging hot metal around. The video below shows a fairly expansive shop and some pretty unique tools he uses to recycle cast iron; we were especially impressed with the rig he uses to handle the glowing crucibles from a respectful distance. The cast iron comes from a cheap and abundant source: car disc brake rotors. Usually available free for the asking at the local brake shop, he scores them with an angle grinder and busts them into manageable chunks with a hammer before committing them to the flames. The furnace itself is quite a thing, running on a mixture of diesel and waste motor oil and sounding for all the world like a jet engine starting up. [luckygen1001] had to play with the melt, adding lumps of ferrosilicon alloy to get a cast iron with better machining properties than the original rotors. It’s an interesting lesson in metallurgy, as well as a graphic example of how not to make a flask for molding cast iron.

Cast iron from the home shop opens up a lot of possibilities. A homemade cast aluminum lathe is one thing, but one with cast iron parts would be even better. And if you use a lot of brake rotors for your homebrew cast iron lathe, it might require special handling.

Continue reading “Move Over Aluminum: Cast Iron For The Home Foundry”

Blinging Up A Scope: Scale Your Divisions In Style

When a hacker owns an oscilloscope, it’s more than a possession. Weary nights are spent staring at the display, frantically twiddling the dials to coax out vital information. Over time, a bond is formed – and only the best will do for your scope. So why settle for the stock plastic dials when you could go for gold? Well in case you hadn’t noticed, we’re partial to a bit of over-engineering here at Hackaday, and [AvE] has upgraded his Rigol scope by adding metal knobs.

Employing his usual talent in the shop, [AvE] first turns the basic knob shapes from the stock, before drilling them and milling the outer texture pattern at an angle. Voilà: six custom knobs for 100% more torque and traction control. No matter how trivial the project, it’s always good to watch him at work. This [AvE] video doesn’t come with the usual fruity language warning; instead this build is set to the swelling tones of Beethoven. “Less Talk – More Action!” says the title, but we have to say that we miss his quips. That said, he still manages to deliver his signature humour through action alone.

For some slightly more functional oscilloscope upgrades, you can read about adding a hybrid touchscreen interface, or hacking a Rigol scope’s software to unlock greater bandwidth, storage depth and more.

Continue reading “Blinging Up A Scope: Scale Your Divisions In Style”

A Crash Course In Reliable Communication

It’s probably fair to say that anyone reading these words understands conceptually how physically connected devices communicate with each other. In the most basic configuration, one wire establishes a common ground as a shared reference point and then the “signal” is sent over a second wire. But what actually is a signal, how do the devices stay synchronized, and what happens when a dodgy link causes some data to go missing?

All of these questions, and more, are addressed by [Ben Eater] in his fascinating series on data transmission. He takes a very low-level approach to explaining the basics of communication, starting with the concept of non-return-to-zero encoding and working his way to a shared clock signal to make sure all of the devices in the network are in step. Most of us are familiar with the data and clock wires used in serial communications protocols like I2C, but rarely do you get to see such a clear and detailed explanation of how it all works.

He demonstrates the challenge of getting two independent devices to communicate, trying in vain to adjust the delays on the receiving and transmitting Arduinos to try to establish a reliable link at a leisurely five bits per second. But even at this digital snail’s pace, errors pop up within a few seconds. [Ben] goes on to show that the oscillators used in consumer electronics simply aren’t consistent enough between devices to stay synchronized for more than a few hundred bits. Until atomic clocks come standard on the Arduino, it’s just not an option.

[Ben] then explains the concept of a dedicated clock signal, and how it can be used to make sure the devices are in sync even if their local clocks drift around. As he shows, as long as the data signal and the clock signal are hitting at the same time, the actual timing doesn’t matter much. Even within the confines of this basic demo, some drift in the clock signal is observed, but it has no detrimental effect on communication.

In the next part of the series, [Ben] will tackle error correction techniques. Until then, you might want to check out the fantastic piece [Elliot Williams] put together on I2C.

[Thanks to George Graves for the tip.]

Continue reading “A Crash Course In Reliable Communication”

Robot snakes on the grass

Making Robot Snakes That Slither, Sidewind, And Strike

[Will Donaldson] has been making robot snakes of all sorts. One of his snakes hugs the ground, slithering across it with a sine wave motion. Flipping it on its side and calling different code, that same snake also moves like an inchworm. Another of his snakes lifts parts of itself upward to move sideways across the ground, again using sine waves.

3D printed scales
3D printed scales

At first, his slithering snake would only oscillate in place on the floor. Looking more closely at biological snakes, he found that part of the reason they moved forward was due to their scales. The scales move smoothly over the ground in one direction but grip when pushed backward or sideways. He also found work done at Harvard University where they combined pumped air and papercraft to make scales which change shape. And so [Will] designed and 3D printed some scales for his snake. However, as you can see in the video below, they didn’t work on carpet.

His success came when he added wheels to each segment. They didn’t work like a car, there was no engine turning the wheels. Instead, they acted more like scales, rotating freely in one direction and gripping when pushed sideways. This success also allowed him to add a parameter to his code for turning left or right.

As we said above, he can flip the ground hugger sideways and run it as an inchworm and he also has a working sidewinder snake variation. The sidewinder can even lift up its head and strike like a cobra. Check out his hackaday.io page if you want to make your own. He’s provided STL files, code, and construction details.

[Will] has a lot of future plans for his snakes. Currently, they’re tethered to a modified ATX power supply but he’d like to incorporate LiPo batteries into the snakes instead. His original goal was to make a tree climbing snake like the one by the Biorobotics lab at Carnegie Mellon University (updated link for the article) but his first snake wasn’t long enough. He still plans on pursuing that as well as an underwater electronic eel. There seems to be no limit to the things he can try. For now, check out the video below to see his successes and his failures so far. Maybe you even have some suggestions for those tricky scales. The undersides of his snake’s segments do seem modular, lending themselves to experimentation.

Continue reading “Making Robot Snakes That Slither, Sidewind, And Strike”

Motorbike piston espresso machine

Espresso Machine From Motorbike Engine Parts

[Rulof Maker] is a master at making things from salvaged parts, and being an Italian lover of espresso coffee, this time he’s made an espresso machine. The parts in question are a piston and cylinder from an old motorbike, believe it or not, and parts from an IKEA lamp.

Why the piston and cylinder? For those not familiar with espresso machines, they work by forcing pressurized, almost boiling water through ground coffee. He therefore puts the water in the piston cylinder, and levers the piston down onto it, forcing the water out the bottom of the cylinder and through the waiting coffee grounds. Parts from the IKEA lamp form a base for the waiting cup to sit on.

Of course, he takes great care to clean out any burnt oil and gas before starting. We also like how he centers a lever arm on a U-shaped bolt using two springs. Clever. But see the master in action for yourself in the video below.

Continue reading “Espresso Machine From Motorbike Engine Parts”

Folding Robots With Special Materials

When it comes to robots, we usually see some aluminum extrusion, laser-cut parts, maybe some 3D printed parts, and possibly a few Erector sets confabulated into a robot arm. This entry for the Hackaday Prize is anything but. It’s a robot chassis, a 3D printer, and the structural frame for any sort of moving project that’s made out of a special composite material.

[Marc]’s project for the Hackaday Prize is all about articulated mechanisms. Instead of the usual structural components, he’s using Hylite, a special material that’s basically a polypropylene core clad in a sheet of aluminum on both sides. By carefully milling away the aluminum on both sides, [Marc] is creating a living hinge that can be used to build a 3D printer, robot, or really anything else.

This really isn’t a finished project; it’s more of a technology demonstrator. That said, [Marc] has a lot of examples where he can bend these Hylite aluminum plates over on themselves, can create boxes and space frames, and has the ability to create just about any shape he wants. It’s really a highly precise means of bending aluminum with a mill, and has the added benefit of looking really, really good.

Already, [Marc] has a few interesting robots that are built around this construction technology. The first is a remote control focus for a telescope that simply connects an eyepiece to the scope. Actuation is provided pneumatically, and all reports say this example works well. The other example is a flat-pack phone stand. It’s a bit simpler than a focus mechanism, but it is a small and inexpensive way to show off the technology. Great work, and an excellent project in The Hackaday Prize.