A Complete Desktop PCB Etching Station

Right now you can get a custom circuit board delivered to your door in about a week for just a few dollars. There’s little reason to make your own circuit boards at home anymore, but when you need a board now, you want to have that capability. [Tuval Ben Dosa] designed a complete PCB etching station that is the perfect tool for making printed circuit boards at home. It’s got everything you need for the perfect etch, and with this setup you can make a board in hours instead of waiting for days.

The chemistry for any etching setup is important, and in recent years the entire community has moved from ferric chloride to copper chloride for a very good reason: you can recharge copper chloride etchant by bubbling oxygen (or air) through it, whereas ferric chloride is a one-use etchant.

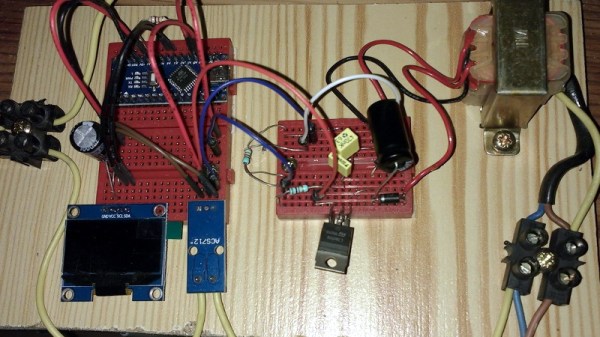
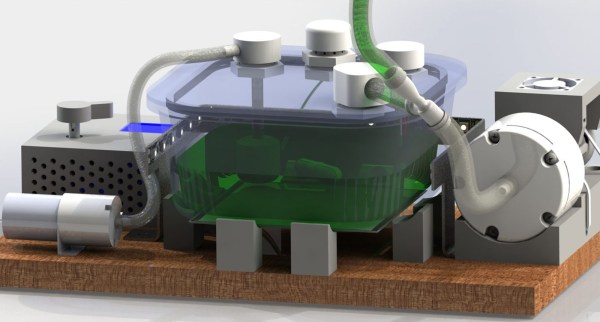
The mechanical part of this build consists of an airtight glass food container sitting on top of a PCB heating element not unlike the heated bed of a 3D printer. Along with that is an I2C temperature sensor encased in a silicone tube, a stir bar, diaphram pump, and a few pumps to blow air into the etchant and pump out the chlorine gas generated. This is controlled by a small microcontroller with a UI consisting of just an encoder and OLED display.

If you’re looking for builds that will etch copper and brass at home, this has been something that has been done before. The Etchinator is a fantastic build capable of making everything from printmaking plates to printed circuit boards. That’s a build that requires a lot of work, and this small, compact etching station does everything you need without taking up too much space in the shop. Check out the video below.

Continue reading “A Complete Desktop PCB Etching Station”

The Battery Is Part Of The Art

A work of art is appreciated for its own sake and we will never tire of seeing stunning circuits from microscopic dead-bugs to ornate brass sculptures. We also adore projects that share the tricks to use in our own work. Such is the case with [Jiří Praus] who made some jewelry and shared his templates so we try this out ourselves.

The materials include brass wire, solder, and surface-mount LEDs. Template design expects a 1206 light, so if you step outside that footprint, plan accordingly. The printable templates are intuitive and leverage basic wire jewelry making skills. Some good news is that flashing LEDs are available in that size so you can have an array of blinkenlights that appears random due to drifting circuits. Please be wary with RGB lights or mixing colors because red LEDs generally run at a lower voltage and they will siphon a significant chunk of a coin-cell’s power from a competing green or blue. How else can these be personalized?

[Jiří]’s charms are just the latest of circuits that capture our eyes and tickle our ears.

Midiboy, The Portable Gaming Console With MIDI

The ArduBoy is a tiny little gaming console that’s also extremely simple. It’s only a small, cheap, monochrome OLED display, a microcontroller with Arduino-derived firmware, and a few buttons. That’s it, but with these simple ingredients the community around the ArduBoy has created a viable gaming platform. It has cartridges now, and one version has a crank. Now, the MIDIboy is bringing something like the ArduBoy to the world of electronic music.

Inside the MIDIboy is what you would expect from any review of the ArduBoy schematics. There are six buttons, a speaker, a USB port, and a SPI OLED display. In addition to all of this are two big chonkin’ DIN-5 ports for MIDI in and MIDI out, and yes, the MIDI in port has an optoisolator.

As for what you can do with a tiny little game console connected to MIDI, there are already a few choice apps — the MIDI Chords app creates chords, obviously, and the MIDImon sketch is a MIDI monitor. There are some controllers for MIDI synths, and of course this device is completely open source. If you’ve ever wanted a DIY controller for your favorite MIDI synth, this is what you need.

If an ArduBoy with MIDI doesn’t sound exciting, just check out Little Sound DJ. That’s a Game Boy cartridge that turns your old brick Game Boy into a music production workstation. Yes, it sounds great and there’s a lot of potential in a pocket game console with MIDI ports.

Earthquake Detection On A Chip

If you’ve ever been in an earthquake you’d assume it would be pretty easy to detect one. If things are shaking, there’s an earthquake. In reality, though, a lot of things can shake a sensitive instrument that is detecting shaking, so — for example — mechanical sensors will produce a lot of false positives. Now, however, you can filter out errant vibrations and reliably detect earthquakes on a chip.

The Rohm BP3901 has two primary features. First, it supposedly eliminates false detections due to things like a heavy truck rumbling by. In addition, while most sensors must be mounted completely flat, the BP3901 has a compensation method for angle which lets you mount it as much as 15 degrees rotated in either direction and still get good results. That’s because the BP3901 is based on the combination of an accelerometer and a microcontroller in one package to detect movement, characterize it based on an algorithm and reacting through an I2C bus and an INT pin.

Rohm suggests you could power the BP3901 for about 5 years with two AA batteries with the example of averaging 10 three-minute wake up events a month. We aren’t sure why we want to detect an earthquake, but we think we do. Imagine a large sensor network sending back real-time data as an earthquake happens — something we saw last year using Raspberry Pi. That project used a Geophone as the detector, which could be replaced by this chip. Rohm plans to have “OEM quantities” for sale next month which we hope means we can get smaller quantities from distributors.

A lot of people spend a lot of time thinking about how to predict earthquakes, as we’ve seen before. Of interest, the ancient Romans may have had a way to deflect earthquakes, so they probably didn’t care as much about detecting them.

Phase Shift Pump Control? There’s An App For That.

The sort of pumps used in the filtration systems of fountains and swimming pools don’t take kindly to running dry. So putting such a pump on a simple timer to run while you’re away comes with a certain level of risk: if the pump runs out of water while you’re gone, you might come home to a melted mess. One possible solution is a float sensor to detect the water level in whatever you’re trying to pump, but that can get complicated when you’re talking about something as large as a pool.

For his entry into the 2019 Hackaday Prize, [Luc Brun] is working on controller that can detect when the pump is running dry by monitoring the phase shift between voltage and current. With an inductive load like a pump, the current should lag behind the AC voltage a bit under normal operation. But if they become too far out of phase with each other, that’s a sign that the pump is running in a no-load condition because there’s no water to slow it down.

As [Luc] explains in the project write-up, simply monitoring the pump’s peak current could work, but it would be less reliable. The problem is that different motors have different current consumptions, so unless you calibrated the controller to the specific load it’s protecting, you could get false readings. But the relationship between current and voltage should remain fairly consistent between different motors.

The controller is powered by a Arduino Nano and uses a ACS712 current sensor to take phase measurements. Since he had the ability to toggle the pump on and off with a relay attached to the Arduino, [Luc] decided to add in a few other features. The addition of a DS1307 Real Time Clock means the pump can be run on a schedule, and an HC-05 Bluetooth module lets him monitor the whole system from his smartphone with an Android application he developed.

Since the theme of this year’s Hackaday Prize is designing a product rather than a one-off build, judges will be looking for exactly the sort of forward thinking that [Luc] has demonstrated here. As the controller is currently a mass of individual modules held inside a waterproof enclosure, the next steps for this project will likely be the finalization of the hardware design and the production of a custom PCB.

Guitar Made From Noodles Glows In The Dark

Wood.  Specifically, certain types of tone woods; woods that impart a certain tone. That’s what guitars are made of. And occasionally, plastic, or metal, or fibreglass or, well, anything. [_forwardaudio_] built his out of noodles, because, why not?

Well, not completely out of noodles. Epoxy is used to give some strength to the noodles, because, despite the fantastic tone that noodles impart to the guitar, they’re not known for their strength. The epoxy helps keep the noodles in place, focusing their noodly tone.

To add a bit of punch to the look of the guitar, the back and front of the body have UV powder blended in, blue on the front and green on the back. Once the guitar was assembled, a set of UV strings were added as well, to add even more glowy goodness.

In the video (after the break) the build process is shown along with the simplified, volume only, wiring. At the end, [_forwardaudio_] noodles around on the guitar a bit.

I’ll show myself out.

If noodles aren’t your thing, maybe you’d prefer 3D printing an extended fretboard for your guitar, or to build yourself a 12 foot long guitar.

Continue reading “Guitar Made From Noodles Glows In The Dark”

3D Printed Buttons, Printed As A Single Unit

These nifty buttons come from [Marc Schömann], and they are intended to cover just about any kind of tact switches. The buttons, their cover, and the compliant bits that act as a spring can be 3D printed as a complete unit that requires no assembly, and can be used fresh off the print bed.

The design is still being developed, but those interested in playing with it can download the current model here. [Marc] printed this version in two colors, but that’s just to make how the buttons work easier to see. It also gave him an opportunity to test and tune the tool changer on his printer.

Tool changer, you say? Yes, indeed. The printer is the Blackbox, a open source, tool-changing 3D printer of [Marc]’s own design with its own Hackaday.io project page.

Embedded below is a video overview of the button design being prepped and printed on a Blackbox printer, with a tool change happening in the process. Tool changing is an attractive feature that many people including E3D have taken a swing at, and it’s always exciting to see it in action.

Continue reading “3D Printed Buttons, Printed As A Single Unit”