An RGB Backlight For The Nokia 5110 LCD

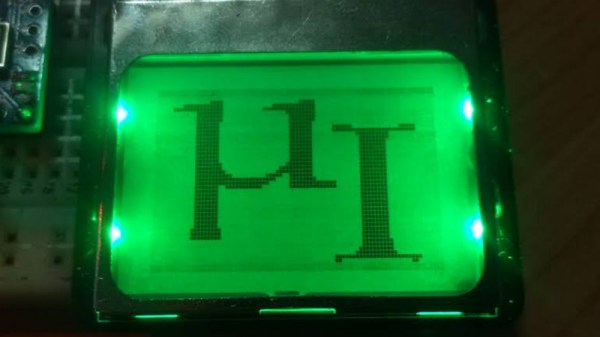
Hardware hackers love the Nokia 5110 LCD. Or at least, they love the clones of it. You can pick up one of these panels for a couple bucks wherever electronic bits and bobs are sold, and integrating it into your project is a snap thanks to all the code and documentation floating around out there. But while it might be cheap and reliable, it’s not a terribly exciting component.

Which is perhaps why [Miguel Reis] thought he’d spruce it up a bit with an RGB backlight. While we’ll admit that this hack is mostly about looking cool, it’s not entirely without practical application. If your gadget experiences some kind of fault, having it flash the LCD bright red is sure to get somebody’s attention from across the room.

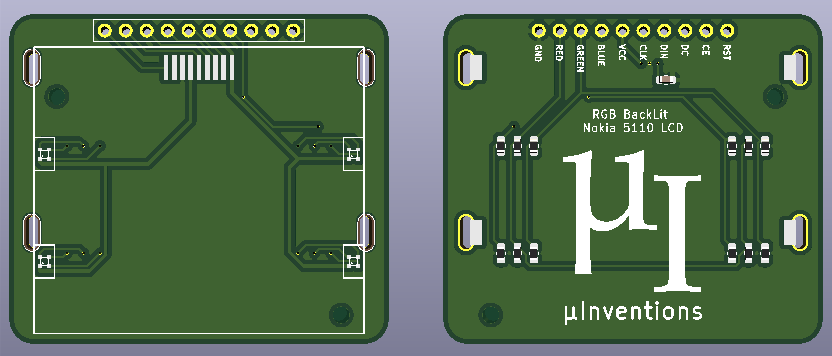
The board itself is very straightforward, with four MHPA1010RGBDT RGB LEDs and a couple of passives to keep them happy. The Nokia 5110 LCD module just pops right on, and beyond the extra pins added for the three LED colors, gets wired up the same as before. The backlight LEDs just need a few spare GPIO pins on your microcontroller to drive them, and away you go.

[Miguel] is currently selling his RGB version of this iconic LCD on Tindie for only a couple dollars more than the standard version, so it looks like a pretty cheap way to add a little bling to your next project. (Tindie is owned by Supplyframe, which also owns Hackaday. But they didn’t put us up to adding this link.)

A Word Clock You Don’t Have To Actually Build To Enjoy

The great thing about word clocks is that while they all follow the same principle of spelling out the time for you, they come in so many shapes, sizes, and other variations, you have plenty of options to build one yourself. No matter if your craft of choice involves woodworking, laser cutting, PCB design, or nothing physical at all. For [Yasa], it was learning 3D modeling combined with a little trip down memory lane that led him to create a fully functional word clock as a rendered animation in Blender.

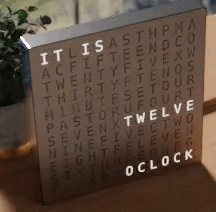
Inspired by the picture of a commercially available word clock, [Yasa] remembered the fun he had back in 2012 when he made a Turkish version for the Pebble watch, and decided to recreate that picture in Blender. But simply copying an image is of course a bit boring, so he turned it into an actual, functioning clock by essentially emulating a matrix of individually addressable LEDs using a custom texture he maps the current time to it. And since the original image had the clock positioned by a window, he figured he should have the sun move along with the time as well, to give it an even more realistic feel.

Of course, having the sun situation in real-time all year round would be a bit difficult to render, so [Yasa] choose to base the scene on the sun during spring equinox in his hometown Stockholm instead. You can see the actual clock showing your local time (or whichever time / time zone you set your device to) on his website, and his write-up is definitely a fun read you should check out if you’re interested in all the details or 3D modeling in general — or just to have a look at a time lapse of the clock itself. As he states, the general concept could be also used to model other word clocks, so who knows, maybe we will see this acrylic version or a PCB version of it in the future.

The Cheap Way To Glitch An STM8 Microcontroller

Reverse engineering or modifying a device often requires you to access the firmware stored on a microcontroller. Since companies are usually not fond of people who try to peek into their proprietary data, most commercial devices are readout protected. [rumpeltux] ran into this problem when he tried to dump the firmware on an HC-12 wireless serial communication module for yet undisclosed reasons. Hacking into the device was a challenge that he gladly accepted and in the end, he succeeded by building a low-cost setup for voltage glitching.

Voltage glitching is a form of fault injection that has, e.g., been successfully used to hack the Playstation Vita. It involves the injection of voltage spikes on the power line in order to force the bootloader to skip security checks. The hard thing is trying to find the right shape of the waveform and the best way to inject the signal.

While there are already open-source boards for fault injection like ChipWhisperer, [rumpeltux] chose to build his own setup around an FPGA. By using a cheap EPM240 board, some MOSFET, and a USB-to-Serial converter, the total costs of the glitching setup were under 20 Euros. [rumpeltux] then recorded a larger number of voltage traces on the VCC pin around the reset phase and analyzed the differences. This helped him to pinpoint the best time for injecting the signal and refine the search space. After some unsuccessful attempts to glitch the VCC and GND pins, he got lucky when using one of the voltage regulator pins instead.

Be sure not to miss Samy Kamkar’s talk at Supercon 2019 if you want to know more about hardware attacks or how to eavesdrop on people using a bag of potato chips.

A Reason To Code

My son is just getting to the age that puts him in the crosshairs of all of the learn-to-code toys. And admittedly, we’ve been looking at some of those Logo-like toys where you can instruct a turtle-bot to make a few moves, and then to repeat them. After all, if breaking down a problem into sub-problems and automating the repetition isn’t the essence of programming, I don’t know what is.

But here’s the deal: I think drawing ‘bots are cooler than he does. If you ask a kid “hey, do you want a car that can draw?” that’s actually pretty low on the robot list. I’m not saying he won’t get into it once he’s got a little bit more coding under his belt and he can start to make it do fun things, but by itself, drawing just isn’t all that impressive. He can draw just fine, thank-you-very-much.

Meanwhile, I was making a robot arm. Or rather, I started up on yet another never-to-be-completed robot arm. (Frankly, I don’t know what I would do with a robot arm.) But at least I started with the gripper and wrist. Now that’s pretty cool for a kid, but the programming is waaaay too complicated. So I pulled the brains out and hooked up the servos to an RC plane remote. Just wiggling the thing around, duct-taped to the table, got him hooked. And this weekend, we’re building a remote controlled cherry-picker arm to put on a pole, because cherries are in season. His idea!

So no coding. He’s a little too young anyway, IMO. But silly little projects like these, stored deep in his subconscious, will give him a reason to program in the future, will make it plainly obvious that knowing how to program is useful. Now all I need is a reason to finish up a robot arm project…

Travel Globe Spins You Around Memory Lane

We all have our own preferences when it comes to travel souvenirs — that little something that brings back the memories and feelings of a past holiday every time we look at it, whether it’s the cliché fridge magnet, some local speciality, or just the collection of photos we took. But then there are those journeys that can’t be summarized into a single item and may require a bit more creativity. For [Jonathan], it was last year’s trip around the world that took him and [Maria] to locations all over Europe, Asia, and Oceania, and he found a great way to remember it: an interactive, laser-cut travel globe displaying all the places they went to.

Building a sphere is of course a bit tricky with a laser cutter, so [Jonathan] went for the icosahedron shaped Dymaxion map projection (think of a large d20 dice) and burnt the world onto it. Inside the globe is an ESP8266, an MPU-6050 IMU, and a bunch of LEDs to light up the travel locations using the WLED library. Taking the data from the IMU, he customized the WLED library to determine which way the globe is positioned, and highlights the top-facing location in a different color.

While that would already make a nice souvenir on its own, [Jonathan] didn’t stop here. Using Google’s My Maps service, which lets you create custom maps with own points of interest and have for example photos attached to them, the ESP8266 hosts the travel map also as a web page. Feeding the IMU data to the JavaScript code that’s handling the map API, the globe itself now doubles as an input device to control the virtual map. So whenever the globe is physically rotated to highlight a certain location, the web page’s map is focused to that same location and shows randomly the pictures they have taken there. Check out the video below to see it all in action.

This is a great way to reminisce about a memorable journey even years down the road, and while it may not be flexible to extend, it seems like the kind of trip that deserves a standalone device anyway. Plus, the Dymaxion map is definitely an interesting projection — so here’a a foldable one, just because. And If you like tracking things on a globe, here’s one that shows the location of the ISS.

Continue reading “Travel Globe Spins You Around Memory Lane”

This Iron Man Suit Is A Hacker’s Dream Come True

[Techmaster], like probably a lot of us, was hugely inspired by the engineering wonder that is the Iron Man suit. So, like any good maker, he decided to build his own. [Techmaster’s] social media pages are filled with promotional videos that are sure to get you excited for your next Comic-Con (when you can go in-person of course).

It’s difficult to summarize all the work [Techmaster] has put into his suit in a single post, so we’ll let his social media pages do the talking. From the knuckle launcher to the repulsor and the beloved Arc rector, [Techmaster] is really putting together an impressive set. Now, we’ve seen our fair share of Iron Man-inspired projects here on Hackaday, but [Techmaster’s] designs might be the closest attempt to a full suit with the projectiles to match.

[Techmaster’s] goal is to develop the most realistic Iron Man suit ever, well..other than the original we suppose. Given the dynamic nature of his development process, there aren’t any DIY instructions for the rest of us to follow as of yet (though he does host live streams), so you’ll have to piece together design ideas from his promotional videos.

[Techmaster] might be living the dream a lot of us wish were our realities and we certainly can’t wait to see an official version 1 release. Feel free to support his development if you feel so inclined.

DJing Without The Truckload Of Equipment; Secret Ingredient Is Raspberry Pi

There is a romance to notions of a byegone age of DJing — driving a pair of Technics 1200s dwarfed on either side by the stacks, pumping techno bass through the laser-tinged darkness into a hungry crowd. Even if the reality of early evening Saturday wedding parties playing inoffensive crooners for the 50-somethings didn’t really live up to it.

The trouble with DJing old-style was that it required extensive logistics to shift all that equipment not to mention a record collection, so the modern DJ for whom everything has gone digital is truly lucky in the scale of their operation. For some people even that is too much to carry, and [Dennisdebel] has minimised a DJ rig to the next level, by running the popular Mixxx DJing software on a Raspberry Pi hooked up to his DJ controller. You can see the result in the video below the break.

This is more of a HOWTO for installing a set of software packages on the Pi to achieve an aim rather than a special hardware hack, but as he points out the interest lies in regaining control of the process. The DJ space is dominated by commercial offerings increasingly laden with DRM and proprietary cloud offerings, so this represents a means of taking back control of the process. If it’s not hacky enough, you can always add a home-made DJ mixing station.

Continue reading “DJing Without The Truckload Of Equipment; Secret Ingredient Is Raspberry Pi”