Syringes Put The Squeeze On This Mini Drill Press

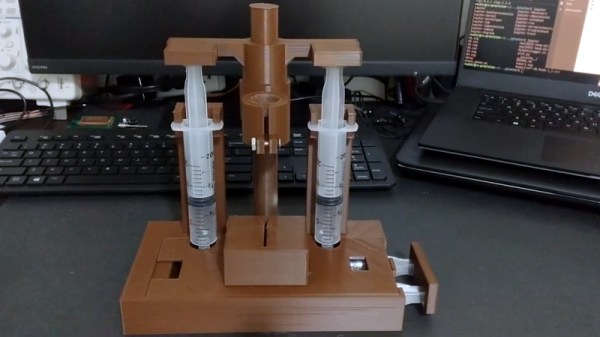
If you’re making your own PCBs for through-hole projects at home, getting the board etched is only half the battle; you’ve still got to drill all those little holes. It’s a tedious process, and if you’ve got a lot of them, doing them freehand with a drill just isn’t going to cut it. Which is why [Ruchir Chauhan] built this tiny 3D printed drill press.

This design is actually interesting for a number of reasons. The fact that it’s primarily 3D printed is a big one, though of course it’s not the first time we’ve seen that. We also like the minimal part count and low-cost, which is sure to appeal to those looking to produce PCBs on a budget. But the most impressive feature has to the hydraulic system [Ruchir] has come up with to actually do the drilling.

Rather than pulling an arm to lower the bit towards the work piece, a system utilizing four syringes, some water, and a bit of tubing is used to pull the tool down. This might seem extravagant, but if you’ve got a lot of holes to drill, this design is really going to save your arms. This method should also give you more consistent and accurate results, as you won’t be putting any torque on the structure as you would with a manually operated press.

[Ruchir] doesn’t offer much in the way of instructions on the project’s Hackaday.io page, but once you print out all of the provided STLs and get your syringes ready to go, the rest should be fairly self explanatory. Personally we might have added a smooth steel rod in there to make sure the movement is nice and straight, but we can see the appeal of doing it with a printed part to keep things cheap.

Looking for more ideas? If you’re after something a bit larger we might suggest this one made from PVC pipes, and this 3D printed desktop press would look good on anyone’s bench. Just don’t blame us if your arms get tired.

Continue reading “Syringes Put The Squeeze On This Mini Drill Press”

Reviving A DOA Smart Bulb With Custom Firmware For Its ESP8266

There are some incredibly cheap WiFi smart bulbs on the market these days, but as is often the case, you tend to get what you pay for. When [Viktor] took delivery of his latest bargain basement bulb, the thing didn’t even work. So much for Quality Assurance. On the plus side, it was a great excuse to pop it open and replace the firmware.

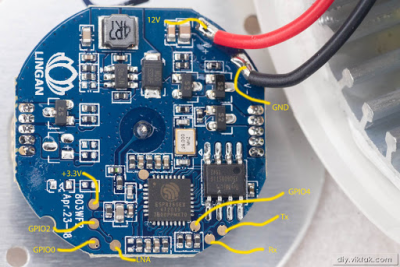
For anyone wondering, [Viktor] never actually figured out why the bulb didn’t work. Its ESP8266-based control board was getting power, and data was getting spit out of the serial port when he connected it to the computer (although he never got the communications settings right to actually see what it was saying). But he also didn’t care much; once he confirmed that the hardware was good, he just uploaded the custom firmware he’d previously developed for another ESP8266 bulb.

Of course, it wasn’t quite that easy. The chances that both bulbs would have used the same GPIO pins to control the red, green, blue, and white LEDs were pretty slim. But after some testing and modifications to the code, he was able to fire them up. The other issue was a bit trickier, as it turned out the bulb’s flash chip was too small to hold his firmware’s web configuration pages. So he had to break out the hot air gun and replace the SPI flash chip with something a bit roomier. We suppose he could have just made smaller web pages… but where’s the fun in that?

Even with the chip swap, this looks a lot easier than building your own smart bulbs from scratch. With so many cheap ESP8266 bulbs on the market, it seems there’s never been a better time to code your own home lighting solution.

Bathymetric Map Uses Edge Lighting To Stunning Effect

A bathymetric map is one concerning the floor or bottom of a body of water. It’s the wet equivalent of a topographical map. Combine this with humanity’s inherent taste in seaside real estate, and they can be quite attractive when done correctly. We’d say this effort from [pubultrastar] hits the mark.

Created as a commission piece, the subject of the map is Tichigan Lake in Wisconsin, USA. Made on a Glowforge laser cutter, the design is built of layers of lasercut wood stacked up to represent the natural contours of the bottom of the lake. There’s also a layer of acrylic included, to which special standoffs are fitted. These standoffs hide blue LEDs inside, which allow the acrylic to be edge lit without the LEDs themselves being visible.

The final effect is impressive, with the blue water contrasting artfully with the laser-engraved wood front panel when the lights are turned on. It’s an excellent conversation piece, particularly for those with a waterfaring bent. It’s not the first bathymetric map we’ve featured, either, with this book serving as a particularly stunning example.

Slothbot Lives Up To Its Name

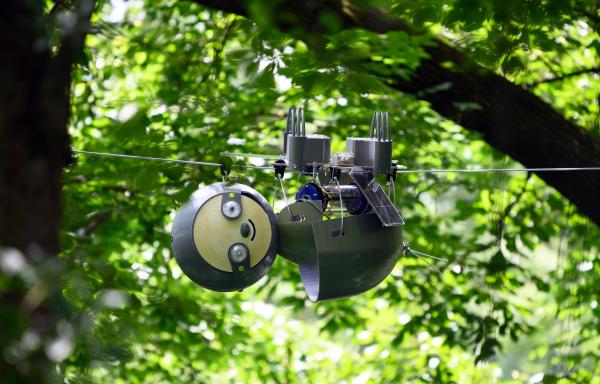
For moving about in the real world, robots can crawl along the ground or take to the sky. Both options have disadvantages, with obstacles being a problem on the ground and flying being very energy intensive. What we don’t often see are robots that move along aerial cables, which can offer the best of both worlds for certain use cases. Taking inspiration from a sloth’s slow and efficient movement through the trees, researchers from Georgia Tech created a robot to crawl slowly along a cable network and monitor the world around it, and of course named it Slothbot.

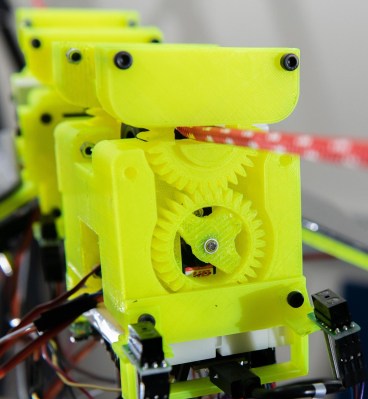
The cable switching mechanism

Slothbot trades speed for efficiency, letting it operate for very long periods on solar power alone. It does require the set up and maintenance of a cable network, but that brings the advantage of no obstacles, and the ability to stop and recharge. To us the most interesting feature is the cable switching mechanism, that allows it to navigate its way along a web of interconnected cables.

Ring gears with a section removed hold the upper part of the pulley mechanism, but can rotate it’s opening to the left or right to allow an interconnecting cable to pass through,  The body is in two pieces, with an actuated hinge in the middle to allow it to turn onto a different cable section. Each section of the body also has a powered wheel which pushes up against the cable and moves the robot along slowly. Not surprisingly, researchers say that making the cable switching mechanism reliable is the biggest challenge. It does look like the current design would not work well with thicker cable joints. Watch the video after the break for a better look at the mechanism Continue reading “Slothbot Lives Up To Its Name”

DIY Baby MIT Cheetah Robot

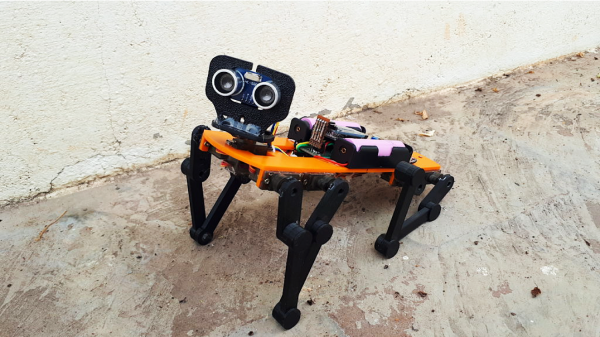
3D printers have become a staple in most makerspaces these days, enabling hackers to rapidly produce simple mechanical prototypes without the need for a dedicated machine shop. We’ve seen many creative 3D designs here on Hackaday and [jegatheesan.soundarapandian’s] Baby MIT Cheetah Robot is no exception. You’ve undoubtedly seen MIT’s cheetah robot. Well, [jegatheesan’s] hack takes a personal spin on the cheetah robot and his results are pretty cool.

The body of the robot is 3D printed making it easy to customize the design and replace broken parts as you go. The legs are designed in a five-bar linkage with two servo motors controlling each of the four legs. An additional servo motor is used to rotate an HC-SR04, a popular ultrasonic distance sensor, used in the autonomous mode’s obstacle avoidance mechanism. The robot can also be controlled over Bluetooth using an app [jegatheesan] developed in MIT App Inventor.

Overall, the mechanics could use a bit of work — [jegatheesan’s] baby cheetah probably won’t outpace MIT’s robot any time soon — but it’s a cool hack and we’re looking forward to a version 3. Maybe the cheetah would make a cool companion bot?

Continue reading “DIY Baby MIT Cheetah Robot”

Finding A Secret Message From A Gaming Legend

Satoru Iwata is perhaps best remembered for leading Nintendo through the development of the DS and Wii, two wildly successful systems which undeniably helped bring gaming to a wider and more mainstream audience. But decades before becoming the company’s President in 2002, he got his start in the industry as a developer working on many early console and computer games. [Robin Harbron] recently decided to dig into one of the Iwata’s earliest projects, Star Battle for the VIC-20.

Finding the message was easy, if you knew were to look.

It’s been known for some time that Iwata, then just 22 years old, had hidden his name and a message in the game’s source code. But [Robin] wondered if there was more to the story. Looking at the text in memory, he noticed the lines were actually null-terminated. Realizing the message was likely intended to get printed on the screen at one point during the game’s development, he started hunting for a way to trigger the nearly 40 year old Easter Egg.

As it turns out, it’s hidden behind a single flag in the code. Just change it from 0 to 1, and the game will display Iwata’s long-hidden credit screen. That proved the message was originally intended to be visible to players, but it still didn’t explain how they were supposed to trigger it during normal game play.

That’s where things really get interesting. As [Robin] gives us a guided tour through Star Battle’s inner workings, he explains that Iwata originally intended the player to hit a special combination of keys to tick over the Easter Egg’s enable flag. All of the code is still there in the commercial release of the game, but it’s been disabled. As Iwata’s life was tragically cut short in 2015 due to complications from cancer, we’ll perhaps never know the reason he commented out the code in question before the game was released. But at least we can now finally see this hidden message from one of gaming’s true luminaries.

Last time we heard from [Robin], he’d uncovered a secret C64 program hidden on a vinyl record. With his track record so far, we can’t wait to see what he digs into next. Continue reading “Finding A Secret Message From A Gaming Legend”

Digi-Key Hacks UV Into Conveyor Line To Protect Warehouse Staff

No doubt that every hacker has already heard of Digi-Key, the electronic component distributor that makes it just as possible to order one of something as it is to order a thousand of it. As an essential business, Digi-Key has been open during the duration of the lockdown since they support critical manufacturing services for virtually every industry on the planet including the medical industry.

Ensuring their workforce stays healthy is key to remaining open and as part of their efforts they hacked together a nice addition to their sanitation regime. They use around 8,000 plastic totes to transport components around the distribution center and devised a way to sanitize tote coming in from the receiving area using a UV light tunnel. From their sanitation plan we can see this is in addition to the fogging system (likely a vaporized hydrogen peroxide system) used to regularly sanitize the totes passing throughout the warehouse.

They developed a UV light tunnel that wraps around the conveyor rollers. The design includes a sensor and a timer to control when and how long the UV lights are on. The totes are a frequent touch point for employees, and running incoming shipments through the UV light tunnel helps decrease the chance of exposure.

Thinking of using UV as a sanitation tool? Make sure you do your research on the wavelengths you need and vet the source of critical components. [Voja] ran into UV lamps that were anything but germicidal.