AVR Multi-Tool Learns The Latest Tricks

Like many of us who fiddle with microcontrollers, [Mike] and [Brian] often found themselves using an ISP programmer and a USB-to-serial adapter. But when they started working on the latest generation of ATtiny chips, they found themselves in need of a Unified Program, and Debug Interface (UPDI) programmer as well. So they decided to wrap all three functions into one handy open hardware gadget.

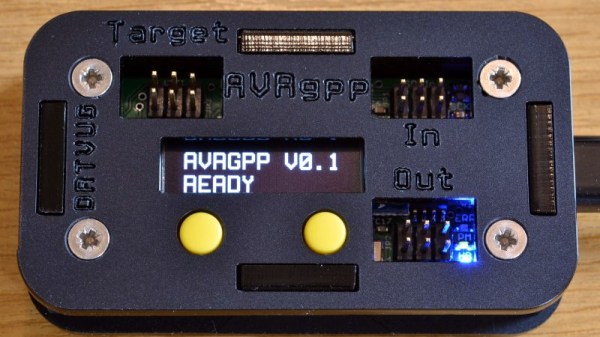
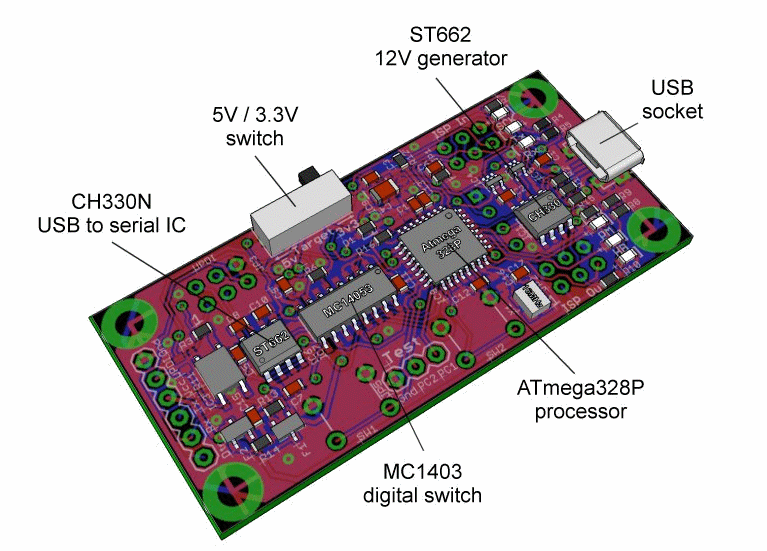
They call their creation the AVR General Purpose Programmer, or AVRgpp for short. It runs on an ATmega328P with a Pro Mini bootloader, which means that the programmer itself is fully compatible with the Arduino IDE. USB-to-serial capability is provided by a CH330N, and a MC14053 digital switch IC is used to select between talking to the AVRgpp’s onboard MCU or the target device.

A 128 x 32 I2C OLED and two push buttons are used to select the device’s current mode, and there’s a physical switch to select between 5 V or 3.3 V power for the target. There’s also a ST662 12 V regulator, as UPDI targets occasionally need a high voltage pulse to switch into programming mode. Everything is packaged up in a pocket-sized laser cut enclosure that you can easily toss in your bag.

[Mike] and [Brian] say they are considering putting the AVRgpp into small scale production if there’s enough interest, so let them know if you’d like to get one without having to build it yourself.

Inputs Of Interest: X-Bows Ergo-Mechanical Keyboard

Okay, let’s just get this out of the way up front, shall we? This ergonomic mechanical keyboard was a free sample offered to me by X-Bows. They contacted me after I expressed interest in trying one in the comments of my post about the Kinesis Advantage. I had my doubts about this keyboard as far as my own personal ergonomic needs go, which are admittedly on the extreme side. TL;DR: I won’t be abandoning my curvy girls anytime soon. But I will say that I’m definitely impressed by the X-Bows.

X-Bows was founded by a doctor who saw a lot of RSI issues in programmers and writers and decided to take matters into his own hands. The keyboard was born on Kickstarter in 2017 and now comes in three models. They sent me the mid-range model called The Knight, which retails for $249, but seems to be on permanent sale for $199. The top-of-the-line Knight Plus has a magnetic, detachable 10-key that can attach to either side. Continue reading “Inputs Of Interest: X-Bows Ergo-Mechanical Keyboard”

PHONK – A Hacker’s Fun Shortcut To Android Programming

As the common myth goes, the average human utilizes only about 10% of the true potential their smartphone is capable of. Especially when it comes to electronics projects, it seems that we often overlook how we can integrate and take advantage of their functionality here. Maybe that’s not a big surprise though — while it isn’t rocket science, getting into mobile development certainly has its hurdles and requires a bit of commitment. [Victor Diaz] figured there had to be a better way, so he went on and created PHONK, the self-contained creative scripting toolbox for Android.

PHONK is installed like any other app, and allows rapid prototyping on your Android device via JavaScript by abstracting away and simplifying the heavily boilerplated, native Java parts. So instead of setting up an app from scratch with all the resources defining, UI design, activity and application lifecycle management — not to mention the Android development environment itself — PHONK takes care of all that behind the curtain and significantly reduces the amount of code required to achieve the task you’re actually interested in. In case you’re worrying now that you have to actually program on your phone, well, you can, which can definitely come in handy, but you don’t have to.

Once the app is opened, a web server is started, and connecting to it from any modern browser within the same WiFi network presents you the PHONK development environment with everything you need: editor, file browser, console, and API documentation. You can write your code in the browser, and pressing the run button will execute it straight on the device then. As everything is self-contained within the app itself, no additional software is required, and you can start right away by exploring the set of provided examples that showcase everything supported so far: sensor interaction, BLE server and client, communication protocols like MQTT or WebSockets, OpenStreetMap maps, and even integration with Pure Data and Processing. Attach a USB OTG cable and you can program your Arduino, have serial communication, or interface a IOIO board. You can even connect a MIDI controller.

This is really impressive work done by [Victor], and a lot of attention to detail went into the development. If you have an old Android phone collecting dust somewhere, this would be a great opportunity to revive it and build something with it. And as [Victor] writes on the project’s GitHub page, he’s always curious what people will come up with. If you’re thinking about building a mobile sensor lab, or want to learn more about the sensors inside your phone, have a look at the 36C3 talk about phyphox.

Number Crunching GPS For The DIYer

Many of us have had cause to add GPS to a project, whether it’s because we need an accurate timebase or just want to know where the bloody thing is. Normally, this consists of plugging in a cheap module and making sure the antenna has a good view of the sky. [Mike] wanted to dig deeper, however, and figure out just what goes into decoding a GPS signal and calculating a location fix.

[Mike]’s investigation combined several avenues of investigation. In terms of decoding live radio signals, he selected a KiwiSDR software defined radio. Combined with a Digilent Nexys 2 FPGA, it was now possible to get live data off the air and into the PC quickly for decoding. In concert with this, [Mike] used a sample of raw GPS data captured in Nottingham, UK in order to test his code. After much experimentation, [Mike] was able to get the data decoded with 700 lines of C code. Decoding three minutes worth of data took all night, but further development allowed things to be sped up over 200 times. For the curious, the code is up on Github to convert raw ADC samples into actual location fixes.

Armed with the wealth of resources online and the right hardware, [Mike] was sucessfully able to achieve his goal, and figure out just precisely where his house is, to boot. As a bonus, the whole project was inspired by a similar project posted in these very pages back in 2013! If you’re working on your own satellite-based projects, be sure to drop us a line.

Merlin Pi Camera Is A Photographic Wizard

[Mister M] was quite excited to mess around with the new high-quality Raspberry Pi camera and build a project around it. Unfortunately, lockdown forced him to rummage through old tech on hand rather than hunting down a fresh eye-catching enclosure out in the wild. We spent many hours playing with one of these Merlin toys whenever six AA batteries could be spared to feed the matrix of hungry 1970s LEDs, so we would argue that [Mister M] should explore his personal stores more often.

Before we forget — it’s cool; this one was already broken. The Merlin Pi camera’s wizardry works on two levels — [Mister M] can take still pictures and record video through the GUI he built for the touchscreen, or go retro and use the little push buttons nestled in the Merlin control panel. [Mister M] worked a Dropbox uploader into the GUI, so he doesn’t have to worry about filling up the SD card with backyard bird movies in the middle of filming them.

[Mister M] says he accidentally warped the Merlin’s battery cover while trying to soak away the sticker and had to use a piece of acrylic. Although it’s unfortunate, we think it may have been for the better given the huge hole necessitated by the camera lens. Check out the build video after the break.

If you hadn’t heard about this beefy new camera module until now, our own [Jenny List] brought it into focus a couple months back and more recently had a go at hacking with it herself.

Continue reading “Merlin Pi Camera Is A Photographic Wizard”

3D Printing Damascus-like Steel

Recreating Damascus steel remains a holy grail of materials science. The exact process and alloys used are long ago lost to time. At best, modern steelworking methods are able to produce a rough visual simulacra of sorts that many still consider to be pretty cool looking. Taking a more serious bent at materials science than your average knifemaker, a group of scientists at the Max Planck institute have been working to create a material with similar properties through 3D printing.

The technology used is based on the laser sintering of metal powders. In this case, the powder consists of a mixture of iron, nickel and titanium. The team found that by varying the exact settings of the laser sintering process on a layer-by-layer basis, they could create different microstructures throughout a single part. This allows the creation of parts that are ductile, while remaining hard enough to be sharpened – a property which is useful in edged weapons like swords.

While the process is nothing like that used by smiths in Damascus working with Wootz steel, the general idea of a metal material with varying properties throughout remains the same. For those eager to get into old-school metalwork, consider our articles on blacksmithing. For those interested in materials research, head to a good university. Or, better yet – do both!

[Thanks to Itay for the tip, via New Atlas]

Pop Open Your Neighbor’s Front Door With 12 Volts

Many in the community are skeptical about the security of commercial smart home devices, and for good reason. It’s not like you have to look far to find examples of poorly implemented systems, or products that are abandoned by their manufacturers and left without critical security updates. But the design flaw in this video doorbell really drives home how little thought some companies give to their customer’s security.

As explained by [Savvas], and demonstrated in the video after the break, all you need to do if you want to get into a home equipped with one of these vulnerable door bells is pop the unit off the wall and hit it with 12 volts DC.

Incredibly, the terminals that connect to the electronic lock inside the house are completely accessible on the back of the unit. They even labeled them, on the off-chance the robber forgets which wire is which. It’s not even as though the thing is held on with some kind of weird security screws, it’s just a garden variety Phillips.

In the video, [Savvas] even shows he used a little gadget attached to a QuickCharge USB battery bank to get a portable 12 VDC source suitable for tripping these locks. Which, interestingly enough, is based on a trick he read about in the Hackaday comments. Something to consider while penning your next comment on these storied pages.

[Savvas] says he’s reached out to the company to get their side of the story, but so far, hasn’t received a response. We aren’t surprised, this is a fundamental flaw in the product’s execution. Clearly they wanted to make an easy to install device that doesn’t require any additional electronics in the house, and this is the inevitable end result of that oversimplification. All the more reason to roll your own smart doorbell.

Continue reading “Pop Open Your Neighbor’s Front Door With 12 Volts”