Quality Upgrades Give Old Synth New Lease On Life

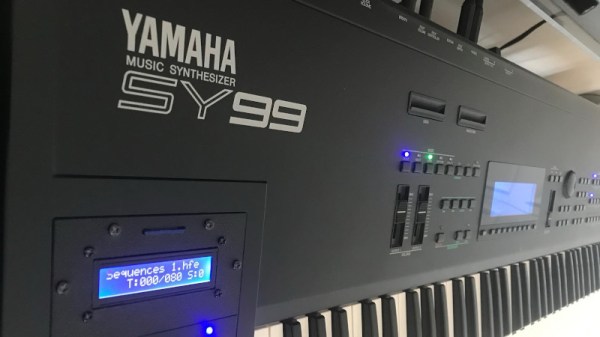
Technology marches on at a rapid pace, but in many fields much love remains for older hardware. While still highly capable, there’s often room for improvement thanks to components made available in the intervening years. After longing for his SY-77 synthesiser of the 90s, [Mark] sourced a tired SY-99, the next model up in the line – and set to work on some upgrades.

The SY-99 relied on floppy disks for storage, but the mechanical drives are now difficult to maintain, to say nothing of the unreliability of floppy media. [Mark] installed a SD Card HXC floppy emulator instead, using a Sparkfun SD breakout to neatly install the card slot in the synth’s case. The tired LCD was replaced with a newer model using the same controller, with an LED backlight proving a nice upgrade over the original EL unit.

Additionally, [Mark] realised that there was scope to create his own upgrade modules with off-the-shelf SRAM chips. This proves far cheaper than sourcing second-hand Yamaha stock off eBay, and is readily achievable by anyone with a basic understanding of digital logic. The ICs can be had for a few dollars, versus well over $50 for the original cards – if you can even find them. Some labor is involved, but it’s a lot less painful to the wallet.

[Mark]’s work is a great example of how hardware that was once prohibitively expensive can be given greater functionality at a lower cost thanks to new technology. We’ve seen other synths modded too, like this Korg Monotron. If you’ve been tinkering away in a keyboard yourself, be sure to let us know!

[Thanks to CRJEEA] for the tip]

Writing Android Apps In C, No Java Required

Older Android devices can be had for a song, and in many cases are still packing considerable computational power. With built in networking, a battery, and a big touch screen, they could easily take the place of a Raspberry Pi and external display in many applications. As it so happens, Google has made it very easy to develop your own Android software. There’s only one problem: you’ve got to do it in Java.

Looking to get away from all that bloat and overhead, [CNLohr] set out to see what it would take to get 100% C code running on an Android device. After collecting information and resources from the deepest and darkest corners of the Internet, he found out that the process actually wasn’t that bad. He’s crafted a makefile which can be used to get your own C program up and running in seconds.

We mean that literally. As demonstrated in the video after the break, [CNLohr] is able to compile, upload, and run a C Android program in less than two seconds with a single command. This rapid development cycle allows you to spend more time on actually getting work done, as you can iterate through versions of your code almost as quickly as if you were running them on your local machine.

[CNLohr] says you’ll still need to have Google’s Android Studio installed, so it’s not as if this is some clean room implementation. But once it’s installed, you can just call everything from his makefile and never have to interact with it directly. Even if you don’t have any problem with the official Android development tools, there’s certainly something to be said for being able to write a “Hello World” that doesn’t clock in at multiple-megabytes.

Continue reading “Writing Android Apps In C, No Java Required”

Blinkenlights For Your Parallel Port

Most modern equipment is connected over USB, and generally speaking we’re all the better for it. But that’s not to say there aren’t some advantages to using serial and parallel ports. For example, the slower and less complex protocols can be a bit easier to debug when devices aren’t communicating, which [Jeremy Cook] demonstrates in his latest project.

Looking to troubleshoot some communications problems he was having between his computer and CNC router, [Jeremy] came up with a handy little gadget that will allow him to visualize data passing through each pin of the parallel port in real-time. Even from across the room he can tell at a glance if communication is active, and with a keen eye, determine if he’s getting bi-directional traffic or not.

From a technical standpoint, this is a pretty simple project. The custom PCB is essentially just a pass-through, with an array of 3 mm LEDs and matching 10K resistors hanging off the data lines. But [Jeremy] found it to be an excellent excuse to brush up his KiCad skills. As he explains in the video after the break, this project certainly won’t impress the folks that do PCB design on a daily basis; but if you’re still learning the ropes, these are precisely the kind of projects you should be looking for.

Before any of you say it in the comments, we already know devices like this are available commercially for a few bucks. But that’s hardly the point. Things would be awfully slow around these parts if we disregarded any project that had a commercial alternative.

Continue reading “Blinkenlights For Your Parallel Port”

CircuitPython Macro Pad Is One Build That Won’t Bite

Have you built a macro keypad yet? This is one of those projects where the need can materialize after the build is complete, because these things are made of wishes and upsides. A totally customized, fun build that streamlines processes for both work and play? Yes please. The only downside is that you actually have to like, know how to build them.

Suffer no more, because [Andy Warburton] can show you exactly how to put a macro pad together without worrying about wiring up a key switch matrix correctly. [Andy]’s keypad uses the very affordable Seeeduino Xiao, a tiny board that natively runs Arduino code. Since it has a SAMD21 processor, [Andy] chose to run CircuitPython on it instead. And lucky for you, he wrote a separate guide for that.

Practicalities aside, the next best thing about macro keyboards is that they can take nearly any shape or form. Print a case from Thingiverse as [Andy] did, or build it into anything you have lying around that’s sturdy enough to stand up to key presses and won’t slide around on your desk.

No room left on the desk? Build a macro foot stool and put those feet to work.

Via r/circuitpython

Aladdin Lamp Shoots Flames With A Snap Of Your Fingers

Despite their dangers, even Marie Kondo would not convince us to abandon flamethrower projects because they literally spark joy in us. To make this flame shooting Aladdin lamp [YeleLabs] just used a 3D printer and some basic electronics.

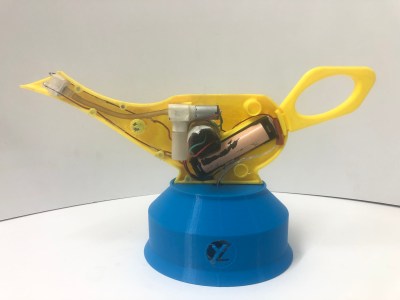
The lamp body consists of two 3D-printed halves held together by neodymium magnets. They house a 400 kV spark generator, a fuel pump plus tank, and a 18650 Li-ion battery. The fuel pump is actually a 3 V air pump but it can also pump liquids at low pressure. As fuel [YeleLabs] used rubbing alcohol that they mixed with boric acid to give the flame a greenish tint. The blue base at the bottom of the lamp houses the triggering mechanism which magically lights up the lamp when you snap your fingers. This is achieved by a KY-038 microphone module and KY-019 relay module connected to a Digispark ATTiny85 microcontroller. When the microphone signal is above a certain threshold the relay module will simultaneously switch on the spark generator and fuel pump for 150 ms.

Although they proclaim that the device is a hand sanitizer it is probably safer to stick to using soap. The project still goes on the list of cool flamethrower props right next to the flame shooting Jack-o-Lantern.

Video after the break.

Continue reading “Aladdin Lamp Shoots Flames With A Snap Of Your Fingers”

The Mark 14 Torpedo — When Just About Everything Goes Wrong, Even The Testing

I am a fan of the saying that those who don’t know history are doomed to repeat it. After all, humans have been building things for a number of centuries and we should learn from the engineers of the past. While you can learn a lot studying successes, sometimes — maybe even most of the time — we learn more from studying failure. The US Navy’s Mark 14 torpedo certainly has a lot to teach us.

The start of the story was the WWI-era Mark 10 torpedo which was fine for its day, but with faster destroyers and some additional data about how to best sink enemy ships it seemed necessary to build a new torpedo that would be faster, carry more explosive charge, and use a new method of detonation. Work started in 1931 with a $143,000 budget which may sound laughable today, but that was a lot of coin in the 1930s. Adjusted for inflation, that’s about $2.5 million.

Continue reading “The Mark 14 Torpedo — When Just About Everything Goes Wrong, Even The Testing”

Printed Jig Is A Welding Rig

[NixieGuy] was scheming to build robots with cable-driven joints when the pandemic hit. Now that component sourcing is scarce, he’s had to get creative when it comes to continuous cables. These cables need to be as seamless as possible to avoid getting caught on the pulleys, so [Nixie] came up with a way to weld together something he already has on hand — lengths of .45mm steel cable.

The 3D printed jig is designed to be used under a digital microscope, and even clamps to the pillar with screws. Another set of screws holds the two wires in place while they are butt welded between two pieces of copper.

[Nixie] adds a spot of solder paste for good measure, and then joins the wires by attaching his bench power supply set to 20V @ 3.5A to the copper electrodes. We love that [Nixie] took the time to streamline the jig design, because it looks great.

This just goes to show you that great things can happen with limited resources and a little bit of imagination. [Nixie] not only solved his own supply chain problem, he perfected a skill at the same time. If you don’t have a bench supply, you might be able to get away with a battery-powered spot welder, depending on your application.