Custom Tool Helps Hakko Set Threaded Inserts

When the tool you need doesn’t exist, you have to make it yourself. Come to think of it, even if the tool exists, it’s often way more fun to make it yourself. The former situation, though, is one that [Sean Hodgins] found himself in with regard to threaded inserts. Rather than suffer from the wrong tool for the job, he machined his own custom threaded insert tool for his Hakko soldering iron.

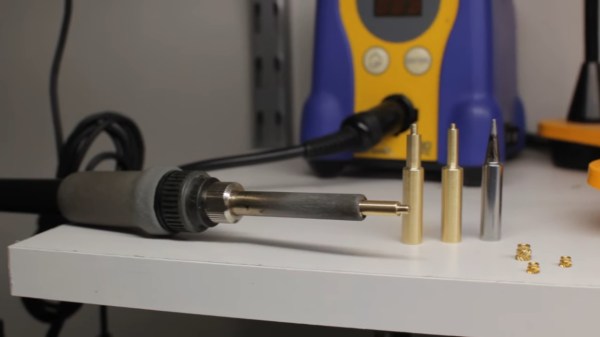
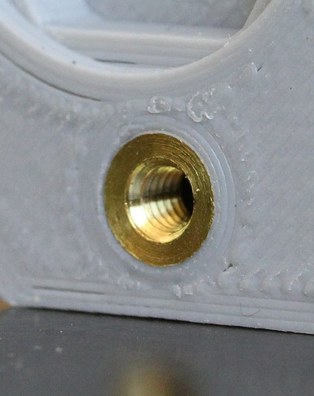
Like many of us, [Sean] has embraced the use of heat-set threaded inserts to beef up the mechanical connections on his 3D-printed parts. [Sean] dedicated a soldering iron to the task, equipping it with a tip especially for the job. But it was the flavor of iron proverbially known as a “fire stick” and he found that this iron was too hot for PLA prints. As the new owner of a lathe, he was able to make quick work of the job using a piece of brass rod stock. Luckily, Hakko tips just slip on the heating element, so no threading operations were needed. [Sean] made insert tips for multiple sized inserts, and the results speak for themselves.

If you haven’t tried these out yet, check out [Joshua Vasquez’s] excellent guide on heat-set inserts. You’ll find this guide to the relative merits of the different types useful when ordering inserts. And if you’ve got the itch to buy a lathe now, we’ve got you covered there too.

Continue reading “Custom Tool Helps Hakko Set Threaded Inserts”

NVIDIA Announces $59 Jetson Nano 2GB, A Single Board Computer With Makers In Mind

NVIDIA kicked off their line of GPU-accelerated single board computers back in 2014 with the Jetson TK1, a $200 USD development system for those looking to get involved with the burgeoning world of so-called “edge computing”. It was designed to put high performance computing in a small and energy efficient enough package that it could be integrated directly into products, rather than connecting to a data center half-way across the world.

The TK1 was an impressive piece of hardware, but not something the hacker and maker community was necessarily interested in. For one thing, it was fairly expensive. But perhaps more importantly, it was clearly geared more towards industry types than consumers. We did see the occasional project using the TK1 and the subsequent TX1 and TX2 boards, but they were few and far between.

Then came the Jetson Nano. Its 128 core Maxwell CPU still packed plenty of power and was fully compatible with NVIDIA’s CUDA architecture, but its smaller size and $99 price tag made it far more attractive for hobbyists. According to the company’s own figures, the number of active Jetson developers has more than tripled since the Nano’s introduction in March of 2019. With the platform accessible to a larger and more diverse group of users, new and innovative applications for machine learning started pouring in.

Cutting the price of the entry level Jetson hardware in half was clearly a step in the right direction, but NVIDIA wanted to bring even more developers into the fray. So why not see if lightning can strike twice? Today they’ve officially announced that the new Jetson Nano 2GB will go on sale later this month for just $59. Let’s take a close look at this new iteration of the Nano to see what’s changed (and what hasn’t) from last year’s model.

Continue reading “NVIDIA Announces $59 Jetson Nano 2GB, A Single Board Computer With Makers In Mind”

Making Music With A Go Board Step Sequencer

Ever wonder what your favorite board game sounds like? Neither did we. Thankfully [Sara Adkins] did, and created a step sequencer called Let’s Go that uses the classic board game Go as input.

In the game Go, two players place black and white tokens on a grid, vying for control of the board. As the game progresses, the configuration of game pieces gets more complex and coincidentally begins to resemble Conway’s Game of Life (or a weird QR Code). Sara saw music in the evolving arrangement of circles and transformed the ancient board game into a modern instrument so others could hear it too.

To an observer, [Sara’s] adaptation looks fairly indistinguishable from the version played in China 2,500 years ago — with the exception of an overhead webcam and nearby laptop, of course. The laptop uses OpenCV to digitize the board layout. It feeds that information via Open Sound Control (OSC) into popular music creation software Max MSP (though an open-source version could probably be implemented in Pure Data), where it’s used to control a step sequencer. Each row on the board represents an instrumental voice (melodic for white pieces, percussive for black ones), and each column corresponds to a beat.

Every new game is a new piece of music that starts out simple and gradually increases in complexity. The music evolves with the board, and adds a new dimension for players to interact with the game. If you want to try it out yourself, [Sara] has the project fully documented on her website, and all of the code is available on GitHub. Now we’re just left wondering what other games sound like — [tinkartank] already answered that question for chess, but what about Settlers of Catan?

Continue reading “Making Music With A Go Board Step Sequencer”

Minimal TinyAVR 0 Programming

When [Alain] wanted to use some of the new TinyAVR 0 chips — specifically, the Attiny406 — it seemed overkill to use the Windows IDE. There are plenty of sources of information on programming other AVR chips using simple command line tools, but not for these newer 0-series parts which use a new programming protocol known as UPDI. That led to a deep diving into how to program a TinyAVR 0 with a text editor, makefile, and USB-to-serial cable.

The Attiny406 has 4K of flash, 256 bytes of RAM and can run at 20 MHz with no external clock. You might think programming would be similar to a regular AVR part, but these tiny devices use UPDI (Unified Programming and Debug Interface) which uses 3 pins for programming. Older devices used different protocols.

It is very easy to create a UPDI programmer. A USB to logic-level serial cable and a 4.7K resistor is all it takes. There’s Python code that knows how to drive the protocol, too. You can also use the logic-level serial port on the Raspberry Pi with some device tree modifications explained in the code’s documentation.

[Alain] made a nice breakout board for the device. It fits a breadboard, allows for 5V or 3.3V operation, and has an LED and switch. Nothing fancy, but handy. Once you know how to ship a hex file to the chip, the rest is pretty standard. While the AVR version of gcc doesn’t cross-compile for the ATTiny out of the box, there is a device pack from Microchip that enables that feature.

The trend is to go to bigger processors, not smaller, but when you need to cram something in a small space, save a few pennies per unit, or draw very little power, these tiny processors can be just the ticket. The processors may be small, but if you work you can do some pretty big things with them.