Mars 2020 Rover: Curiosity’s Hi-Tech Twin Is Strapped For Science; Includes A Flying Drone

While Mars may be significantly behind its sunward neighbor in terms of the number of motor vehicles crawling over its surface, it seems like we’re doing our best to close that gap. Over the last 23 years, humans have sent four successful rovers to the surface of the Red Planet, from the tiny Sojourner to the Volkswagen-sized Curiosity. These vehicles have all carved their six-wheeled tracks into the Martian dust, probing the soil and the atmosphere and taking pictures galore, all of which contribute mightily to our understanding of our (sometimes) nearest planetary neighbor.

You’d think then that sending still more rovers to Mars would yield diminishing returns, but it turns out there’s still plenty of science to do, especially if the dream of sending humans there to explore and perhaps live is to come true. And so the fleet of Martian rovers will be joined by two new vehicles over the next year or so, lead by the Mars 2020 program’s yet-to-be-named rover. Here’s a look at the next Martian buggy, and how it’s built for the job it’s intended to do.

Continue reading “Mars 2020 Rover: Curiosity’s Hi-Tech Twin Is Strapped For Science; Includes A Flying Drone”

Emulating A Bluetooth Keyboard With The ESP32

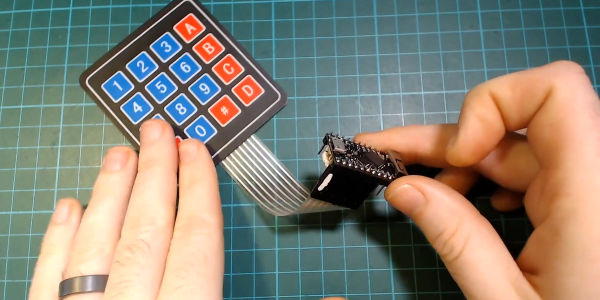
Most people associate the ESP family of microcontrollers with WiFi, which makes sense as they’ve become the solution of choice for getting your project online quickly and easily. But while the WiFi capability might be the star of the show, the ESP32 also comes equipped with Bluetooth; we just don’t see people using it nearly as often. If you’re looking to get started using Bluetooth on the ESP32, then this simple wireless macro keypad from [Brian Lough] would be a great way to get started.

From a hardware standpoint, this project is incredibly straightforward. All you need to do is connect a membrane keypad up to the GPIO pins on the ESP32. Adding in a battery is a nice touch, and you probably would want to put it into a enclosure of some sort, but as a proof of concept it doesn’t get much easier than this. In this case [Brian] is using the TinyPICO board, but your personal ESP32 variant of choice will work just as well.

The rest of the project is all software, which [Brian] walks us through in the video after the break. There’s a preexisting library for Bluetooth Human Interface Device (HID) emulation on the ESP32, but it needs to be manually installed in the Arduino IDE. From there, he demonstrates how you can build up a functioning keyboard, including tricks such as sending multiple virtual keys at once.

In the past we’ve seen the ESP32 used to create a Bluetooth game controller, but the ability to emulate a keyboard obviously offers quite a bit more flexibility. With a practical demonstration of how easy as it is to turn this low-cost microcontroller into a wireless input device, hopefully we’ll start seeing more projects that utilize the capability.

Continue reading “Emulating A Bluetooth Keyboard With The ESP32”

Star Wars Themed Laser Badge: All That Is Missing Is The Pew Pew Sound Effect

In the quest to advance the art of the electronic badge, the boundaries of what is possible to manufacture in small quantities are continually tested. Full-colour PCBs, injection moulding, custom keyboards, and other wow factor techniques have all been tried, leading to some extremely impressive creations. With all this innovation then it’s sometimes easy to forget that clever design and a really good idea can produce an exceptional badge with far more mundane materials.

The 10th InCTF cybersecurity contest held at Amrita, Kerala, India, had a Star Wars themed badge designed by Team bi0s for the event. It takes the form of a Millennium Falcon-shaped PCB, with a NodeMCU ESP8266 board mounted on it, a shift register, small OLED display, and the usual array of buttons and LEDs. The fun doesn’t stop there though, because it also packs a light-dependent resistor and a laser pointer diode that forms part of one of its games. Power for this ensemble comes courtesy of a set of AA cells on its underside.

They took a novel approach to the badge’s firmware, with a range of different firmwares for different functions instead of all functions contained in one. These could be loaded through means of a web-based OTA updater. Aside from a firmware for serial exploits there was an Asteroids game, a Conway’s Game Of Life, and for us the star of the show: a Millennium Cannon laser-tag game using that laser. With this, attendees could “shoot” others’ LDRs, with three “hits” putting their opponent’s badge out of action for a couple of minutes.

Unusually this badge is a through-hole design as a soldering teaching aid, but its aesthetics do not suffer for that. We like its design and we especially like the laser game, we look forward to whatever next Team bi0s produce in the way of badges.

This isn’t the first badge packing a laser we’ve seen, at last year’s Def Con there was a laser synth badge. No laser tag battles though.

Werewolf Ears With A Sense For Danger

When walking down a dark street, it’s common to get a sense that one is being followed. It pays to check, of course, but what if we could get better data than simply a vague feeling from the unknown? [caitlinsdad] built a project that can do just that, with a cute pair of ears to boot.

The werewolf ears claim to be ISO Standard, though we’re yet to see the relevant documents to bear that out. Regardless, they use an Adafruit Gemma M0 microcontroller to run the show, hooked up to an infrared proximity sensor to detect movement. When triggered, the Gemma responds to the signal by twitching the wolf ears attached to a headband, alerting the wearer that someone is closing in.

Built and calibrated properly, this could be a useful invention for those who regularly find themselves followed by those skulking on the sidewalk and for whom moving to another neighbourhood is a more expensive option. We’ve seen other responsive wearables, too. Video after the break.

Continue reading “Werewolf Ears With A Sense For Danger”

All Band Radio Uses Arduino And Si4730

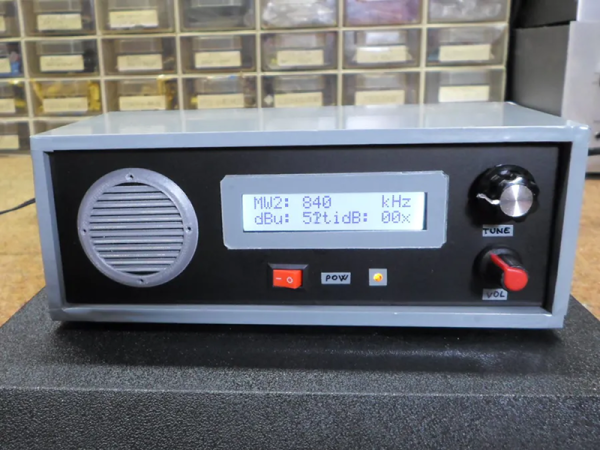
It is getting harder and harder to tell homemade projects from commercial ones. A good case in point is [Mirko’s] all band radio which you can see in the video below the break. On the outside, it has a good looking case. On the inside, it uses a Si4730 radio which has excellent performance that would be hard to get with discrete components.

The chip contains two RF strips with AGC, built-in converters to go from analog to digital and back and also has a DSP onboard. The chip will do FM 64 to 108 MHz and can demodulate AM signals ranging from 153 kHz to 279 kHz, 520 kHz to 1.71 MHz, and 2.3 MHz to 26.1 MHz. It can even read RDS and RBDS for station information. The output can be digital (in several formats) or analog.

Continue reading “All Band Radio Uses Arduino And Si4730”

Laser Tachometer Knows How Fast You Were Spinning Back There

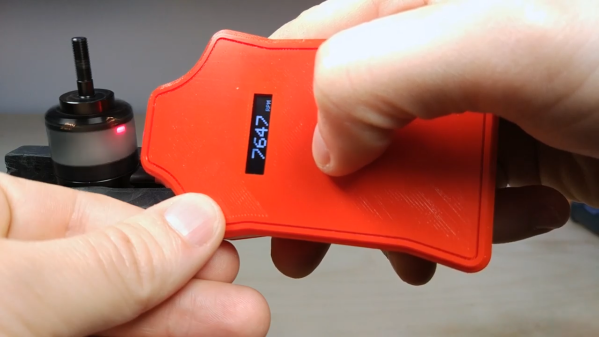
Does your drill go as fast as the manufacturer says it will? Well, you’d need a tachometer to figure that out. They’re not that expensive to buy, but as [Elite Worm] shows, they’re not that expensive to make, either — about $10 total if you get your parts from the right places. Lucky for you, he has links to everything.

Really, the links are just the tip of the iceberg here as far as the gifts that [Elite Worm] bestows upon those who choose to undertake this project. The build video (after the break, as usual; our favor to you) is fantastic, and would be perfect for a beginner because of the entrancing speed at which he builds it. The video is straight up relaxing to watch, whether you want to build one or not.

It’s a fairly simple circuit — just push the momentary switch, and the laser diode and sensor pair count the revolutions over one second. The Arduino Nano multiplies this number by 60 and displays the RPM on the OLED screen. What we absolutely love about this build is the care that taken in designing the case. There’s a designated spot for each component, and the ones without their own special holder are kept in place with printed crossbar pieces. [Elite Worm] says this has a higher refresh rate than his store-bought tacho, and we say it looks way cooler, too.

Still don’t want to make one yourself? Well, okay. Before you buy one, try using your phone to calculate RPM.

Continue reading “Laser Tachometer Knows How Fast You Were Spinning Back There”

Pneumatic Glove For Therapy And Experimentation

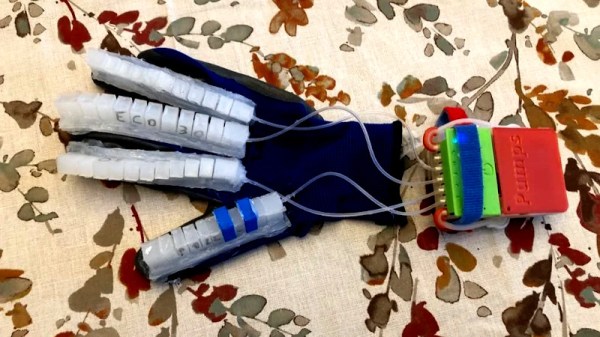
Many projects have aimed to replicate the function of the human hand, creating robotic structures that mimic real anatomy. Fewer have attempted to work with human hands directly. SoftGlove is a project by [france.bonde] that uses pneumatics to do just that.

The glove works by using a silicone pneumatic actuator for each digit on the human hand, attached to a glove. These are created with 3D printed molds, into which EcoFlex silicone is poured. A FlowIO device is used to run the pneumatics, which combines a microcontroller with penumatic hardware to pump air in and out of the actuators.

The goal of the project is to use a companion unit, in which a glove with flex sensors is used to make the SoftGlove mimic its movements. This would allow SoftGlove to move the fingers of a person with damaged muscle control, potentially aiding the muscles and nerves to recover when used in a therapeutic setting.

It’s exciting to see typical maker technologies used in a context to create better outcomes for patients, and we’re excited to see where this project leads next. It also has potential applications for robotic actuators, too. Programmable Air is another exciting project working in this space, too. And of course, if you’ve got a hot pneumatics project you’re cooking up in the garage, be sure to let us know!