Micro:bit Makes Cardboard Pinball More Legit

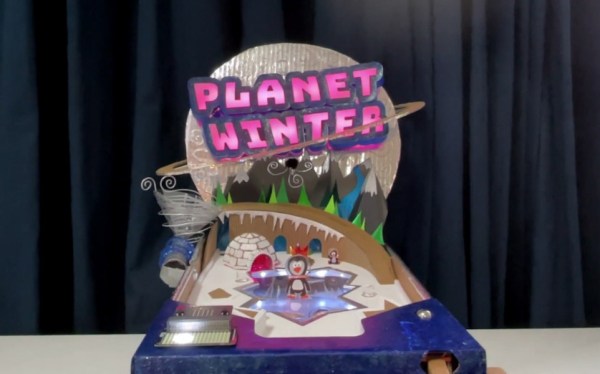
What have you been doing to ward off the winter blues? [TechnoChic] decided to lean in to winter and make a really fun-looking game out of it by combining the awesome PinBox 3000 cardboard pinball sandbox with a couple of Micro:bits to handle and display the player’s score. Check it out the build and gameplay in the video after the break.

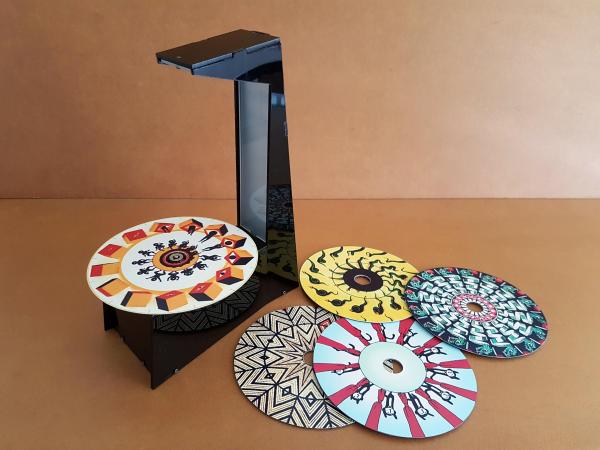
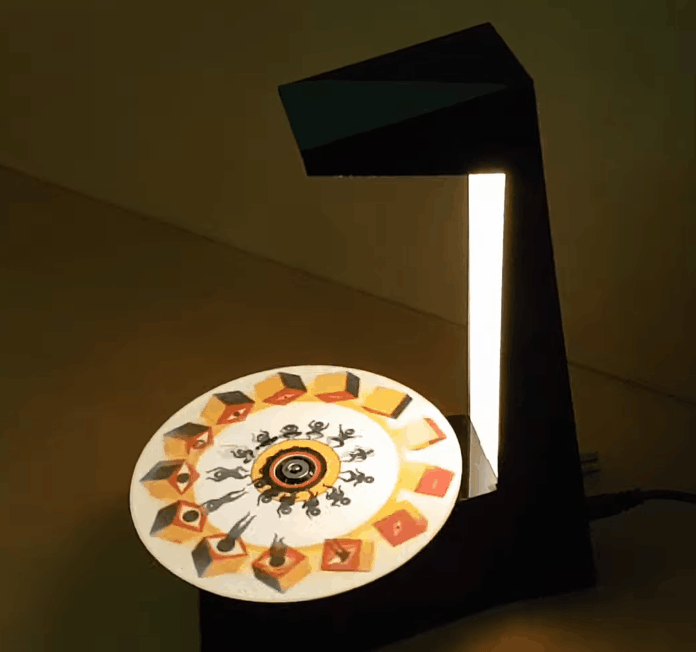
The story of Planet Winter is a bittersweet tale: basically, a bunch of penguins got tired of climate change and left Earth en masse for a penguin paradise where it’s a winter wonderland all year round. There’s a party igloo with disco lights and everything.

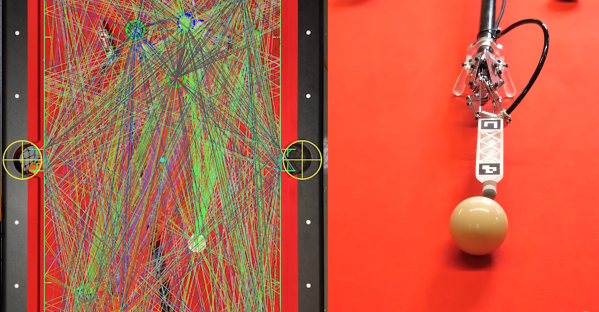
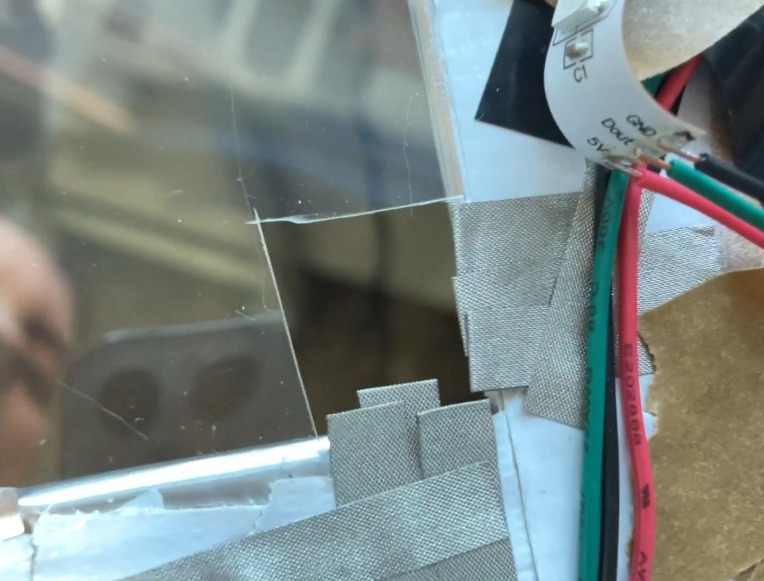
[TechnoChic] used a Micro:bit plugged into a Brown Dog Gadgets board to keep track of scoring, control the servo that kicks the ball back out of the igloo, and run the blinkenlights. It sends score updates over Bluetooth to a second Micro:bit and a Pimoroni Scrollbit display that sit opposite the pinball launcher. She went through a few switch iterations before settling on conductive maker tape and isolating the ball so it only contacts the tape tracks.

There are two ways to score on Planet Winter — the blizzard at the end of the ball launcher path nets you ten points, and getting the ball in the party igloo is good for thirty. Be careful on the icy lake in the middle of the playfield, because if the ball falls through the ice, it’s gone for good, along with your points. It’s okay, though, because both the party igloo and the ice hole trigger an avalanche which releases another ball.

Seriously, these PinBox 3000 kits are probably the most fun you can have with cardboard, even fresh out of the box. They are super fun even if you only build the kit and make a bunch of temporary targets to test gameplay, but never settle on a theme (ask us how we know). Not convinced? Hackaday Editor-in-Chief [Mike Szczys] explored them in depth at Maker Faire in 2018.

Continue reading “Micro:bit Makes Cardboard Pinball More Legit”

Robotic Pool Cue Can Be Your Friend Or Your Foe

In his everlasting quest to replace physical skill with technology, [Shane] of [Stuff Made Here] has taken aim at the game of eight-ball pool. Using a combination of computer vision and mechatronics, he created a robotic pool system that can allow a physical game of pool over the internet, or just beat human players. See the video after the break.

Making a good pool shot requires three discrete steps. First, you need to identify the best shot, then figure out how exactly to strike the balls to achieve the desired results, and finally physically execute the shot accurately. [Shane’s] goal was to automate all these steps. For the physical part, he built a pool cue with a robotic tip which only requires the user to place in approximately the right position, while a pneumatic piston mounted on a Stewart platform does the rest. A Stewart platform is a triangular plate mounted with six reciprocating rods, which gives it the required freedom of motion. The rods’ bases are attached to a set of cranks actuated by tension cables pulled by servos mounted at the rear-end of the cue. An adjustable air system allows the power of the shot to be adjusted as required.

A camera mounted is mounted over the table and connected to computer vision software to gather the required position information. Fiducials on the corners of the table and the cue tip allow the position of the pockets, balls, and cue to be accurately determined, and theoretically should allow the robot to take the perfect shot. Getting this to work in reality quickly turned into a very frustrating experience. After many hours of debugging, [Shane] tracked the error to a tiny forgotten test function that was introducing 5-10 mm of position error, and 2 of the six servos in the cue not performing up to spec. To determine the vertical positioning of the cue, an IMU and fixed height foot were added. [Shane] also added an overhead projector to overlay all required information directly on the table. Continue reading “Robotic Pool Cue Can Be Your Friend Or Your Foe”

Motor-Driven Movement Modernizes POV Toy

Just as we are driven today to watch gifs that get better with every loop, people 100+ years ago entertained themselves with various persistence of vision toys that used the power of optical illusions to make still images come to life. [jollifactory] recently recreated one of the first POV devices — the phenakistoscope — into a toy for our times.

The original phenakistoscopes were simple, but the effect they achieved was utterly amazing. Essentially a picture disk with a handle, the user would hold the handle with one hand and spin the disk with the other while looking in a mirror through slits in the disk. Unlike the phenakistoscopes of yore that could only be viewed by one person at a time, this one allows for group watching.

Here’s how it works: an Arduino Nano spins a BLDC motor from an old CD-ROM drive, and two strips of strobing LEDs provide the shutter effect needed to make the pictures look like a moving image.The motor speed is both variable and reversible so the animations can run in both directions.

To make the disks themselves, [jollifactory] printed some original phenakistiscopic artwork and adhered each one to a CD that conveniently snaps onto the motor spindle. Not all of the artwork looks good with a big hole in the middle, so [jollifactory] created a reusable base disk with an anti-slip mat on top to spin those.

If you just want to watch the thing in action, check out the first video below that is all demonstration. There be strobing lights ahead, so consider yourself warned. The second and third videos show [jollifactory] soldering up the custom PCB and building the acrylic stand.

There are plenty of modern ways to build old-fashioned POV toys, from all-digital to all-printable.

Continue reading “Motor-Driven Movement Modernizes POV Toy”

Hacking A Non-Dimmable LED Fixture

For most of us, the solution to having a non-dimmable LED light bulb but needing a dimmable one is a simple as a drive to the store to get the right kind of bulb. But that seems downright boring, not to mention wasteful, so when [Leo Fernekes] was faced with this problem, he looked for a way to make a non-dimmable bulb dimmable.

To be fair, there was a financial aspect to this hack, too. [Leo] had a bunch of cheap non-dimmable light fixtures he wanted to put to use. He started with a teardown and reverse-engineering of a light strip, which contains little more than LEDs and a small buck converter. His analysis of the circuit led him to a solution for dimming the light: inserting a MOSFET as a shunt around the LEDs. That and the addition of a diode to isolate the LEDs from the current regulator would allow for simple PWM-control of the lights via a microcontroller.

As is typical with these things, there were complications. [Leo] found that a timing problem resulted in flickering LEDs; the fix came from adding a sync circuit that cleverly leveraged a flip-flop inside the PIC16 microcontroller he chose for the circuit. His prototype incorporates these modifications, plus an interface that supports the DALI protocol for architectural lighting control. As always, [Leo] is quick to point out that mixing line voltage into your projects is not without risks, which he takes pains to mitigate. And as is also typical for his projects, [Leo] gives just the right amount of detail to understand the theory behind his design.

Continue reading “Hacking A Non-Dimmable LED Fixture”

Taking A Capacitor Microphone To The Next Level

There was a time when a microphone for most people was a cheap plastic affair that probably came for free with their sound card, but in the age of pandemic video streaming no desktop is complete without a chunky model that looks for all the world as though it escaped from a studio. Few people make their own microphones, so the work of [DJJules] in building very high quality condenser microphones is a particularly fascinating read.

A condenser microphone is a capacitor in which one plate is formed by a conductive diaphragm. A bias voltage is supplied to the diaphragm via a resistor, and since the charge on the plate remains constant as its capacitance changes with the sound vibrations, the voltage on the capacitor changes accordingly. This is picked up by a high impedance buffer and from there fed to a normal microphone input. This Instructable uses a commercial condenser microphone capsule, and takes the reader through generating the bias voltage for it before describing the op-amp buffer circuit.

The most interesting part comes at the end, as we’re shown how the sensitivity pattern of a dual-microphone array can be tuned to be omnidirectional, cardoid, or figure-of-eight. This is probably the norm among audio engineers, but we rarely see this sort of insight in our community. We may never build a microphone of our own, but it’s fascinating to see this one from the ground up in the video below the break.

If you’re confused about the difference between a condenser microphone and the more common electret condenser microphone, we have published a guide to that topic. Continue reading “Taking A Capacitor Microphone To The Next Level”

Free RTOS

Real-Time OS Basics: Picking The Right RTOS When You Need One

When do you need to use a real-time operating system (RTOS) for an embedded project? What does it bring to the table, and what are the costs? Fortunately there are strict technical definitions, which can also help one figure out whether an RTOS is the right choice for a project.

The “real-time” part of the name namely covers the basic premise of an RTOS: the guarantee that certain types of operations will complete within a predefined, deterministic time span. Within “real time” we find distinct categories: hard, firm, and soft real-time, with increasingly less severe penalties for missing the deadline. As an example of a hard real-time scenario, imagine a system where the embedded controller has to respond to incoming sensor data within a specific timespan. If the consequence of missing such a deadline will break downstream components of the system, figuratively or literally, the deadline is hard.

In comparison soft real-time would be the kind of operation where it would be great if the controller responded within this timespan, but if it takes a bit longer, it would be totally fine, too. Some operating systems are capable of hard real-time, whereas others are not. This is mostly a factor of their fundamental design, especially the scheduler.

In this article we’ll take a look at a variety of operating systems, to see where they fit into these definitions, and when you’d want to use them in a project. Continue reading “Real-Time OS Basics: Picking The Right RTOS When You Need One”

Deleting The Camshafts From A Miata Engine

The idea of camless automotive engines has been around for a while but so far has been limited to prototypes and hypercars. [Wesley Kagan] has been working on a DIY version for a while, and successfully converted a Mazda Miata to a camless valve system. See the videos after the break.

There have been many R&D projects by car manufacturers to eliminate camshafts in order to achieve independent valve timing, but the technology has only seen commercial use on Koenigsegg hypercars. [Wesley] started this adventure on a cheap single cylinder Harbor Freight engine, and proved the basic concept, so he decided to move up to an actual car. He first sourced a junkyard engine head to convert, and use as a drop-in replacement for the head on the complete project car. An off-the-shelf double-acting pneumatic cylinder is mounted over each valve and connected to the valve stem with a custom adaptor. The double-acting cylinder allows the valve to be both opened and closed with air pressure, but [Wesley] still added the light-weight return spring to keep the valve closed if there is any problem with the pneumatic system.

The controller is an Arduino, and it receives a timing signal from a factory crankshaft and operates the pneumatic solenoid valves via MOSFETs. After mounting the new head and control box into the Miata, it took a couple of days of tuning to get the engine running smoothly. Initial tests were done using the compressor in his garage, but this was replaced with a small compressor and air tank mounted in the Miata’s boot for the driving tests.

Although the pneumatic system works well for short test drives, the compressor is quite noisy and adds a couple of points of failure. [Wesley] is also working on a solenoid actuated system, which would require a lot more current from the battery and alternator, but he believes it’s a better long-term solution compared to compressed air. However, he is still struggling to find solenoids with the required specifications. Continue reading “Deleting The Camshafts From A Miata Engine”