TRS-80 Model 100 Gets 64-Bit CPU And A Very Wide LCD

To say the TRS-80 Model 100 was ahead of its time would be something of an understatement. It had a high-quality mechanical keyboard, phenomenal battery life, plenty of I/O and expansion capabilities, and was actually small and light enough to easily carry around. While its layout might seem to be a bit dated to modern eyes, there’s little debate that it was one of the most successful and influential computers in history.

So it’s little surprise that [belsamber] thought the Model 100 might make an ideal platform for his mobile command line work. With a few modifications, naturally. While technically the nearly 40 year old portable could connect to a Linux computer as a simple serial terminal, its outdated and non-backlit LCD leaves a bit to be desired in 2021. But there’s little sense in upgrading the display if he’d still be saddled with the anemic Intel 80C85 motherboard, so he decided to clean house and replace everything.
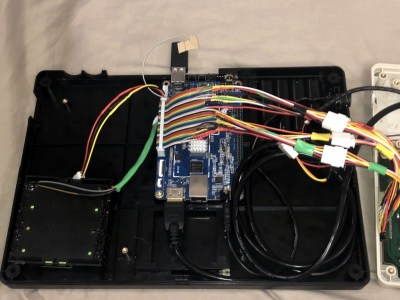
Once stripped of the original hardware, the Model 100’s enclosure offered up plenty of room for a Pine A64 LTS single-board computer, four 18650 cells, and a 1920×480 ultra-wide LCD. While not a perfect match for the dimensions of the original panel, the new screen is an exceptionally close fit. The keyboard has been left intact, but rather than adding a QMK-compatible microcontroller to the mix, [belsamber] wired the matrix directly into the GPIO of the A64.

While we know some retro aficionados might shed a tear to see an iconic computer get gutted, [belsamber] mentions that nothing will go to waste; the parts he pulled from this machine will serve as spares for a second Model 100 he has in his collection. Besides, given the immense popularity of these machines, they aren’t exactly rare to begin with.

As an aside, we recently saw this same unique display used in a 3D printed desktop computer with distinctively retro-futuristic styling. We didn’t have miniature 4:1 ratio displays on our list of 2021 hardware predictions, but it seems they’re already making a strong showing.

AI Learns To Drive Trackmania

Machine learning has long been a topic of interest for humanity, but only in recent years have we had broad access to great computing power to enable to the average person to dive in. [Yosh] recently decided to put an AI to work learning how to race in Trackmania.

After early experiments with supervised learning, [Yosh] decided to implement a genetic algorithm to produce an AI to drive in the game. The AI takes distance from the track walls as an input, and has steering and accelerator values as an output. Starting with 100 AIs in generation 1, [Yosh] iterated by choosing the AIs that covered the longest distance in 13 seconds. Once the AIs started to get the hang of the first few corners, he changed the training to instead prioritize the lowest time taken to traverse each of the checkpoints along the track.

The AI improved over time, and over 100 generations, got down to a 23.48s time on the test track, versus 19.63s for [Trabadia], a talented human. We’d love to see how much better the AI could do with more training. [Yosh] is trying more experiments, like providing extra feedback in the AI fitness function to keep it from hitting the walls. It’s not the first time we’ve seen a genetic algorithm used to train a racing AI, either. Video after the break.

Continue reading “AI Learns To Drive Trackmania”

Serving The Feline Masters: A Chair To Follow The Sunny Spot

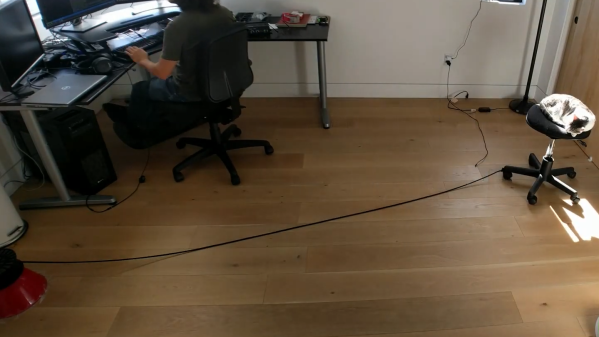
Terry Pratchett once wrote, “In ancient times cats were worshipped as gods; they have not forgotten this”. [Jonathan]’s cat has clearly not forgotten, and makes it loudly known whenever her favorite chair needs to be moved to stay in the spot of sunlight. He was looking for a fun hack anyway, so he decided to give in to her majesty’s demands, and automated the task.

[Jonathan] first considered adding motorizing the chair itself, but decided to keep it simple and just drag the chair across the room with a spool attached to a motor. The rope spool was attached to a small geared DC motor, mounted on a salad bowl base, and connected to an ESP8266 via a motor driver. The ‘8266 is running  NodeMCU with a web server that accepts simple motor commands through a RESTful API. This setup can’t reset the chair to it’s starting position at the end of the day, but this is a small price to pay for simplicity. The motor was a bit underpowered, but it only needed to move the chair in small distances at a time, so [Jonathan] removed the chair’s back to reduce the weight, and upped the motor voltage.

Determining when and how far to move the chair is the second part of the challenge. [Jonathan] considered a simple lookup table for the time of day, but the motor’s movement wasn’t consistent enough. The final solution was a set of three BH1750 digital ambient light sensors to give feedback. A pair of sensors on the chair determines its position relative to the sunny spot, by comparing light levels to a reference sensor mounted in the window. These light sensors are also attached to NodeMCUs, and send movement commands to the winding unit as necessary.

Continue reading “Serving The Feline Masters: A Chair To Follow The Sunny Spot”

Arduino Wannabe Should Have Used A 555. Oh Wait, It Does.

It’s a little known secret that when the Hackaday writers gather in their secret underground bunker to work on our plans for world domination, we often take breaks to play our version of the corporate “Buzzword Bingo”, where paradigms are leveraged and meetings circle back to loop in offline stakeholders, or something like that. Our version, however, is “Comment Line Bingo”, and right in the middle of the card is the seemingly most common comment of all: “You should have used a 555,” or variations thereof.

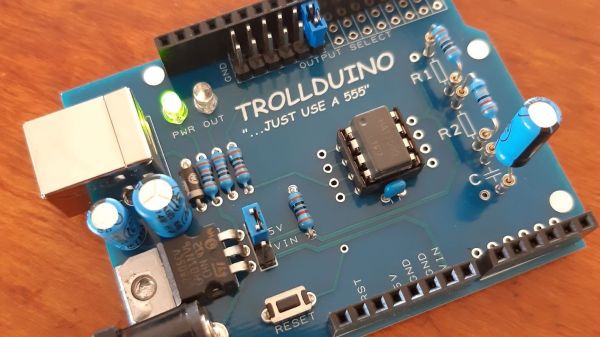
So it was with vicious glee that we came across the Trollduino V1.0 by the deliciously named [Mild Lee Interested]. It’s the hardware answer to the common complaint, which we’ll grant is often justified. The beautiful part of this is that Trollduino occupies the same footprint as an Arduino Uno and is even pin-compatible with the microcontroller board, or at least sort of. The familiar line of components and connectors sprout from the left edge of the board, and headers for shields line the top and bottom edges too. “Sketches” are implemented in hardware, with jumpers and resistors and capacitors of various values plugged in to achieve all the marvelous configurations the indispensable timer chip can be used for. And extra points for the deliberately provocative use of Comic Sans in the silkscreen.

Hats off to [Lee] for a thoroughly satisfying troll, and a nice look at what the 555 chip can really do. If you want a more serious look at the 555, check out this 555 modeled on a breadboard, or dive into the story of the chip’s development.

RGB Glasses Built From PCBs

Shutter shades were cool once upon a time, but if you really want to stand out, it’s hard to go past aggressively bright LEDs right in the middle of your face. A great way to achieve that is by building a pair of RGB glasses, as [Arnov Sharma] did.

The design intelligently makes use of PCBs to form the entire structure of the glasses. One PCB makes up the left arm of the glasses, carrying an ESP12F microcontroller and the requisite support circuitry. It’s fitted to the front PCB through a slot, and soldered in place. The V+, GND, and DATA connections for the WS2812B LEDs also serve as the mechanical connection. The right arm of the glasses is held on in the same way, being the same as the left arm PCB but simply left unpopulated. A little glue is also used to stiffen up the connection.

It’s a tidy build, and one that can be easily controlled from a smartphone as the ESP12F runs a basic webserver which allows the color of the glasses to be changed. It’s not the first time we’ve seen a flashy pair of LED shades either! Video after the break.

Continue reading “RGB Glasses Built From PCBs”

DIY LEGO Record Cleaner Is Revolutionary

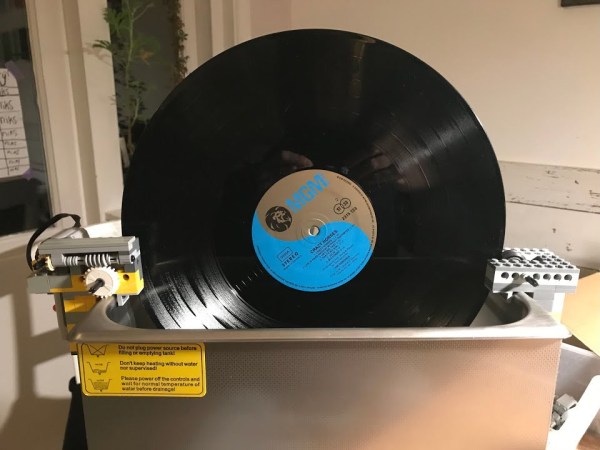
There are many schools of thought when it comes to keeping vinyl records clean. It’s a ritual that’s nearly as important as the one that comes after it — queuing up the record and lowering the needle. We’ve seen people use everything from Windex and microfiber towels to ultrasonic cleaning machines that cost hundreds or even thousands. In the midst of building a beefier ultrasonic record cleaner and waiting for parts, [Baserolokus] looked around at all the LEGO around the house and decided to build a plastic prototype in the interim.

The idea behind ultrasonic cleaning is simple — high-frequency sound waves pumped through distilled water produce tons of tiny bubbles. These bubbles gently knock all the dirt and grime out of the grooves without using any brushes, rags, or harsh cleaners. [Baserolokus] built two pieces that hang on the edge of a washtub. On one side, a Technic motor spins the record at just under one RPM, it spins against a 3D printer wheel embedded in the other side. Check it out in action after the break.

Cleaning your vinyl is a great first step, but you might be ruining your records with a sub-par turntable. Take a deep dive with [Jenny List]’s thorough primer on the subject.

Continue reading “DIY LEGO Record Cleaner Is Revolutionary”

3D Printing Without Support Material Thanks To An Additional Axis

Fused Deposition Modelling (FDM) 3D printers which squirt out molten plastic layer by layer are by far the most popular type in general use. Most machines extrude plastic through a nozzle above print bed, and struggle to produce parts with overhangs without using support material. However, a German team of researchers have recently come up with a solution.

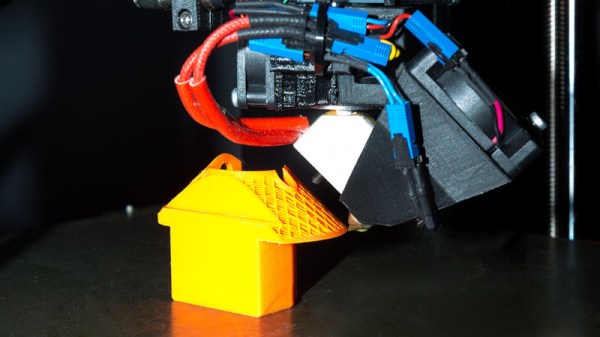
In a prototype built by researchers at the Zurich University of Applied Sciences (ZHAW), a standard Cartesian printer has a third rotary axis added, upon which the nozzle can rotate. Additionally, the nozzle is angled at 45 degrees to the print bed, rather than the usual perpendicular setup. This allows layers of a print to be built up in such a way that support material is not needed for the vast majority of typical overhangs. This is particularly useful for hollow parts, where removing support material can be particularly difficult.

The team believes that such technology could be implemented on existing printers by way of a simple upgrade kit, and we can imagine a few experimenters will be champing at the bit to try it out. If you do, be sure to drop us a line. Alternatively, consider using a marker to make removing supports easier. Video after the break.

Continue reading “3D Printing Without Support Material Thanks To An Additional Axis”