RGB Glasses Built From PCBs

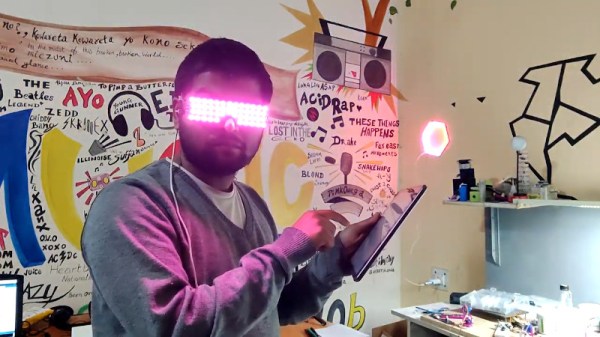
Shutter shades were cool once upon a time, but if you really want to stand out, it’s hard to go past aggressively bright LEDs right in the middle of your face. A great way to achieve that is by building a pair of RGB glasses, as [Arnov Sharma] did.

The design intelligently makes use of PCBs to form the entire structure of the glasses. One PCB makes up the left arm of the glasses, carrying an ESP12F microcontroller and the requisite support circuitry. It’s fitted to the front PCB through a slot, and soldered in place. The V+, GND, and DATA connections for the WS2812B LEDs also serve as the mechanical connection. The right arm of the glasses is held on in the same way, being the same as the left arm PCB but simply left unpopulated. A little glue is also used to stiffen up the connection.

It’s a tidy build, and one that can be easily controlled from a smartphone as the ESP12F runs a basic webserver which allows the color of the glasses to be changed. It’s not the first time we’ve seen a flashy pair of LED shades either! Video after the break.

Continue reading “RGB Glasses Built From PCBs”

DIY LEGO Record Cleaner Is Revolutionary

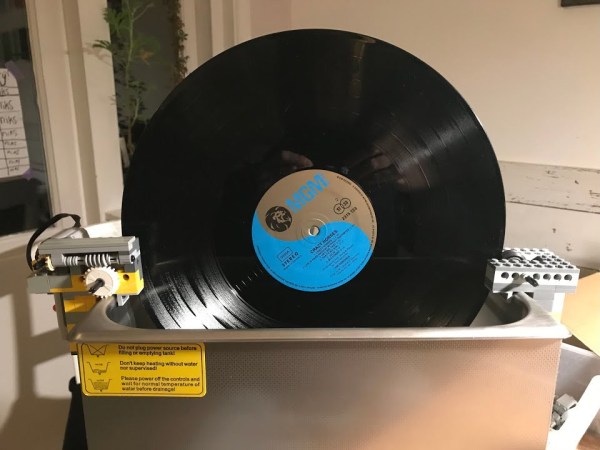
There are many schools of thought when it comes to keeping vinyl records clean. It’s a ritual that’s nearly as important as the one that comes after it — queuing up the record and lowering the needle. We’ve seen people use everything from Windex and microfiber towels to ultrasonic cleaning machines that cost hundreds or even thousands. In the midst of building a beefier ultrasonic record cleaner and waiting for parts, [Baserolokus] looked around at all the LEGO around the house and decided to build a plastic prototype in the interim.

The idea behind ultrasonic cleaning is simple — high-frequency sound waves pumped through distilled water produce tons of tiny bubbles. These bubbles gently knock all the dirt and grime out of the grooves without using any brushes, rags, or harsh cleaners. [Baserolokus] built two pieces that hang on the edge of a washtub. On one side, a Technic motor spins the record at just under one RPM, it spins against a 3D printer wheel embedded in the other side. Check it out in action after the break.

Cleaning your vinyl is a great first step, but you might be ruining your records with a sub-par turntable. Take a deep dive with [Jenny List]’s thorough primer on the subject.

Continue reading “DIY LEGO Record Cleaner Is Revolutionary”

3D Printing Without Support Material Thanks To An Additional Axis

Fused Deposition Modelling (FDM) 3D printers which squirt out molten plastic layer by layer are by far the most popular type in general use. Most machines extrude plastic through a nozzle above print bed, and struggle to produce parts with overhangs without using support material. However, a German team of researchers have recently come up with a solution.

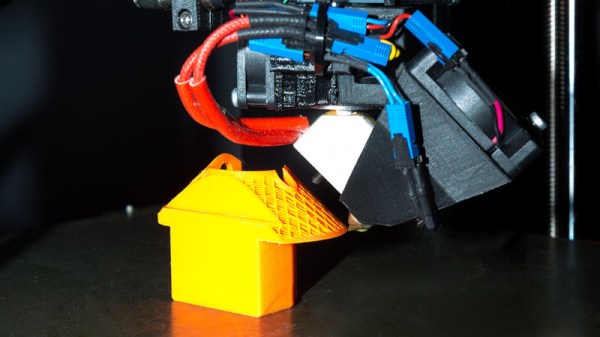
In a prototype built by researchers at the Zurich University of Applied Sciences (ZHAW), a standard Cartesian printer has a third rotary axis added, upon which the nozzle can rotate. Additionally, the nozzle is angled at 45 degrees to the print bed, rather than the usual perpendicular setup. This allows layers of a print to be built up in such a way that support material is not needed for the vast majority of typical overhangs. This is particularly useful for hollow parts, where removing support material can be particularly difficult.

The team believes that such technology could be implemented on existing printers by way of a simple upgrade kit, and we can imagine a few experimenters will be champing at the bit to try it out. If you do, be sure to drop us a line. Alternatively, consider using a marker to make removing supports easier. Video after the break.

Continue reading “3D Printing Without Support Material Thanks To An Additional Axis”

Interference Patterns Harnessed For Optical Logic Gates

The basics of digital logic are pretty easy to master, and figuring out how the ones and zeroes flow through various kinds of gates is often an interesting exercise. Taking things down a level and breaking the component AND, OR, and NOR gates down to their underlying analog circuits adds some complexity, but the flow of electrons is still pretty understandable. Substitute all that for photons, though, and you’ll enter a strange world indeed.

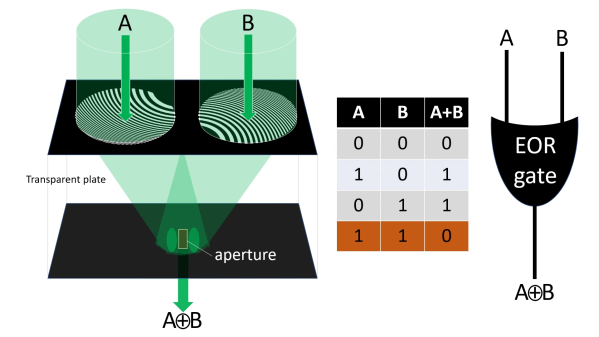
At least that’s our take on [Jeroen Vleggaar]’s latest project, which is making logic gates from purely optical components. As he himself admits in the video below, this isn’t exactly unexplored territory, but his method, which uses constructive and destructive interference, seems not to have been used before. The basic “circuit” consists of a generator, a pair of diffraction patterns etched into a quartz plate, and an evaluator, which is basically a pinhole in another plate positioned to coincide with the common focal point of the generator patterns. An OR gate is formed when the two generators are hit with in-phase monochromatic light. Making the two inputs out of phase by 180° results in an XOR gate, as destructive interference between the two inputs prevents any light from making it out of the evaluator.

Continue reading “Interference Patterns Harnessed For Optical Logic Gates”

USB-C Programmable Power Supply For Any Project

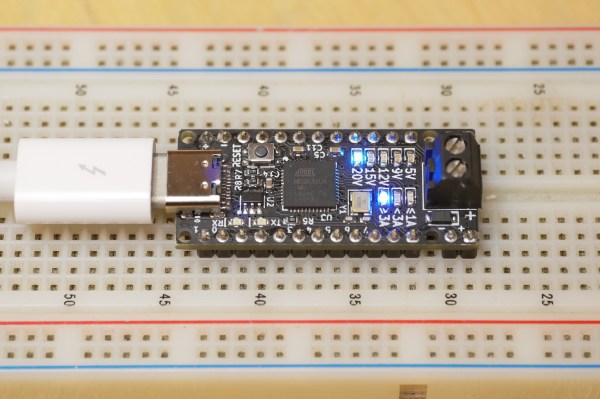
USB-C Power Delivery 3.0 (PD3.0) introduces a new Programmable Power Supply (PPS) mode, which allows a device to negotiate any supply of 3.3-21 V in 20 mV steps, and up to 5 A of current in 50 mA steps. To make use of this new standard, [Ryan Ma] create the PD Micro, an Arduino-compatible development board, and a self-contained software library to allow easy integration of PD3.0 and the older PD2.0 into projects.

The dev board is built around an ATMega32U4 microcontroller and FUSB302 USB-C PHY. The four-layer PCB is densely packed on both sides to fit in the Arduino Pro Micro Form factor. The board can deliver up to 100W (20 V at 5 A) from an appropriate power source and shows visual feedback on the PD status through a set of LEDs.

The primary goal of the project is actually in the software. [Ryan] found that existing software libraries for PD take up a lot of memory, and are difficult to integrate into small projects. Working from the PD specifications and PD PHY chip data sheet, he created a lighter weight and self-contained software library which consumes less than 8 K of flash and 1 K of RAM. This is less than half the Flash and RAM available on the ATmega32U4.

[Ryan] is running a Crowd Supply campaign (video after the break) to get some of these powerful boards out in the wild, and has released all the source code and schematics on GitHub. The PCB design files will be released during the last week of the campaign, around 25 January 2021.

USB-C and power delivery are not simple standards, but the ability to add a high-speed data interface and a programmable power supply into almost any project has real potential.

Continue reading “USB-C Programmable Power Supply For Any Project”

Hackability Matters

The Unix Way™ provides extreme hackability. The idea is that software should be written as tools to accomplish discrete tasks, and that it should be modular, extensible, and play well with others. It’s like software as a LEGO set — you can put the blocks together however you want, within limits, and make stuff that’s significantly cooler than any of the individual blocks alone.

Clearly this doesn’t work for all applications — things like graphics editors and web browsers don’t really lend themselves to being elegant tools that integrate well with others, right? It’s only natural that they’re bloaty walled gardens. What happens in the browser must stay in the browser, right?

But how sad is it that the one piece of software you use all day, your window into cyberspace, doesn’t play well with the rest of your system? I’d honestly never really been bothered by that fact until stumbling on TabFS. It’s an extension to Chrome that represents the tabs on your browser as if they were files on your local system — The Unix Way™. And what this means is that any other program that can read from or write to a file can open tabs, collect them, change webpages on the fly, and so on. It opens up the browser to you.

This is tremendously powerful. Don’t like the bookmarking paradigm of your particular browser? Writing your own would be a snap in Python — and you could do cleverer things like apply a little machine learning to handle putting them in categories. Want to pop open (or refresh) a set of webpages at a particular time every day? Cron, or its significantly more complicated counterpart systemd, and a couple lines of code will do that. Want to make a hardware button that converts dark mode to light mode and vice-versa for every website starting with “H”? Can do.

I’m picking on browsers, but many large pieces of software are inaccessible in the same way — even if they’re open source, they don’t open up channels for interaction with user code or scripts. (Everything “in the cloud” or “as a service”, I’m looking at you! But that’s a further rant for another day.) And that’s a shame, because most of these “big” pieces of software actually do the coolest things.

So please, if you’re working on a big software package, or even just writing a plug-in for one, do think about how you can make more of its abilities available to the casual scripter. Otherwise, it’s just plastic blocks that don’t fit with the rest of the set.

TV Turned Automatic Etch A Sketch With Raspberry Pi

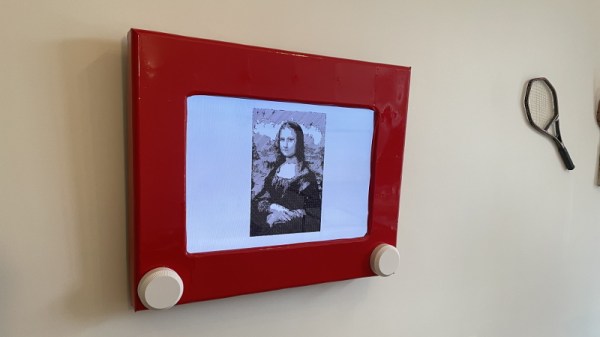
Considering one of the biggest draws of the original Etch a Sketch was how simple it was, it’s always interesting to see the incredible lengths folks will go to recreate that low-tech experience with modern hardware. A perfect example is this giant wall mounted rendition of the iconic art toy created by [Ben Bernstein]. With a Raspberry Pi and some custom electronics onboard, it can even do its own drawing while you sit back and watch.

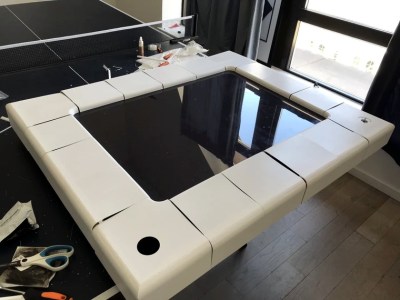
At a high level, what we’re seeing here is a standard Samsung LCD TV with a 3D printed Etch a Sketch shell mounted on top of it. That alone would be a pretty neat project, and had [Ben] just thrown some videos of designs getting sketched out onto the display, he could have achieved a similar end result with a lot less work. But where’s the fun in that?

It took hundreds of hours to print the shell.

To make his jumbo Etch a Sketch functional, [Ben] spent more than a year developing the hardware and software necessary to read the user input from the two large 3D printed knobs mounted under the TV. The knobs are connected to stepper motors with custom PCBs mounted to their backs that hold a A4988 driver chip as well as a AS5600 absolute magnetic rotary encoder. This solution allows the Raspberry Pi to not only read the rotation of the knobs when a person is using the Etch a Sketch interactively, but spin them realistically when the software takes over and starts doing an autonomous drawing.

Several Python scripts pull all the various pieces of hardware together and produce the final user interface. The software [Ben] wrote can take an image and generate paths that the Etch a Sketch can use to realistically draw it. The points that the line is to pass through, as well as variables that control knob rotation and pointer speed, are saved into a JSON file so they can easily be loaded later. Towards the end of the Imgur gallery [Ben] has created for this project, you can see the software working its way through a few example sketches.

We’ve seen several projects that motorize an Etch a Sketch to draw complex images, but this may be the first example we’ve seen where everything was done in software. This digital version doesn’t need to follow the traditional “rules”, but we appreciate that [Ben] stuck to them anyway. Incidentally this isn’t the first Etch a Sketch TV conversion to grace these pages, though to be fair, the other project took a radically different approach.

Continue reading “TV Turned Automatic Etch A Sketch With Raspberry Pi”