The Metabolizer Is Turning Trash Into Treasure Even Faster Now

Do you remember [Sam Smith]’s Metabolizer from a few years back? In case you’ve forgotten, this baby takes trash and turns it into printed plastic objects, and it’s solar-powered to boot. Although the Metabolizer didn’t win the 2018 Hackaday Prize, [Sam] and his machine won many achievements that year, including the Open Hardware Challenge. It’s fantastic to see the project still improving.

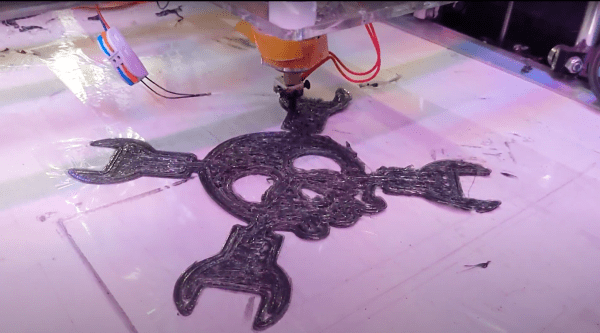
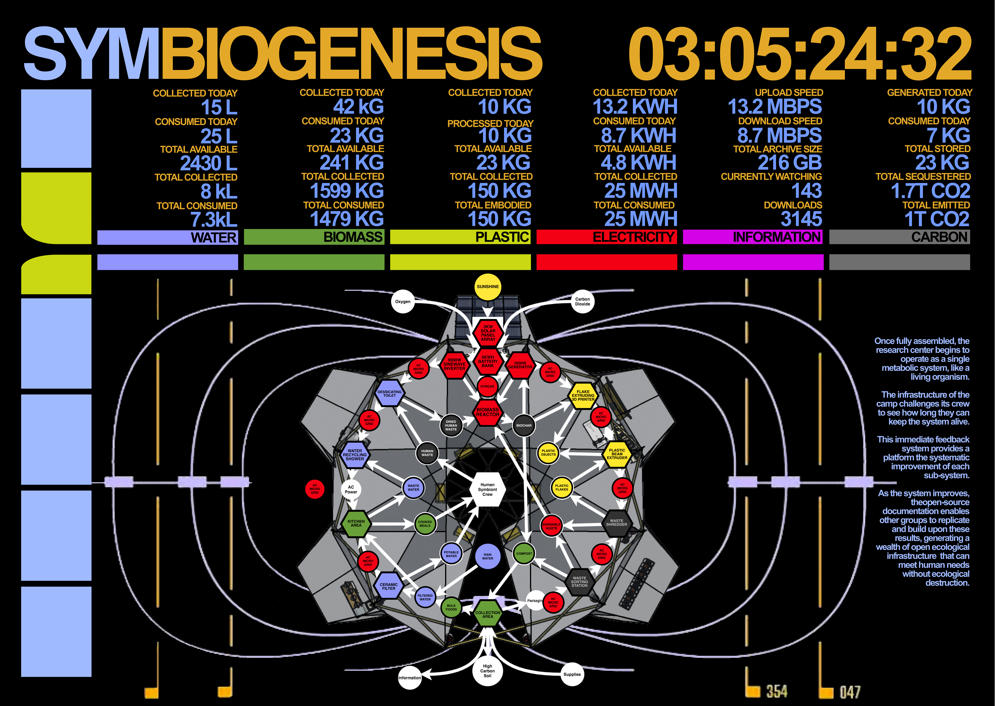
To recap, the sun hits the solar panels and charge up the battery bank. Once there’s enough power to start the reaction, it gets dumped into a heating element that turns biomass into biochar. This smoke is cooled, collected, refined, and fed into a small gas generator, which produces DC power to run a 3/4-horsepower shredder and the trash printer.

[Sam] likens this beast to a Rube Goldberg machine in that it performs an overly-complicated chain reaction to do a simple task. We certainly see his point, but we think that this machine is worth so much more than those classic machines, which tend to do nothing useful at all and tend to consume many resources in the process.  On the contrary, the Metabolizer’s chain reaction starts with sunshine and ends with useful objects that keep plastic out of landfills. Honestly, it’s more akin to a compost heap with a PhD in Biology and a handful of steroids and a 3D printer attached.

Unfortunately, [Sam] couldn’t get a prototype working in time for the Prize, and he turned to Patreon to gain support after the $1,000 ran out. Three years and a ton of improvements later, [Sam] has a working prototype that’s cheaper, more efficient, and easier to build. But can it be built relatively easily by someone other than [Sam]? Consider the gauntlet thrown down.

Not happy with your standard-style compost pile? You need a DIY trommel to sift out the bad stuff.

Battle Robot Uses Carbon Fiber To Save Weight

ZAP! The saw is capable of delivering high-voltage discharges to damage its foes.

Combat robots come in all shapes and sizes, with regulating authorities often using weight limits to create a level playing field for competitors. [Hans Jørgen Grimstad] is building a robot to compete in a 4 kg class, and made some interesting design decisions to that end.

4 kg is not a lot of weight to play with. When considering the motors needed to propel the robot and the batteries needed to run everything, there’s then precious little weight left for weapons systems and armor plating.

Thus, in an effort to make the most of the weight limitations, [Hans] decided to use carbon fiber for the robot’s outer shell. The method used is a simple wet layup in a mold. We’d be supremely interested to see how this armor holds up in competition, versus more typical choices like aluminium and steel.

Other interesting features include a belt-driven saw, which [Hans] tests with his hands mere inches away and the robot’s motors powered up. Don’t do this if you value your fingers. This is paired with a high-voltage discharge taser module. When the saw gets close to another robot, it may cause sparks to jump to the enemy, damaging its electronics in the process. It’s something we haven’t seen too often, as such measures are actually banned in some contests.

Diehard enthusiasts in the battle robot community will likely have fierce opinions on many points of the design; have it out in the comments. It’s certainly not the first carbon-fiber bot, but it’s nice to see the fancy material being thrown in the ring.

We’ve seen other designers innovate, too, such as this remarkably successful walking robot build. Video after the break.

Continue reading “Battle Robot Uses Carbon Fiber To Save Weight”

Prepare For Wildfire Season With An Air Quality Monitor

For some reason, wildfire seasons in Australia, North America, and other places around the world seem to happen more and more frequently and with greater and greater fervor. Living in these areas requires special precautions, even for those who live far away from the fires. If you’re not sure if the wildfires are impacting your area or not, one of the tools you can build on your own is an air quality meter like [Costas Vav] shows us in this latest build.

The air quality indicator is based around an Adafruit Feather RP2040 which is in turn based on the 32-bit Cortex M0+ dual core processor. This makes for a quite capable processor in a small package, and helps accomplish one of the design goals of a rapid startup time. Another design goal was to use off-the-shelf components so that anyone could easily build one for themselves, so while the Feather is easily obtained the PMS5003 PM2.5 air quality sensor needed to be as well. From there, all of the components are wrapped up in an easily-printed enclosure and given a small (and also readily-available) OLED screen.

[Costas Vav] has made all of the files needed to build one of these available, from the bill of materials to the software running on the Pi-compatible board to the case designs. It’s a valuable piece of technology to have around even if you don’t live in fire-prone areas. Not only can wildfire smoke travel across entire continents but simple household activities such as cooking (especially with natural gas or propane) can decimate indoor air quality. You can see that for yourself with an army of ESP32-based air quality sensors.

Brain Implant Offers Artificial Vision To The Blind

Nothing makes you appreciate your vision more than getting a little older and realizing that it used to be better and that it will probably get worse. But imagine how much more difficult it would be if you were totally blind. That was what happened to [Berna Gomez] when, at 42, she developed a medical condition that destroyed her optic nerves leaving her blind in a matter of days and ending her career as a science teacher. But thanks to science [Gomez] can now see, at least to some extent. She volunteered after 16 years to have a penny-sized device with 96 electrodes implanted in her visual cortex. The research is in the Journal of Clinical Investigation and while it is a crude first step, it shows lots of promise and uses some very novel techniques to overcome certain limitations.

The 96 electrodes were in a 10×10 grid with the four corner electrodes missing. The resolution, of course, is lacking, but the project turned to a glasses-mounted camera to acquire images and process them, reducing them to signals for the electrodes that may not directly map to the image.

Continue reading “Brain Implant Offers Artificial Vision To The Blind”

A monoblock split keyboard with the all-important num pad.

Back-to-the-Office Ergo Brings A Bit Of Home Sweet Home

We sure do love a good one-piece split keyboard, and it’s not just because you never have to worry about the halves drifting too far apart throughout the day, though that’s a big plus. For one thing, the angles are always just right without having to mess with anything, so muscle memory gets you back to the home row every time. Usually, the only thing missing from these mono-block splits is the num pad. Well, not on the SuperLyra.

This is [Malevolti]’s back-to-the-office build, and it’s sure to start a few conversations. While we don’t have a lot of details, there will be plenty forthcoming on the Black Cat Plasticworks website. As soon as next year, [Malevolti] plans to sell fully-assembled SuperLyras, kits, and bare-bones PCBs. We really appreciate that it allows for either MX-type switches or Chocs, depending on the hot swap sockets installed.

As much as we love the Maltron-esque num pad in the middle, we imagine that it would be more comfortable to use if it were canted at 45° angle relative to the user’s dominant hand. Fortunately, some enterprising redditor had the same idea. They’ve already mocked this up in Photoshop and are inviting comments on another thread.

Want to go split, but don’t know which is right for you? Check out this Split Keyboard Finder.

Big RGB LED Cube You Can Build Too

LED cubes are really nothing new, many of us consider the building of a good sized one almost an electronics rite of passage that not so many manage to find the time or have the skill to pull off. It’s our pleasure to draw your attention to a lovely build, showing all the processes involved, the problems and the solutions found along the way.

Building a small cube is somewhat of a trivial affair, especially without considering PWM colour mixing, however as simple maths will illustrate, as you increase the number of LEDs on each side, the total number will quickly get quite large. More LEDs need more power and increase control complexity considerably. A larger matrix like this 16 x 16 x 16 LED build, has a total of 4096. This would be a nightmare to drive with plain RGB LEDs, even with cunning multiplexing, but luckily you can buy indexable LEDs in a through-hole package similar to the ubiquitous WS2812-based SMT LEDs you see around. These are based on the PD9823 controller, which can be programmed as if they were a WS2812, at least according to this analysis. Now you can simply chain a column of LEDs, with the control signal passed from LED to nearest neighbour.

Early on in the video build log, you will note there are four power supply modules needed to feed this juice. If we assume each LED consumes 60 mA on full-white (the data for this product link shows a peak value of 100 mA) that is still a total of 246 A or around 1 kW of power. The video does shows a peak power measurement of around this figure, for the whole array on full white, so the maths seems about right.

Control is via a Teensy 4.0 using the FlexIO function of the IMXRT1060RM CPU, and a bunch of 74AHCT595 shift registers giving 32 channels of up to 1000 LEDs per channel if needed. Roughly speaking, using the DMA with FlexIO, the Teensy can drive up to 1 Million LED updates per second, which works out about 32 channels of 100 LEDs per channel updated at 330 frames/sec, so plenty of resource is available. All this is with almost no CPU intervention, freeing that up for handling the 2.4-inch LCD based UI and running the animations, which looks pretty darn slick if you ask us. You can checkout the description of the firmware in the firmware section of the GitHub project. 3D printed jigs allowed for bending and clipping the LEDs leads as well as fixing and aligning the LED column units, so there really is enough detail there to allow anyone so inclined reproduce this, so long as you can swallow the cost of all those LEDs.

For a different approach to LED cubes, checkout this sweet panel based approach, and here’s a really small 4x4x4 module for those with less space to spare.

Continue reading “Big RGB LED Cube You Can Build Too”

A 3D-printed maypole braider can produce woven tubes of rope, yarn, or whatever you've got. Al dente spaghetti strands, maybe.

3D-Printed Braiding Machine Will Show You The Ropes

A maypole braider, aka a circular braider, is a type of horn gear braider that makes braided tubes, like one of those woven finger traps or that lovely bit of gutted paracord that’s jazzing up your otherwise boring DIY USB cable. They are called so because the action mimics the motion of a group of maypole dancers bobbing and weaving around each other in an intricate choreography that results in an equally intricate pole decoration job.

A 3D-printed model showing the motion of a maypole braider. Maypole braiders like [kmatch98]’s are responsible for all kinds of ropes, cords, and other braided goods like fly-fishing lines. They use three or more bobbins, each loaded up with a single strand of yarn.

One of the most important parts of braiding anything, including hair, is maintaining tension on the braid as you go. Here, each bobbin rides inside a bobbin carrier, which performs a number of tasks — it holds the bobbin in place, releases yarn when it’s supposed to, and maintains tension on the yarn while skating a figure eight around the track.

This mesmerizing machine consists of spur gears, a frame with a figure 8 track, a pair of horn gears, and a foot — a guide on the bottom of the bobbin that rides along in the track. Early on, [kmatch98] made a fidget spinner version to visualize the basic function. He studied pictures of commercial bobbin carriers and managed to not only reverse engineer them, but improve the design by eliminating one of the two springs and replacing it with gravity. The remaining spring is used for the bobbin release.

Surprisingly, this isn’t the first plastic braiding machine we’ve featured. Here’s one made of freakin’ LEGO.