Should’ve Used A 555 — Or 276 Of Them

When asked to whip up a simple egg timer, most of us could probably come up with a quick design based on the ubiquitous 555 timer. Add a couple of passives around the little eight-pin DIP, put an LED on it to show when time runs out, and maybe even add a pot for variable timing intervals if we’re feeling fancy. Heck, many of us could do it from memory.

So why exactly did [Jesse Farrell] manage to do essentially the same thing using a whopping 276 555s? Easy — because why not? Originally started as an entry in the latest iteration of our 555 Contest, [Jesse]’s goal was simple — build a functional timer with a digital display using nothing but 555s and the necessary passives. He ended up needing a few transistors and diodes to pull it off, but that’s a minor concession when you consider how many chips he replaced with 555s, including counters, decoders, multiplexers, and display drivers. All these chips were built up from basic logic gates, a latch, and a flip-flop, all made from one or more 555s, or variants like the 556 or 558.

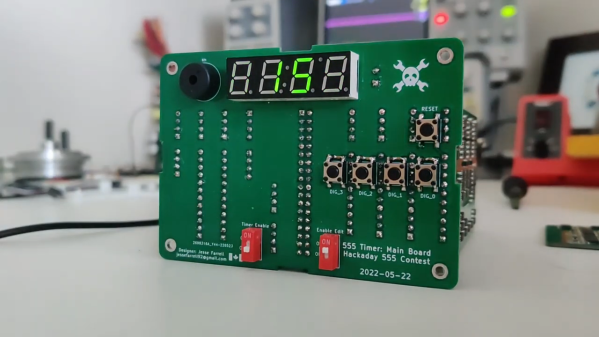
As one can imagine, 276 chips take a lot of real estate, and it took eleven PCBs to complete the timer. A main board acts as the timer’s control panel as well as serving as a motherboard for ten other cards, each devoted to a different block of functions. It’s all neat and tidy, and very well-executed, which is in keeping with the excellent documentation [Jesse] produced. The whole thing is wonderfully, needlessly complex, and we couldn’t be more tickled to feature it.

Continue reading “Should’ve Used A 555 — Or 276 Of Them”

A Steam Box For Not A Lot

If you have ever marveled at the complex wooden curves used by shipbuilders or some furniture makers, then you have probably at some point hankered after a steam box. This is as its name suggests, a chamber in which a piece of wood is steamed until it becomes flexible, at which point it can be pressed into a new shape that it will retain once cooled. The ever-resourceful [Xyla Foxlin] shows us how to make a steam box using easy-to-find parts, as can be seen in the video below the break.

The steam supply comes from a commercial steam boiler of the type used by decorators for wallpaper stripping, and the steam box itself is made from a length of PVC pipe. Inside the pipe are a series of aluminium dowels that form a rack upon which the wood sits away from any condensation, and the whole things sits at a slant with the steam inlet and a condensation drain at the bottom end.

In use, a piece of wood is loaded into the tube and steamed, before being bent using a set of forms in a vice.  The process looks straightforward enough that even we could give it a go, so we’re sure Hackaday readers will find it interesting.

We think this may be the first steam box we’ve brought you, but it’s not the first time we’ve discussed bending wood.

Continue reading “A Steam Box For Not A Lot”

Art of 3D printer in the middle of printing a Hackaday Jolly Wrencher logo

Forget The UV Resist Mask: Expose Custom PCBs Directly On Your SLA Printer

For the enterprising hobbyist and prototyping hardware developer, creating custom PCBs remains somewhat of a struggle. Although there are a number of approaches to go about this, they usually involve printing or drawing a mask that is used to expose the photoresist layer on the to-be-etched PCB. Here [Andrew Dickinson]’s Photonic Etcher project provides an intriguing shortcut, by using the UV source of an MSLA 3D printer directly after converting the project’s Gerber files into a format the MSLA printer can work with.

The concept is as simple as can be: since MSLA printers essentially function by creating a dynamically updated UV mask (either via an LCD panel or DLP system), this means that an MSLA printer can be used to expose the PCB’s UV-sensitive photoresistive coating, effectively making the mask there insoluble during the etching step. This can be done with negative as well as positive photoresistive coatings, depending on the use case.

The obvious advantage of this approach is that you don’t need an additional UV source or any kind of separate mask, only an MSLA printer with a large enough work area to fit the PCB you wish to expose. One limitation of [Andrew]’s project at this point is that it can only convert Gerbers to PWMS (Photon Mono) files, but this can presumably be fairly easily extended to support more MSLA printers.

Scratching Out Business Intelligence

At Hackaday, we love things both from scratch and in Scratch, Scratch being the blocks building helpful language for teaching kids and the like how to program. However, when you have a large amount of data that needs to be processed, queried, and collated to get meaningful insights, it is a pain to rewrite a SQL query every time a new question arises that needs an answer. So perhaps a more elegant approach would be to give the people asking the questions the tools to answer them, but rather than teach them SQL, Mongo, GraphQL, or any other database, give them the tools to scratch out the answers themselves.

That’s enough scratch puns for one article. [Tommy] ran into this situation in 2011 and recently wrote about it. Scratch came out in 2003 and has inspired several projects, such as Google’s Blockly. [Tommy] used Blockly to create a web app where users could drag and drop different blocks to form queries. These layouts were passed to a PHP-backed (though later HVVM for performance reasons) and executed as SQL.

Eventually, big data came around, and the company hired proper data scientists. Though [Tommy] notes that some of those who used his tool went on to learn proper SQL and do it themselves. Applying concepts from programs designed to teach children programming might sound a little odd in a business sense, but we love seeing projects that help someone become curious enough to peer inside the machine.

An opened plastic project box with electronics inside

Smoking Meat Finds Natural Home In The Cloud

Did you know that backyard barbecues now come with WiFi? It should be no surprise, given the pervasiveness of cloud-enabled appliances throughout the home. However [Carl] wasn’t ready to part with his reliable but oh-so-analog BBQ smoker, so instead he created an affordable WiFi-based temperature monitor that rivals its commercial counterparts.

Accurate temperature measurement is essential to smoking meat from both a taste and safety standpoint. In this project, two Maverick ET-732/733 thermistor probes take care of the actual temperature monitoring. One probe is skewered into meat itself, and the other measures the ambient ‘pit’ temperature. Combined, these two gauges ensure that the meat is smoked for exactly the right length of time. [Carl] mentions that adding an extra temperature sensor is trivial for larger setups, but he’s getting by just fine with two data points.

Naturally an ESP8266 does most of the heavy lifting in bridging the gap between smoke and cloud. At the core of this project is utility and practicality – temperature statistics can be viewed on any device with a web browser. Being able to study the temperature trends in this way also makes it easier to predict cooking times. Electronic alerts are also used to notify the chef if the temperature is too hot or cold (among other things). The entire contraption is housed in a smart looking project box that contains an LCD and rotary encoder for configuration.

If this has piqued your culinary interest, check out the extensive documentation recipe over on GitHub and the project Wiki.  We also recommend checking out this project that takes automated meat smoking to the next level.

Conference badge with the custom chip soldered-on on top left, the custom chip itself in a SOIC-16 package on the top right, two close-up die shots on the bottom

Student Competition Badge Bears Custom Silicon

[Daniel Valuch] shared a fun and record-setting conference badge story (Slovak, translated) with us. He was one of the organizers for the “ZENIT in electronics” event, which is an annual Slovak national competition for students. During the competition, students are assigned a letter+number code for the purpose of result submission anonymity, and organizers are always on the lookout for a fun way to assign these codes – this time, they did it with custom silicon!

It just so happened that [Peter], one of [Daniel]’s colleagues, was at the time working for onsemi who were doing a tapeout and had some free space on their test chips. Of course, they didn’t have to think twice. When it was a student’s turn to draw their identification number, instead of a slip of paper, they received a SOIC-16 package with custom silicon bonded to it. Then, they had to solder it to their competition badge – which was, of course, a PCB. Each chip was individually laser-trimmed to contain the student’s number, and that number could then be decoded using a multimeter – or a reasonably sharp eye.

There’s way more to this competition story than just the badge, but the custom silicon part of it sure caught our eyes. Who knows, maybe next year stars will align again and we’ll see custom silicon on one of the hacker conference badges. After all, things have been advancing rapidly on that front – for instance, since Skywater PDK project’s inception in 2020, there’s been several successful runs already, and if you’d like to learn more, you could check the HackChat we’ve had this year, and this Remoticon 2020 workshop!

Up Your Desk Toy Game With This 3D Printed Escalator

Let’s be real, nobody needs a tiny motorized escalator for their desk. But now that you’ve seen it, can you really say you don’t want one of your own? The design comes our way from [AlexY], and is actually the logical evolution of a manually-operated version released previously. But for our money (and 3D printing time), we’d definitely go with this new motorized variant.

While the core mechanism is largely the same, the powered unit uses a N20 geared motor and an 18650 cell. There’s no fancy motor controller here — just flip the switch and you’ve got 30 RPMs worth of stair-steppin’ action. When you’ve run the cell down, and you will, there’s an onboard TP4056 charging module to keep the good times rolling.

[AlexY] hasn’t had a chance to document the build process for the motorized version of the escalator, but as most of the parts are compatible with the manual version, you should be able to figure it out by referencing the earlier assembly guide.

Hot squirted plastic not your thing? We’ve previously seen a wooden escalator designed to keep a Slinky in motion for as long as it takes for you to realize you could be using your skills for something more constructive.

Continue reading “Up Your Desk Toy Game With This 3D Printed Escalator”