Monitor For Bedridden Patients Aims To Improve Care

One of the joys of being a Maker and Hacker is solving problems and filling needs. When you can do both, well, that’s something special. [rodrigo.mejiasz]’s project surely fits into that special category of solving a problem and filling a dire need with his Bedridden Patient Monitor.

While [Rodrigo]’s project page does not specify his motivation for creating this project, one only needs to look as far as their local hospital ward or senior care facility to understand why this device is so wonderful. Healthcare workers and caregivers are stretched paper thin, and their attention is being constantly interrupted.

This is where the Bedridden Patient Monitor comes in. A healthy person can reposition themselves if they are uncomfortable, but bedridden patients cannot. It’s not just that a bedridden patient is unable to get out of bed, but that they are unable to move themselves without assistance. The result is a great amount of pain. And if left unchecked, pressure sores can be the result. These are not only extremely unpleasant, but an added danger to a patients health.

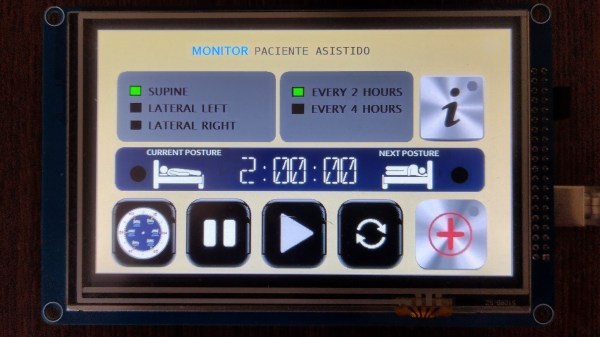
The Bedridden Patient Monitor steps in and provides not just an egg-timer like alert, but helps caregivers track a patients position in bed across even several working shifts. This ensures a continuity of care that might otherwise be easy to miss.

The beauty of this build is in its application but also its simplicity: it’s just an Arduino Mega, a TFT shield with its Micro SD card, and the touch screen itself. A few LED’s and a buzzer take care of alerts. A thoughtfully configured interface makes the devices use obvious so that staff can make immediate use of the monitor.

Makers have a long history diving into the medical field, such as this stab wound treatment device that won the Dyson award in 2021.

Continue reading “Monitor For Bedridden Patients Aims To Improve Care”

The SHA2017 Badge Just Keeps On Giving, This Time It’s A Solar Monitor

Regular readers will know that we have covered the world of electronic badges for many years, and nothing pleases us more than seeing an event badge having a life afterwards rather than becoming a piece of e-waste. Thus we were especially pleased to see [Angus Gratton]’s use of a SHA2017 badge as a solar output monitor, over four years after the event.

The SHA badge used an ESP32 as its processor, and paired it with a touch keypad and an e-ink screen. Its then novel approach of having a firmware that could load MicroPython apps laid the groundwork for the successful open source badge.team firmware project, meaning that it remains versatile and useful to this day.

The solar monitor simply grabs time-series information from the database used by his web graphing system and displays it on the e-ink screen in graph form, but the interest apart from the use of the badge in his treatise on MicroPython coding. He makes the point that many of us probably follow unconsciously, writing for full-fat Python and then fixing the parts which either don’t work or use too many resources on its slimmer cousin. Finally he powers the device from an old phone charger, and shares some tips on controlling its tendency to reboot on power spikes.

It’s almost a year ago that we showed you a SHA badge being used as an environmental sensor.

Thanks [Sebastius] for the tip.

Exercise Bike Hacked As Input For Xbox 360

If you like playing Grand Theft Auto, you’re pretty familiar with squeezing the triggers for accelerating and braking while driving around. [David Programa] decided this was too easy, and instead developed a system to allow him to pedal his way around the virtual world.

The device relies on a flywheel-based exercise bike, with six magnets placed on the flywheel that triggers a reed switch six times per rotation. The extra magnets give the system better resolution at slow speeds. A Hall Effect sensor would be a more reliable way to build this to survive in the long term, but the reed switch does work. It’s paired with a debounce circuit to keep the output clean. A Raspberry Pi is pressed into service, running a Python program to read a GPIO pin activated by the reed switch, counting pulses to determine the speed of pedalling.

The trigger control used in the Xbox 360 controller is a potentiometer that creates varying voltages depending on its position, allowing it to act as an analog accelerator input. 0 volts corresponds to no input, while the trigger reads 3.3 volts when fully depressed. The Raspberry Pi emulates this with its PWM output, paired with a low-pass filter to create the relevant voltage to inject into the trigger input on a generic Xbox 360 controller.

While it’s a lot less practical than simply using a regular controller, the pedal controls do allow you to get a great workout while playing Grand Theft Auto. Some of the more intense chase missions should be a great way to get your heart rate up, and that’s got to be a good thing.

Ironically, though, the system only works for cars and motorbikes in game. The bicycles in Grand Theft Auto are controlled by mashing the A button instead. Alternatively, you might consider a similar system for playing Mario Kart on the Nintendo Switch. Video after the break.

Continue reading “Exercise Bike Hacked As Input For Xbox 360”

Better Car Hinges By 3D Printing

We often use 3D printing to replicate items we might otherwise make with traditional machining methods. Fraunhofer’s new door hinge for a sports car takes a different tack: it tries to be better than the equivalent machined part. The company claims that the new part is half the cost and weighs 35% less than the normal hinge.

Using tools in their 3D Spark software, the team analyzed different factors that led to manufacturing cost. Some of these were specific to the part while others were specific to the process. For example, orienting the part to minimize support and maximize the quantity that fit on the build surface.

Continue reading “Better Car Hinges By 3D Printing”

Reverse Engineering: Trash Printer Gives Up Its Control Panel Secrets

Many of us hardware-oriented types find it hard to walk past a lonely-looking discarded item of consumer electronics without thinking “If only I could lug that back to the car and take it home to play with” and [phooky] from NYC Resistor is no stranger to this sentiment. An old Epson WF-2540 inkjet printer was disassembled for its important ‘nutrients,’ you know, the good stuff like funky motors, encoders and switches. But what do you do with the control panel? After all, they’re usually very specific to the needs of the device they control, and don’t usually offer up much scope for reuse.

The RP2040 PIO is quite capable of pushing out those LCD pixels

[phooky] doesn’t usually bother with them, but this time decided to have a crack at it for fun. Inside, nothing out of the ordinary, with a large single-sided PCB for the key switches and LEDs, and a small PCB hosting the LCD display. The easy part was to figure out how the keyboard scanning was done, which turned out to be pretty simple, it just uses some 74-series shift register devices to scan the columns and clock out the row lines. A Raspberry Pi Pico module was pressed into service to scan the keyboard and enable a keyboard map to be created, by pure brute-force. No need to trace the circuit.

Things got interesting when [phooky] started looking into the LCD interface, based on the Epson E02A46EA chip (good luck finding a datasheet for that one!) and quickly realised that documentation simply wasn’t available, and it would be necessary to do things the hard way. Poking around the lines from the main CPU (an Epson E01A9CA , whatever that is) the display clock was identified, as well as some control signals, and three lines for the RGB channels. By throwing a Saleae data capture into some ROM exploring software, the display configuration was determined to be a standard 320×120 unit.

The PIO unit of the RP2040 was used to generate the video waveforms and push the pixels out to the LCD controller, allowing the RP2040 board to be wired inside the case permanently, converting the control panel into a USB device ready for action!

Want to know a little more about reverse engineering junk (or not) items and repurposing them to your will? Checkout this hacking piece from a couple of weeks back. For something a little more advanced, you could try your hand at a spot of car ECU hacking.

Thanks [Perry] for the tip!

Building A Lightsaber And Scoring A World Record, Too

As we all know, the lightsaber is an elegant weapon, for a more civilized age. [Alex Burkan] is doing what he can to bring that technology to fruition, and even secured a Guinness World Record in the process.

Melty melty.

The build relies on an electrolyzer, splitting water into hydrogen and oxygen gas which is stored in a small tank. This gas can then be released and combusted in a burning stream, creating a weapon with a vague resemblance to a movie-spec lightsaber. With the hydrogen torch burning at temperatures of thousands of degrees, it’s hot enough to melt steel just like in the films.

While the concept of operation is simple, actually building such a device in a handheld size is incredibly difficult. [Alex] highlights key features such as the flashback arrestor that stops the gas tank exploding, and the output nozzle that was carefully designed to produce a surprisingly long and stable flame.

The resulting device only burns for 30 seconds, so you’ve only got a short period of time to do what you need to do. However, unlike previous designs we’ve seen, it doesn’t use any external gas bottles and is entirely self-contained, marking an important step forward in this technology. Video after the break.

Continue reading “Building A Lightsaber And Scoring A World Record, Too”

Young Maker Mixes Traditional Japanese Construction With Modern Art

We’re Makers. By definition, we make things. Some of us prefer to build from scraps, while others like to make their own IC’s in their garage. [Make With Miles] on the other hand prefers one of the oldest types of making around: woodworking. And in this build, he goes a step further by using a very old Japanese method of woodworking called Kumiko to build a Stratocaster style electric guitar. The results are absolutely stunning as you can see in the video below.

Inspired by a challenge put forth by [The Modern Maker Podcast] to build a woodworking project that ties into another hobby that isn’t related to woodworking, [Miles] knocked it out of the park by including several art forms in this one-off Strat.

The centerpiece of this guitar build is the Kumiko style of construction used within the body. Kumiko is a Japanese method of assembling wood without the use of fasteners. Developed around 600-700AD, Kumiko is as much a construction method as an art form. [Miles] went further by filling the Kumiko framework with blackened epoxy resin which was then sanded and polished. Decals bring the headstock into the motif, but the attention to details goes much, much further. Be sure to watch the video so you can get an appreciation for the high level of workmanship that this young man displays.

That’s right- [Miles] isn’t a maker with decades of experience. In fact in 2017, one of his YouTube videos was “12 yr Old Builds a Row Boat!!!” [Miles], our hats are off to you and we look forward to seeing your art progress, for you truly have commanded the attention of the maker community that you are so rightfully part of.

Just as [Miles]’ guitar hides some great hacks, so does this guitar with Hot Swappable pickups. Thanks to [Keith] for sending this on to the Tip Line!

Continue reading “Young Maker Mixes Traditional Japanese Construction With Modern Art”