Custom Enclosure For 3D Printer

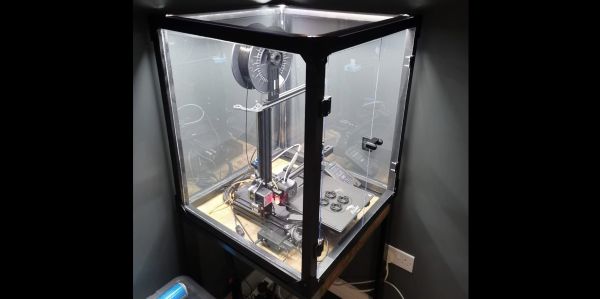
Having an enclosure around an FDM 3D printer is generally a good idea, even when printing only with PLA, as it keeps the noise in, and the heat (and smell, with ABS) inside. With all the available options for enclosures out there, however, [David McDaid] figured that it should be possible to make an enclosure that does not look like a grow tent and is not overly expensive. He also shared the design files on GitHub.

The essential idea is very simple and straightforward: the structural part is cut out of pine beams that are cut to size and joined into a cube by (3D-printed) corner brackets, with acrylic (Perspex) sheets filling in the space between the wooden beams. A door is formed using (also 3D-printed) hinges and door handles. The whole enclosure is rounded off with a lick of paint on the wooden elements, and a diffused set of LED lights for internal illumination.

It definitely has to be admitted that it makes for a very stylish enclosure, with a lot of modding potential. It can also easily be adapted to differently sized printers and filament material demands.

SDR Scanner Listens To Everything

In the old days, scanners would listen to a bunch of channels in a round-robin fashion. If a signal breaks the squelch, the scanner stops and scanning continues scanning after a few seconds of inactivity. But with modern SDRs, you don’t have to listen to one channel at a time. You can listen to all of them. [Tech Minds] shows RTL-SDR Scanner on Linux to record up to 20 MHz of the band simultaneously. It records all the channels in the band of interest. The actual project is on GitHub.

Once recorded, you can use a web interface to listen to the channels and see some statistics about them. [Tech Minds] tried recording aircraft traffic. It worked, but the program doesn’t know how to demodulate AM yet so if you want to record the entire shortwave band, aircraft, or other AM sources, you’ll have to wait a bit before this software is ready for your use case.

If you need to run the program under Windows like [Tech Minds] did, you can use VMWare Workstation Player to get a free copy of Linux on Windows. We wondered if WSL version two might work, too, but we don’t know. Once you have Linux running, Docker makes the installation straightforward.  Since the interface is a web interface, you could probably run this on a small computer on the network and then access it at your leisure from another computer.

Of course, old-fashioned scanners were often used to listen to police and fire radios. Those have all gone trunked these days. This isn’t a new idea, but it did seem like a well-packaged solution.

Continue reading “SDR Scanner Listens To Everything”

Arduino Does SDI Video With FPGA Help

If you are running video around your home theater, you probably use HDMI. If you are running it in a professional studio, however, you are probably using SDI, Serial Digital Interface. [Chris Brown] looks at SDI and shows a cheap SDI signal generator for an Arduino.

On the face of it, SDI isn’t that hard. In fact, [Chris] calls it “dead simple.” The problem is the bit rate which can be as high as 1.485 Gbps for the HD-SDI standard. Even for a super fast processor, this is a bit much, so [Chris] turned to the Arduino MKR Vidor 4000. Why? Because it has an FPGA onboard. Alas, the FPGA can’t do more than about 200 MHz, but that’s fast enough to drive an external Semtech GS296t2 serializer which is made to drive SDI signals.

The resulting project contains the Arduino, the serializer, a custom PCB, and both FPGA and microcontroller code. While the total cost of the project was a little under $200, that’s still better than the $350 to $2000 for a commercial SDI signal generator.

If you want to play along, the files are out on GitHub. We used the Vidor back in 2018 when it first came out. If you need a quick start on FPGAs, there’s always our boot camp.

Jupiter’s Moon Io Could Play Host To Life

It was many years ago now when David Bowie asked if there was life on Mars. Since then, we’ve concluded there isn’t, much to everyone’s disappointment. That left scientists the world over to start looking elsewhere for new lifeforms for us to talk to, conquer, or play bridge with. Or perhaps more likely, look at under a microscope.

The latest candidate for hosting nearby life is Jupiter’s moon, Io. Let’s take a look at what makes Io special, and what we might hope to find there.

Continue reading “Jupiter’s Moon Io Could Play Host To Life”

Create Your RTL Simulations With KiCAD

[Bob Alexander] is in the process of designing a homebrew discrete TTL CPU, and wanted a way to enter schematics for digital simulations via a Verilog RTL flow. Since KiCAD is pretty good at handling hierarchical schematics, why not use that? [Bob] created a KiCAD plugin, KiCadVerilog allowing one to instantiate and wire up the circuits under consideration, and then throw the resulting Verilog file at your logic simulator of choice.

KiCadVerilog doesn’t do all the hard work though, as it only provides the structure and the wiring of the circuit. The actual guts of each TTL instance needs to be provided, and a reference to it is manually added to the schematic object fields. That’s a one-time deal, as you can re-use the component library once generated. Since TTL logic has been around for a little while, locating a suitable Verilog library for this is easy. Here’s ice-chips-verilog by [TimRudy] on GitHub for starters. It’s intended as a collection for Icestudio (which is also worth a look). Still, the Verilog code for many TTL series devices is presented ready for the taking, complete with individual test benches in case you need them.

Check out the project GitHub page for the module source code, and some more documentation about the design process.

We’ve seen many RTL hacks over the years, here’s an interesting way to generate a PCB layout with discrete logic, direct from the RTL.

Ask Hackaday: The Ten Dollar Digital Mixing Desk?

There comes a point in every engineer’s life at which they need a mixing desk, and for me that point is now. But the marketplace for a cheap small mixer just ain’t what it used to be. Where once there were bedroom musicians with a four-track cassette recorder if they were lucky, now everything’s on the computer. Lay down as many tracks as you like, edit and post-process them digitally without much need for a physical mixer, isn’t it great to be living in the future!

This means that those bedroom musicians no longer need cheap mixers, so the models I was looking for have disappeared. In their place are models aimed at podcasters and DJs. If I want a bunch of silly digital effects or a two-channel desk with a crossfader I can fill my boots, but for a conventional mixer I have to look somewhat upmarket. Around the three figure mark are several models, but I am both a cheapskate and an engineer. Surely I can come up with an alternative. Continue reading “Ask Hackaday: The Ten Dollar Digital Mixing Desk?”

Surfing The Web Like It’s 1978 — Carbonyl

[Fathy] gets a kick out of doing odd things with Chromium, and Carbonyl is a clever byproduct of that hobby. In this case, it’s what you get when you connect chrome’s renderer to an SVG output module and then convert that SVG to colored characters on a terminal. See, html2svg is an earlier project, taking Chromium’s Skia engine and plugging it into an SVG back-end. And once you have SVG, why not render it to the terminal?


And the results are actually pretty impressive. Imagery is rendered using Unicode 2584, a half-block character. The background and foreground color can be set per character, giving us two controllable pixels per character. Text is handled a bit differently, rendering using the normal text fonts, making for readable pages.

The source is very much a work in progress, but there are some neat ideas already coalescing around the project, like using sixels for better rendering. There’s already decent mouse support and audio output, making for an impressive terminal experience. This might be a project to keep an eye on.