Car Becomes A Massive Bubble Machine

You’ve probably seen street performers or family members making giant bubbles at some point in your life. But what if you could go ever bigger…even approaching a bubble of infinite length? That’s precisely what [Engineezy] tried to do.

The common technique behind blowing big bubbles involves attaching a thick rope to two sticks, then dipping the sticks in bubble fluid. The two sticks can then be spread apart to act as a big triangular bubble wand to create massive bubbles.

So the idea here to create a giant bubble-blowing frame using the same technique, continually feed it with bubble fluid, and stick it on top of a car. Spread the wings of the bubble wand, and watch the bubble grow. Oh, and this setup uses special bubble fluid—made by mixing soap, water, and veterinary J-Lube in specific ratios. Feeding the car-mounted wand with fluid was achieved by tubing delivering a continuous flow. Early small-scale attempts created wild 25 foot bubbles, while the car version made one over 50 feet long. Not infinite, but very cool.

As it turns out, the science of bubbles is deep and interesting.

Continue reading “Car Becomes A Massive Bubble Machine”

On the left, a transluscent yellowy-tan android head with eyes set behind holes in the face. On the right, a bright pink circle with small green eyes. It is manipulated into the image of a smiling face via its topography.

A Robot Face With Human Skin

Many scifi robots have taken the form of their creators. In the increasingly blurry space between the biological and the mechanical, researchers have found a way to affix human skin to robot faces. [via NewScientist]

Previous attempts at affixing skin equivalent, “a living skin model composed of cells and extracellular matrix,” to robots worked, even on moving parts like fingers, but typically relied on protrusions that impinged on range of motion and aesthetic concerns, which are pretty high on the list for robots designed to predominantly interact with humans. Inspired by skin ligaments, the researchers have developed “perforation-type anchors” that use v-shaped holes in the underlying 3D printed surface to keep the skin equivalent taut and pliable like the real thing.

The researchers then designed a face that took advantage of the attachment method to allow their robot to have a convincing smile. Combined with other research, robots might soon have skin with touch, sweat, and self-repair capabilities like Data’s partial transformation in Star Trek: First Contact.

We wonder what this extremely realistic humanoid hand might look like with this skin on the outside. Of course that raises the question of if we even need humanoid robots? If you want something less uncanny, maybe try animating your stuffed animals with this robotic skin instead?

Cutting An IoT Fan Free Of The Cloud

The cloud is supposed to make everything better. You can control things remotely, with the aid of a benevolent corporation and their totally friendly servers. However, you might not like those servers, and you might prefer to take personal control of your hardware. If that’s the case, you might like to follow the story of [ouaibe] and their quest to free a fan from the cloud.

The unit in question was a tower fan from Dreo. [ouaibe] noted that there was already a project to control the fans using Home Assistant, but pure lower-level local control was the real goal here. Work began on pulling apart the Dreo Android app to determine how it talked to the fan, eventually turning up a webserver on board, but little progress. The next step was to disassemble the unit entirely. That turned up multiple PCBs inside, with one obviously for wireless communication and another hosting a Sino Wealth microcontroller. Dumping firmwares followed,  along with reverse engineering the webserver, and finally establishing a custom ESPHome integration to fully control the fan.

[ouaibe] has shared instructions on how to cut your own fan from the cloud, though notes that the work won’t be extended to other Dreo products any time soon. In any case, it’s a great example of just how much work it can take to fully understand and control an IoT device that’s tethered to a commercial cloud server. It’s not always easy, but it can be done!

3D-Printed RC Drift Car Comes With Smoke Effects

Drift cars are cool, but they’re also expensive. If you don’t have money for endless tires, fuel, and engine rebuilds, you might like to get involved at the RC scale instead. [Max Imagination] has just the build to get you started.

The design uses 3D printing for the majority of the chassis. Rigidity is front of mind, as is creating the right  steering and suspension geometry for smooth, controllable drifts. The drivetrain is 3D-printed too, using plastic gears and universal-joint axles combined with off-the-shelf bearings. Steering is controlled via an off-the-shelf servo, with a brushless motor putting power down to all four wheels. While drifting at full scale is best achieved with rear-wheel-drive, it’s easier to control at the small scale with four driven wheels.

True to the DIY ethos, an Arduino-based RC system is used to drive the steering servo and motor speed controller, with a home-built pistol-grip controller. It also activates a small power supply which runs little humidifier modules, which turn water into a visible vapor for a fun smoke effect. It doesn’t really imitate tire smoke, since it disappears nearly the instant the car moves, but it’s still a neat effect.

It’s a neat build that makes a great starting point for your dive into RC. Meanwhile, if you’re more about speed than getting sideways, we’ve seen a homebrew RC car designed to that end as well. Video after the break. Continue reading “3D-Printed RC Drift Car Comes With Smoke Effects”

USB-C Powered Hotplate Is Not For Food

Once upon a time, it was deemed mostly silly to try and schlep power from a computer’s ports. Then it was kind of amusing to do so with USB, and before you knew it, we were running whole laptops off what started out as a data connector. These days, it’s not unusual to run a soldering iron off USB-C, or, as [MarkTheQuasiEngineer] has done—a hotplate!

This hotplate is not for quesadillas, nor samosas. Instead, it’s a tiny hotplate for tiny reflow tasks. Given many PCBs are quite small, there’s no need for a huge hot plate to get your circuits assembled.

The device relies on metal ceramic heating elements to provide the warmth. An NTC thermistor is used for monitoring the temperature for accurate control, which is handled by the STM32 microcontroller that’s running the show. It also drives a small display indicating the mode of operation and current temperature. The STM32 controls the power going to the heating element from the USB-C feed with a stout power MOSFET.

Sadly, the project hasn’t been a complete success. With a PCB on the plate, [MarkTheQuasiEngineer] was only able to achieve peak temperatures of around 200 C. That’s not great for doing proper reflow, but it’s a start. He believes upgrading to a more powerful supply to feed the hotplate will help.

We’ve featured some other great reflow hotplates before too.
Continue reading “USB-C Powered Hotplate Is Not For Food”

Linux Fu: Failing Pipelines

Bash is great for automating little tasks, but sometimes a little script you think will take a minute to write turns into a half hour or more. This is the story of one of those half-hour scripts.

I have too many 3D printers. In particular, I have three that are almost — but not exactly — the same, so each one has a slightly different build process when I want to update their firmware. In all fairness, one of those printers is heading out the door soon, but I’ll probably still wind up building firmware images for it.

My initial process was painful. I have a special directory with the four files needed to configure Marlin for each machine. I copy all four files and ask PlatformIO to perform the build. Usually, it succeeds and gives me a file that looks like firmware-yyyyddmmhhmm.bin or something like that.

The problem is that the build process doesn’t know which of the three machines is the target: Sulu, Checkov, or Fraiser. (Long story.) So, I manually look at the file name, copy it, and rename it. Of course, this is an error-prone process, and I’m basically lazy, so I decided to write a script to do it. I figured it would take just a minute to bundle up all the steps. I was wrong.

Continue reading “Linux Fu: Failing Pipelines”

A Simple Liquid Level Indicator With A Single IC

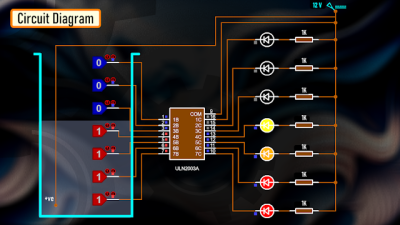
Often, the only liquid level indicator you need is your eyes, such as when looking at your cold beverage on a summer’s day. Other times, though, it’s useful to have some kind of indicator light that can tell you the same. [Hulk] shows us how to build one for a water tank using a single IC and some cheap supporting components.

If you’re unfamiliar with the ULN2003, it’s a simple Darlington transistor array with seven transistors inside. It can thus be used to switch seven LEDs without a lot of trouble. In this case, green, yellow, and red LEDs were hooked up to the outputs of the transistors in the ULN2003. Meanwhile, the base of each transistor is connected to an electrode placed at a different height in the water tank. A further positive electrode is placed in the tank connected to 12 volts. As the water raises to the height of each electrode, current flow from the base to the positive electrode switches the corresponding transistor on, and the LED in turn. Thus, you have a useful liquid level indicator with seven distinct output levels.

It’s a neat build that might prove useful if you need to check levels in a big opaque tank at a glance. Just note that it might need some maintenance over time, as the electrodes are unlikely to remain completely corrosion free if left in water. We’ve seen some other great uses of the ULN2003 before, too. Video after the break.

Continue reading “A Simple Liquid Level Indicator With A Single IC”