Shoot Smooth Video From Your Phone With The Syringe Slider

We love the idea [Btoretsukuru] shared that uses a simple setup called the Syringe Slider to take smoothly-tracked video footage of small scenes like model trains in action. The post is in Japanese, but the video is very much “show, don’t tell” and it’s perfectly clear how it all works. The results look fantastic!
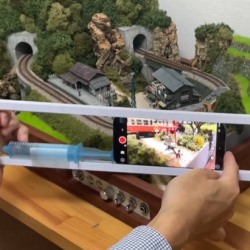
Suited to filming small subjects.

The device consists of a frame that forms a sort of enclosed track in which one’s mobile phone can slide horizontally. The phone butts up against the plunger of an ordinary syringe built into the frame. As the phone is pushed along, it depresses the plunger which puts up enough resistance to turn the phone’s slide into a slow, even, and smooth glide. Want to fine-tune the resistance and therefore the performance? Simply attach different diameter tips to the syringe.

The results speak for themselves, and it’s a fantastically clever bit of work. There are plenty of DIY slider designs (some of which get amazingly complex) but they are rarely small things that can be easily gotten up close and personal with small subjects like mini train terrain.

Continue reading “Shoot Smooth Video From Your Phone With The Syringe Slider”

Some SPI Flash Chip Nuances Worth Learning

Some hackers have the skills to help us find noteworthy lessons in even the most basic of repairs. For instance, is your computer failing to boot? Guess what, it could just be a flash chip that’s to blame — and, there’s more you should know about such a failure mode. [Manawyrm] and [tSYS] over at the Kittenlabs blog show us a server motherboard fix involving a SPI flash chip replacement, and tell us every single detail we should know if we ever encounter such a case.

They got some Gigabyte MJ11-EC1 boards for cheap, and indeed, one of the BIOS chips simply failed — they show you how to figure that one out. Lesson one: after flashing a SPI chip, remember to read back the image and compare it to the one you just flashed into it! Now, you might be tempted to take any flash chip as a replacement, after all, many are command-compatible. Indeed, the duo crew harvested a SPI chip from an ESP32 board, the size matched, and surely, that’d suffice.

That’s another factor you should watch out for. Lesson two is to compare the SPI flash commands being used on the two chips you’re working with. In this case, the motherboard would read the BIOS alright and boot just fine, but wasn’t able to save the BIOS settings. Nothing you couldn’t fix by buying the exact chip needed and waiting for it to arrive, of course! SPI flash command sets are fun and worth learning about — after all, they could be the key to hacking your “smart” kettle. Need a 1.8 V level shifter while flashing? Remember, some resistors and a NPN transistor is more than enough.

Hackaday Links Column Banner

Hackaday Links: September 29, 2024

There was movement in the “AM Radio in Every Vehicle Act” last week, with the bill advancing out of the US House of Representatives Energy and Commerce Committee and heading to a full floor vote. For those not playing along at home, auto manufacturers have been making moves toward deleting AM radios from cars because they’re too sensitive to all the RF interference generated by modern vehicles. The trouble with that is that the government has spent a lot of effort on making AM broadcasters the centerpiece of a robust and survivable emergency communications system that reaches 90% of the US population.

The bill would require cars and trucks manufactured or sold in the US to be equipped to receive AM broadcasts without further fees or subscriptions, and seems to enjoy bipartisan support in both the House and the Senate. Critics of the bill will likely point out that while the AM broadcast system is a fantastic resource for emergency communications, if nobody is listening to it when an event happens, what’s the point? That’s fair, but short-sighted; emergency communications isn’t just about warning people that something is going to happen, but coordinating the response after the fact. We imagine Hurricane Helene’s path of devastation from Florida to Pennsylvania this week and the subsequent emergency response might bring that fact into focus a bit.

Continue reading “Hackaday Links: September 29, 2024”

Thinkpad 13 Gets NVMe Support With Three Jumpers

Hardware restrictions can be unreasonable, and at times, it can be downright puzzling just how arbitrary they are. Such is the case with the Lenovo ThinkPad 13 — it’s got a M.2 M-key socket, yet somehow only supports SATA SSDs in it, despite the CPU being new enough to support both SATA and NVMe effortlessly. [treble] got one of those laptops from a recycler, and decided to figure out just what this laptop’s deal is.

Armed with schematics, she and her friend looked at the M.2 implementation. The slot’s schematic sure looked ready to support either kind of drive, a surprising find. Here’s the catch — Lenovo only populated components for SATA drive support. All you need to switch from SATA to NVMe support is three magnet wire jumpers, or zero-ohm 0402 resistors, and voila; you can now use the significantly cheaper kind of M.2 drives in your ThinkPad.

All is documented, and [treble] even mentions that you could increase the link speed by adding more PCIe lane capacitors that Lenovo, again, left unsoldered. UEFI already has the modules needed to boot from NVMe, too – it’s an outright upgrade for your laptop with just a soldering iron’s touch required, and a reminder that proprietary tech will screw you over for entirely arbitrary reasons. Now, it’s not just laptops you can upgrade with a few resistors — same goes for certain electric cars.

First Tentative Sales Of Tandem Perovskite-Silicon PV Panels

To anyone who has spent some time in photovoltaic (PV) power circles, the word ‘perovskite’ probably sounds familiar. Offering arguably better bandgap properties than traditional silicon cells, perovskite-based PV panels also promise to be cheaper and (literally) more flexible, but commercialization has been elusive. This is something which Oxford PV seeks to change, with the claim that they will be shipping the first hybrid perovskite-silicon panels to a US customer.

Although Oxford PV prefers to keep the details of their technology classified, there have been decades of research on pure perovskite PV cells as well as tandem perovskite-silicon versions. The reason for the tandem (i.e. stacked) construction is to use more of the solar rays’ spectrum and total energy to increase output. The obvious disadvantage of this approach is that you need to find ways to make each layer integrate in a stable fashion, with ideally the connecting electrodes being transparent. A good primer on the topic is found in this 2021 review article by [Yuanhang Cheng] and [Liming Ding].

The primary disadvantage of perovskites has always been their lack of longevity, with humidity, UV irradiation, temperature and other environmental factors conspiring against their continued existence. In a 2022 study by [Jiang Liu] et al. in Science it was reported that a perovskite-silicon tandem solar cell lost about 5% of its initial performance after 1,000 hours. A 2024 study by [Yongbin Jin] et al. in Advanced Materials measured a loss of 2% after approximately the same timespan. At a loss of 2%/1,000 hours, the perovskite layer would be at 50% of its initial output after 25,000 hours, or a hair over 2.85 years.

A quick glance through the Oxford PV website didn’t reveal any datasheets or other technical information which might elucidate the true loss rate, so it would seem that we’ll have to wait a while longer on real data to see whether this plucky little startup has truly cracked the perovskite stability issue.


Top image: Summary of tandem perovskite-silicon solar cell workings. (Credit: Yuanhang Cheng, Liming Ding, SusMat, 2021)

Seven Day Movement Makes A Rubbish Clock

We see a lot of clocks here at Hackaday. Some of them are better than others, but this one from [John Graham-Cumming] is definitely a rubbish clock. It performs the simple yet vital task of keeping track of which day is which when it comes to trash collection.

The big revelation for us from this project is that the standard plastic battery clock mechanism which you’ll  no doubt be familiar with from many cheap clocks can also be bought with gearing for a weekly rather than daily revolution. The physical hack is therefore a pretty simple one of mounting the movement with a single hand over a face showing the waste collections, and the write-up goes into more depth about the code for creating custom SVG clock faces. We’re already thinking of interesting stuff that can be done with one of these movements.

Meanwhile, we like this clock, but it’s certainly not the first trash indicator we’ve seen.

Curing CRT Cataracts Freshens Up Retro Roundy TVs

It’s been a long time since the family TV has had a CRT in it, and even longer since that it was using what was basically an overgrown oscilloscope tube. But “roundies” were once a thing, and even back in the early 80s you’d still find them in living rooms on TV repair calls, usually sporting a characteristic and unsightly bullseye discoloration.

Fast-forward a few decades, and roundy TVs have become collectible enough that curing their CRT cataracts is necessary for restorationists like [shango066], a skill he demonstrates in the video below. The defect comes from the composite construction of CRTs — a safety feature added by television manufacturers wisely concerned with the safety aspects of putting a particle accelerator with the twin hazards of high vacuum and high voltage in the family home. The phosphor-covered face of the tube was covered by a secondary glass cover, often tinted and frosted to improve the admittedly marginal viewing experience. This cover was often glued in place with an epoxy resin that eventually oxidized from the edges in, making the bullseye pattern.

The remedy for this problem? According to [shango066], it’s heat, and plenty of it. After liberating the tube from the remarkably clean TV chassis, he took advantage of a warm summer’s day and got the tube face cooking under a black plastic wrap. Once things were warmed up, more heat was added to really soften the glue; you can easily see the softening progress across the face of the tube in the video below. Once softened, gentle prying with wooden chopsticks completes the job of freeing the safety lens, also in remarkably good shape.

With the adhesive peeled off in an oddly satisfying manner, all that’s left is a thorough cleaning and gluing the lens back on with a little silicone sealant around the edges. We’d love to see the restored TV in operation, but that’s left to a promised future video. In the meantime, please enjoy a look at the retro necessities TV owners depended on in the good old days, which really weren’t all that good when you get down to it.

Continue reading “Curing CRT Cataracts Freshens Up Retro Roundy TVs”