Classic 80’s Stereo Receiver Enjoys A Second Life As RadioduinoWRT

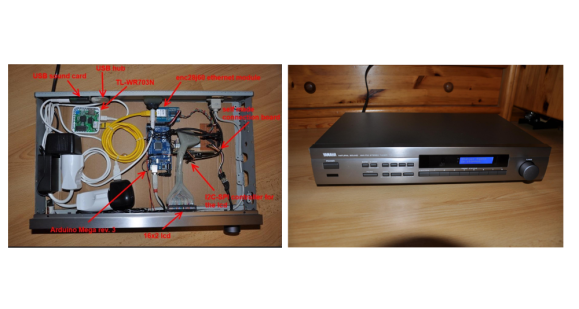
radio2[Raffael] had an old Broken Yamaha natural sound receiver lying around. Rather than throw it out, he built himself a slick web radio. He calls it RadioduinoWRT. [Raffael] started by removing all the internals – though he kept the front panel controls.  He then added an Arduino Mega to handle the front panel controls, including a 16×2 character LCD module. The Arduino also takes commands via IR remote. An enc28j60 Ethernet module allows the Arduino to communicate with a the brains of the operation, a TL-WR703N mini router.

A micro USB hub expands the single USB port on the WR703, allowing both a USB sound card and a 4 gig USB stick to be mounted. We’d like to add that the TL-WR703 is a must in this application – the amazon link [Rafael] provides brings up the TL-WR702 as a top link. Only the TL-WR703 has a USB host connection.

The real magic is in [Raffael’s] software setup. The WR703 is running OpenWRT.  He added modules for the USB sound card, as well as expanding the file system onto the USB stick. Once that was complete [Raffael] added Music Player Daemon (MPD) and MPC, a console app to drive MPD. Lighttpd, a light web server provides an interface for the Arduino as well as a web front end to the entire radio.All this allows [Raffael] to control his radio in several ways. He can log in via any web browser on his network. He can use the front panel controls. He can use an IR remote. Since he is running MPD, any client (there are literally hundreds out there) will also drive the radio.

While a low-end USB sound card in a home stereo application does make our inner audiophile cringe a bit, the quality does seem to be pretty good. [Rafael’s] design would make it simple to swap out a higher quality USB sound card if the need arises.

Continue reading “Classic 80’s Stereo Receiver Enjoys A Second Life As RadioduinoWRT” →
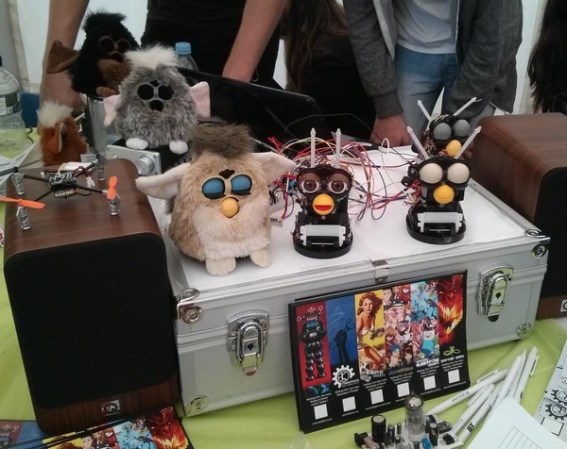
Furbies Sing Queen At Fresher’s Faire

kent-furby

The University of Kent has their own hacker space, called  [Maker Society]. Every year the school holds an orientation for new students called the Fresher’s Faire. The [Maker Society] display at this year’s Fresher’s Faire included a group of partially clothed Furbies singing the classic Bohemian Rhapsody by Queen. This isn’t our first run in with Bohemian Rhapsody and hacked hardware.

The [Maker Society] started by doing some internet research and reverse engineering a first generation Furby.  The Furby itself is a marvel of cost reduction. All the doll’s functions run from a single motor and a cam system. A limit switch tells the on-board microcontroller when the cam is at the zero position. An optical encoder keeps track of the cam as it moves. The [Society] replaced Furby’s internal microcontroller with an Atmel ATMega328. This allowed them to use the Arduino programming environment.

Many classic Animatronic systems use an audio recording for motion. Typically a stereo recorder would perform double duty. The first track would contain the audio for the animation. A second track would contain audio tones corresponding to movement of each of the degrees of freedom of the doll being animated. Because the two tracks were on the same strip of magnetic tape, the audio and movement would always be in sync. Multitrack tape record and playback systems added even more flexibility to this type of system.

Continue reading “Furbies Sing Queen At Fresher’s Faire” →

Can An 8 Node Raspberry Pi Cluster Web Server Survive Hackaday?

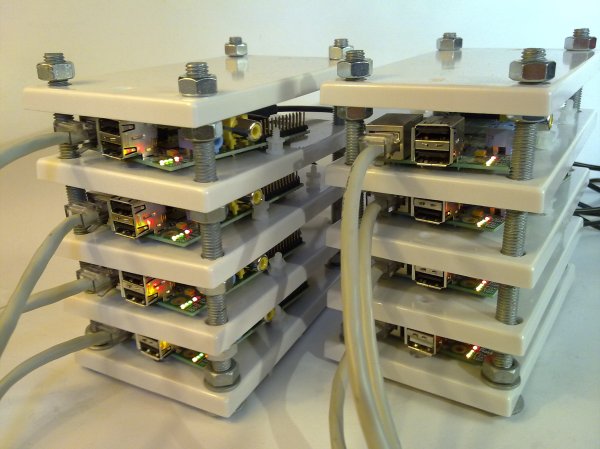
Plenty of folks have used their Raspberry Pi as a web server. [Steve] however is the first 8 node load balanced pi cluster server we’ve run into.  While we have seen pi clusters before, they’ve never been pressed into service as a public facing web server. [Steve] has created a really nice informative website about the Raspberry Pi, and Linux in general. As his page views have increased, he’s had to add nodes to the server. Currently [Steve] sees about 45,000 page views per month.

At first glance it would seem that the load balance system would be the weak link in the chain. However, [Steve] did realize that he needed more than an Pi to handle this task. He built the load balancer using an old PC with 512MB of RAM and a 2.7GHz x86 CPU. The most important thing about the balancer is dual network interfaces, one side facing the internet, the other facing the Pi cluster. The balancer isn’t a router though. Only HTTP requests are forwarded. The Pi nodes themselves live on their own sub net. Steve has run some basic testing with siege, however nothing beats a real world test. We figured a couple of links in from Hackaday would be enough to acid test the system.

ASAP 3 – The Almost Simple As Possible Computer

ASAP-3 12 - LED Display

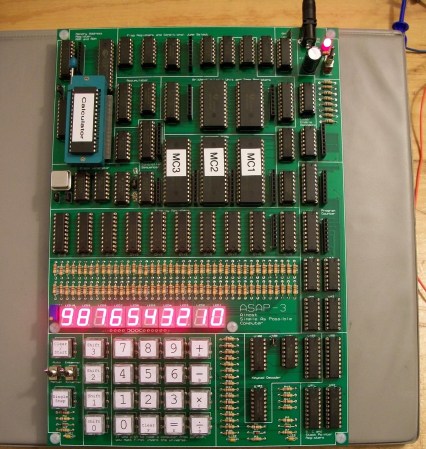
[Pong] has joined an elite club of people who have designed and built their own computer – including a CPU created from discrete 7400 series logic. His computer is the  Almost Simple As Possible Computer 3 (ASAP-3). ASAP-3 is not a completely new design. The architecture is based upon the SAP series of computers from Albert Malvino’s book, Digital Computer Electronics. [Pong] looked at quite a few of the “modern retro” computers such as Magic-1, Big Mess o’ Wires 1, and the Duo. These computers were beyond his skill levels back then, so he began to build his own system. His primary design goal was to be able to run a 4 function calculator program.

One thing that can’t be stressed enough is the fact that [Pong] made his design work much easier by using lots of simulation. His tool of choice was Proteus Design Suite. While simulation can’t solve every problem, it can often help in verifying that a given design is sound. The ASAP-3’s instruction set is microcode, based upon the 8085 series instruction set. The microcode itself is stored on Flash ROMS. Using microcode makes ASAP-3 very flexible. Don’t have a machine instruction you need? No problem – just write one up. When all was said and done, [Pong] had over 100 instructions spread over 3 Flash ROM chips.

The hardware was only half the battle – [Pong] found writing the software just as challenging. He wrote all the software by hand in his own machine code. This is where the simulation mentioned above really saved him some time. Even with simulation he still ran into some problems. The ASAP-1 is limited to a clock speed of around 500kHz. Above that, glitches from the ROM chips start triggering the asynchronous inputs in some of the registers. [Pong] doesn’t have a logic analyzer on hand, so he wasn’t able to track this one down further. He also found a (update simulation only) issue with the carry bit on the 74LS181 bit slice ALU. In certain circumstances the carry bit would not propagate correctly. [Pong] corrected this by using a ROM as a look up table replacement for certain ‘181 functions. Even with these limitations, this is still a great hack!

Continue reading “ASAP 3 – The Almost Simple As Possible Computer” →

“Professor Kill A. Volt” Shocks Pumpkins With His Tesla Coil

jj

[JJ Dasher] is back again this year, shocking some pumpkins! (Volume warning). We featured [JJ] two years ago for his Halloween candy shocking Tesla coil. He apparently has been busy in his mad scientist laboratory doing some upgrades. This year his coil is producing 5 foot long streaming arcs!

[JJ’s] Tesla coil is a uses two microwave oven transformers as a power supply. He also uses an Asynchronous Rotary Spark Gap (ASRG). As the name implies, a rotary spark gap uses a motor to turn a rotor. At certain points in the rotation, the rotor creates a small enough gap that a high voltage spark can jump across, energizing the primary coil. This idea is similar to an automotive ignition system distributor. [Pete] gives a great example of an ASRG in this video. Most ASRG based Tesla coils use the small motor to spin up the spark gap. Varying the speed of the motor creates the characteristic “motor revving” noise heard in the final arcs of the Tesla Coil.

[JJ] made things a bit more interesting by installing a couple of fluorescent bulbs inside a pumpkin near the coil. The coil lights them easily, and they glow even brighter when the pumpkin is struck. Still not satisfied, he also donned his grounded chainmail gloves and drew the arc to himself. We always love seeing people safely taking hits from massive Tesla coils, but this definitely falls under the “don’t try this at home” banner.

Continue reading ““Professor Kill A. Volt” Shocks Pumpkins With His Tesla Coil” →

A Nightmare On CNC Street

[James Dressman] emailed us about his two-year journey of getting a large CNC machine running in his home. He doesn’t currently have a webpage, however his story was so incredible that we just had to feature it.   [James] started by doing plenty of research online, and ordering a new CNC. The real fun started when he opened up a wall to fit the 2300 pound monster into his home. [James] found so much insect and water damage that he ended up rebuilding the entire rear half of his home.

Once the CNC was safely set up, the fun still wasn’t over. Not all family members are keen on having an industrial machine tool in the house. In [James’] case it was the smell of way oil that drove his wife nuts. This was all before spindle problems with the tool itself began to rear their ugly head. Illness and family tragedy put everything on hold for several months, however once [James] strength returned, he attacked the problems with renewed vigor. It was a long and winding road, but he now has a fully functional CNC.

But don’t just take our word for it. Continue after the break to see his photo album and to hear James tell the story in his own words.

Continue reading “A Nightmare On CNC Street” →

Heathkit Clock Updated With A PIC32 And GPS

heathkit-clock

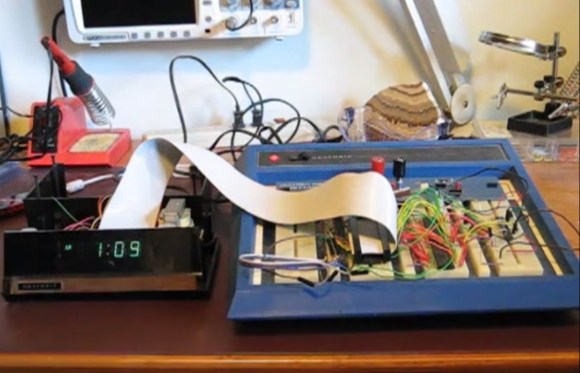
One of [Bob’s] most treasured possessions is a Heathkit alarm clock he put together as a kid. Over the years he’s noticed a few problems with his clock. There isn’t a battery backup, so it resets when the power goes out. Setting the time and alarm is also a forward only affair – so stepping the clock back an hour for daylight savings time means holding down the buttons while the clock scrolls through 23 hours. [Bob] decided to modify his clock with a few modern parts. While the easiest method may have been to gut the clock, that wouldn’t preserve all those classic Heathkit parts. What [Bob] did in essence is to add a PIC32 co-processor to the system.

Like many clocks in the 70’s and 80’s, the Heathkit alarm clock was based upon the National Semiconductor MM5316 Digital Alarm Clock chip. The MM5316 operates at 8 – 22 volts, so it couldn’t directly interface with the 3.3V (5V tolerant)  PIC32 I/O pins. On PIC’s the input side, [Bob] used a couple of analog multiplexer chips. The PIC can scan the individual elements of the clock’s display. On the PIC’s output side, he used a couple of analog switches to control the ‘Fast’, ‘Slow’, and ‘Display Alarm/Time’ buttons.

Continue reading “Heathkit Clock Updated With A PIC32 And GPS” →