Visualizing Audio With An LCD VU Meter

We all love seeing data represented in pretty ways — whether it’s necessary or not. Take VU meters for example. They’re a super useful tool for audio editors to balance signals, but they also look really cool, even if you’re only listening to music. Who didn’t use a Winamp skin with a built-in VU meter back in the day? Even after the demise of everyone’s favorite media player, we still see these great graphs popping up all over the place.

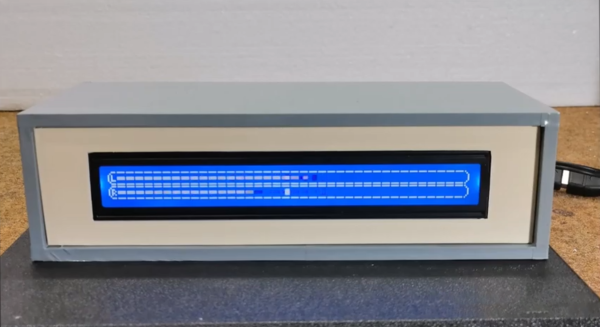
Most recently, we’ve seen VU meters circle back around to have a bit of a retro vibe in this awesome Arduino-controlled LCD VU meter built by [mircemk]. Based on the KTAudio VU Meter project, it features an ultra-wide LCD, audio input, and volume knob, all tidily wrapped up in a case whose color scheme that can only conjure images of the famed Altair 8800, or an old Tektronix oscilloscope. The LCD itself is fairly responsive — but you can judge for yourself in the video below. The signature fading that so commonly accompanies screen refreshes on LCDs such as this one really adds to the retro effect.

You may just need one of these displays on your desk — after all, while you may not need to know how loud each audio channel is, don’t you at least want the information available? Just in case. Bar graph display a bit too modern-looking for you? Well then you should check out [mircemk]’s OLED version that displays dual analog meters.

Continue reading “Visualizing Audio With An LCD VU Meter”

Halloween Hack Requires Minimum Code, Produces Maximum Fun

Every year, [Conor O’Neill] hacks something together to spook and entertain trick-or-treaters who happen by his home on Halloween. He’s noticed a pattern — every year the project involves a mess of code, often slapped together using different frameworks and languages. Attempting to alleviate that, and maybe make things a bit more friendly to beginners who understandably find code-intensive project daunting, this year he set out to write as little code as possible.

Rather than take the electronics-only route, which would undoubtedly include a few 555 timers and some other classics, [Conor] elected to stick with higher-level embedded boards, including fan-favorites such as an ESP32 and a Raspberry Pi, while still trying to keep code to a minimum. Thanks to the visual languages Espruino Blockly and NODE-RED, he only needed to write a couple lines of “traditional code,” as he calls it: a simple JavaScript HTTP request. The project itself consisted of an ultrasonic sensor hooked up to an ESP32, which would detect when children approached the door. The ESP32 used Espruino visual scripting to notify a Raspberry Pi when it sensed motion. The Raspberry Pi would play some spooky sounds, and coordinate with some old conference badges to turn on some lights and trigger a fog machine. The Pi also used a service called Tines to send a door notification via Telegram.

Okay, so this is still by no means simple, but it is interesting how much can be done without writing much code (and the end result was great!). [Conor] says he’s been building similar Halloween projects every year for the last ten or so, and it shows — we wrote about another one of his haunted doorbells back in 2015. We’re looking forward to seeing what he cooks up next year, and we hope you’ll have some awesome automated Halloween decorations as well!

Continue reading “Halloween Hack Requires Minimum Code, Produces Maximum Fun”

Cheap DIY Mic Sounds (And Looks) Damn Good

As any musician, podcaster, or youtuber will be quick to tell you, there’s no substitute for a good microphone. They’ll also be quick to tell you all about their favorite microphone, why it’s better than all the others, and how much it cost (oh, and how round it sounds, whatever that means). But what if you could build your own that sounds as good, if not better, and do it for only $30?

That’s what [Matt] from DIY Perks set out to discover when he built his DIY USB-C Microphone. He was able to source the same microphone capsule that can be found in his high-end, $600 CAD E100S, and built a simple pre-amplifier that bumps its quiet output up to line-level. He even connected it to the mic module with some custom cable made from two tiny enameled wires that won’t transmit bumps and vibrations, wrapped inside desoldering braiding which acts as a shield. He fed the output from the pre-amp into a cheap USB audio interface and voilĂ ! — top-notch sound for next to nothing. Make sure you check out the video below to hear a comparison between the mic and its professional counterparts.

Of course, sounding good isn’t quite enough. [Matt] wasn’t satisfied until the piece looked the part as well, which is why he encased the mic module in custom-bent brass mesh shielding and tubing (which also helps to reduce electrical interference). The brass cage sits suspended via rubber o-rings on a beautiful bent brass mount, which sits atop an articulated brass arm of [Matt]’s own design. Finally, the arm is mounted to a wood and brass enclosure that also serves to house the electronics.

And, in true open-source fashion, the video description is full of links to parts, schematics, and templates in case you want to build one of these beauties for yourself. Between this fantastic build and this other, super-overkill scratch-built USB microphone we featured earlier in the year, there has never been a better time to make yourself a mic you won’t have to trade your car for.

Thanks to [RichV] and [BaldPower] for the tip!

Continue reading “Cheap DIY Mic Sounds (And Looks) Damn Good”

Groovin’ With A Gesture-Controlled MP3 Player

Touchscreens are great, but they’re not always the perfect solution. Trying to operate one with gloves on (even alleged “touchscreen-friendly” ones) can be cumbersome at best, and if the screen is on a publicly-shared device, such as a checkout kiosk it can easily become a home for bacteria, viruses and all sorts of other nasty stuff.

That’s what [Norbert Zare] was thinking when he built his gesture-controlled MP3 player. It uses a PAJ7620U2 gesture sensor to register a few intuitive hand motions including finger twirls to control the volume, hand swipes to skip forward and backwards, and a flat hand to play and pause the song. It even has a motorized knob and cute cutout music notes that move to provide some visual feedback for the gestures, which you can see in-action in the video below. If this seems familiar, it’s because on Tuesday we took a look at the camera-based, glance-to-skip-tracks controller he built.

To actually play some music, he gutted an old MP3 player and hooked the solder pads from the control buttons up to an Arduino, which reads gesture information from the sensor and emulates the MP3 player’s buttons by setting the appropriate pins to HIGH and LOW. Finally, he topped the whole thing off with an LCD screen and a case.

The great thing about [Norbert]’s approach is that it isn’t just limited to an MP3 player — it can be extended to replace the buttons on pretty much any device. Because the Arduino only needs to be connected to the button inputs of the device, it should be relatively easy to adapt most existing tactile interfaces to be touch-free. Paired with this gesture-tracking macro keyboard we saw earlier in the year, the days of actually having to touch our tech may soon be behind us.

Continue reading “Groovin’ With A Gesture-Controlled MP3 Player”

Fluidized Bed In A Pringles Can Paints Parts Inside And Out

Powder coating is a wonderful way to apply a smooth, colored surface to a part, whether for aesthetic reasons or corrosion protection. Traditionally, powder is applied via a air gun that sprays it towards a part while giving the grains an electrostatic charge. The part to be coated (generally metal) is hanging on a rack and given an opposite charge, and the powder readily flows to the surface and sticks well. The dry coated part is then placed in an oven which melts the powder into a solid, continuous surface. The main drawback of the process is that while simple parts with large surfaces are easy to coat, it can become difficult to get powder to flow evenly into deep crevices, or inside a hollow part such as a tube.

Enter fluidized bed powder coating — a process in which air shoots through a vat of powder, making it move like a fluid. A heated part can be dipped inside the vat, instantly melting a thin layer of powder around the part. This much simpler method is great at getting inside all those pesky crevices that traditional coating can’t touch, and hacker [Amper] was able to build a custom fluidized bed coater in a Pringles can. This rendition, inspired by this video tour of Dan Gelbart’s workshop, uses a coffee filter to evenly distribute the air flow supplied by a small compressor — [Amper] quickly learned that just sticking a tube in a bucket of powder results in more of a volcano than a nice, fluid surface. A burner heated up some pieces of metal that were then dipped them in the can, resulting in complete coverage, even inside the tiny 5 mm diameter hole down the center of a piece of 80/20 extrusion. Once [Amper] got the basic idea working, the idea scaled up into a larger machine that you can check out in the video below.

Powder coating is usually one of those processes though of as only viable in professional shops, but [Amper] along with some other intrepid hackers have done a great job demonstrating that it can be possible for the rest of us too. We’ve even seen some others experiment with fluidized bed coating before — it’s always great to see a process such as this one gradually become more and more accessible.

Thanks to [mip] for the tip!

Continue reading “Fluidized Bed In A Pringles Can Paints Parts Inside And Out”

Magnesium: Where It Comes From And Why We’re Running Out

Okay, we’re not running out. We actually have tons of the stuff. But there is a global supply chain crisis. Most of the world’s magnesium is processed in China and several months ago, they just… stopped. In an effort to hit energy consumption quotas, the government of the city of Yulin (where most of the country’s magnesium production takes place) ordered 70% of the smelters to shut down entirely, and the remainder to slash their output by 50%. So, while magnesium remains one of the most abundant elements on the planet, we’re readily running out of processed metal that we can use in manufacturing.

Nikon camera body
The magnesium-alloy body of a Nikon d850. Courtesy of Nikon

But, how do we actually use magnesium in manufacturing anyway? Well, some things are just made from it. It can be mixed with other elements to be made into strong, lightweight alloys that are readily machined and cast. These alloys make up all manner of stuff from race car wheels to camera bodies (and the chassis of the laptop I’m typing this article on). These more direct uses aside, there’s another, larger draw for magnesium that isn’t immediately apparent: aluminum production.

But wait, aluminum, like magnesium is an element. So why would we need magnesium to make it? Rest assured, there’s no alchemy involved- just alloying. Much like magnesium, aluminum is rarely used in its raw form — it’s mixed with other elements to give it desirable properties such as high strength, ductility, toughness, etc. And, as you may have already guessed, most of these alloys require magnesium. Now we’re beginning to paint a larger, scarier picture (and we just missed Halloween!) — a disruption to the world’s aluminum supply.

Continue reading “Magnesium: Where It Comes From And Why We’re Running Out”

Oscilloscope Clocks: Now In Color!

Ordinarily, when we hear the words “clock” and “oscilloscope” in the same sentence we conjure images of measuring a stable, repeating square wave that acts as the heartbeat of a system. Of course, that’s not the only meaning– there’s a much more fun and less useful one: using an oscilloscope to display the time.

That’s what [Wolfgang Friedrich] set out to do when he cobbled some protoboard, probes, and an FPGA into the Multi Color Oscilloscope Clock. Each digit on the clock is treated like a seven-segment display, made up of three horizontal bars and four vertical bars. The horizontal bars are generated by constant voltage at different levels, and the vertical bars are generated by quickly switching between two voltages. [Wolfgang] decided to use an R-2R resistor ladder DAC to create the appropriate analog signals from the FPGA’s digital outputs. For bonus points, each set of digits (hours, minutes, and seconds) are output concurrently through separate channels, so they can be displayed in different colors on the screen of his four-channel scope (the fourth channel is used for the points between numbers).

Misusing oscilloscopes in the name of fun has become a time-honored tradition– from Tennis for Two back in 1958 (which later became the beloved Pong) to the plethora of analog o-scope clocks we’ve seen, it’s clear that hackers just can’t get enough of the unique vector display style that a scope can provide. We love [Wolfgang]’s idea of using the scope’s channels to create a multi-color display, and we’re left wondering what kind of wacky waveforms we’ll be seeing next.