Electric Compass For A Plasma Cutter

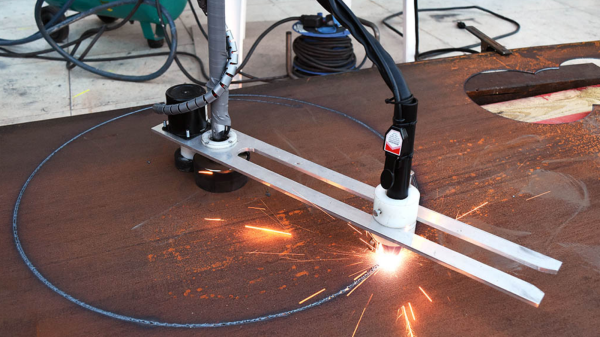
If you are a Maker space or individual lucky enough to own a Plasma Cutter, this electric protractor compass could be handy. The folks over at [MakeItExtreme] built this circle cutting tool to help cut circles and rings in thick metal sheets using their plasma cutter.

The whole thing is built around an electro-magnet, so the jig will only work with magnetic metals. There are not a lot of design details, but it’s possible to infer how to build one looking at the video and the photos on their blog. There’s a couple of nice hacks along the way. Since the electro-magnet is stationary while the rest of the jig rotates, the main mounting bolt had a hole drilled through it to help route the cable. The rotating protractor arm is made from a slab of aluminium and holds all the other parts together – the drive motor, the central hub and the plasma head. The motor used appears to be a 60rpm AC synchro motor. These types usually have an RC phase shifting network between the two coils to allow direction reversal. Friction drive is used to rotate the jig, with the friction coming from a pair of rubber tube bands attached to the electro-magnet and the motor drive hub. The plasma head holder has a rod-end with a roller bearing attached, acting as a caster wheel, ensuring the arc gap is maintained as the jig rotates. A few switches to activate the electro-magnet, motor forward / reverse and plasma enable complete the setup.

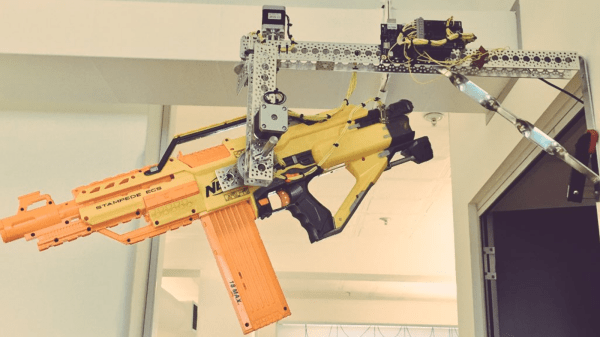
Their blog, and YouTube channel has a lot of other interesting projects that they keep building. Check it out.

Continue reading “Electric Compass For A Plasma Cutter”

Presenting The Internet Of Trash Cans !

This was gonna happen – sooner or later. [matthewhallberg] built a “Smart” trash can that is connected to the Internet and can be controlled by its own Android App. We’re not sure if the world needs it, but he wanted one and so built it. He started it out on a serious note, but quickly realized the fun part of this build – check out his funny Infomercial style video after the break.

trash_can_02
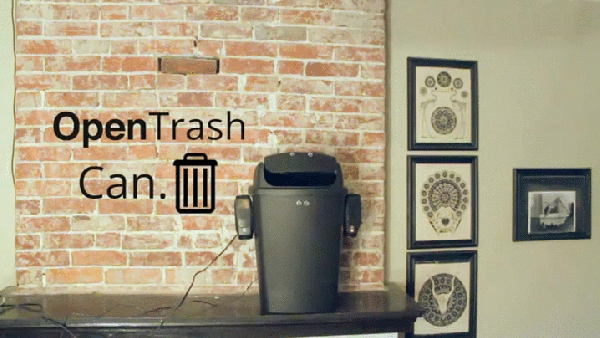
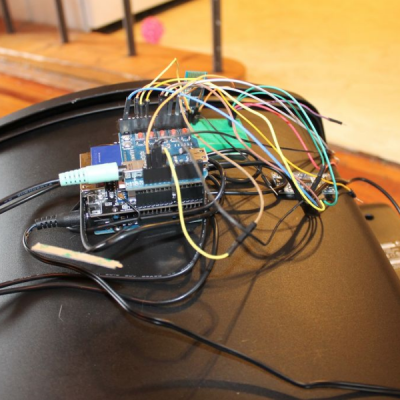
The build itself is uncomplicated and can be replicated with ease. A servo motor helps flip the lid open and close. This is triggered by an ultrasonic ping sensor, which responds when someone waves a hand in front of the trash can. A second ping sensor helps inform the user when it is full and needs to be emptied. A Leonardo with the Idunio Yun shield helps connect the trash can to the internet. An mp3 shield connected to a set of powered computer speakers adds voice capability to the trash can, allowing it to play back pre-recorded sound clips. Finally, a Bluetooth module lets him connect it to an Android phone and the companion app controls the trash can remotely.

For the IoT side of things, [matthewhallberg] uses a Temboo account to send an email to the user when the trash can is full. The Arduino sketch, a header file to configure the Temboo account, and the Android application can all be downloaded from his blog. If this project inspires you, try building this awesome Robotic trash can which catches anything that you throw near it  or read the barcodes off the trash being thrown out and update the grocery list.

Continue reading “Presenting The Internet Of Trash Cans !”

Hacked Turntable Rotates Humans For 3D Scanning

If you are from the 70’s, you’ll probably remember the Disco Body Shaper or the Aerobic Body Shaper exerciser devices that were the rage of the day. Basically, Lazy Susan turntables on which humans could stand and twist away to burn fat. The results were suspect, but [Daniel Kucera] thought one of them would be ideal in 2016 to build a heavy-duty turntable to allow full body scanning.

He had already tried a few other ideas and failed, so it was worth giving this a shot, since it cost just 10 bucks to buy one. The plan was to use a motor to provide friction drive along the circumference of the turntable platform. For this, he used a high torque motor with a gear on the output shaft. From the looks of it, he attached a Meccano plate to the base, and mounted the motor to this plate. A large spring keeps the motor pressed against the rim of the turntable. A strip of rubber scavenged from a bicycle tube was glued along the side of the turntable to provide some friction to the gear drive. The turntable is placed on two thick pieces of foam, to provide clearance for the motor. We aren’t sure if a toothed gear is the best choice to drive this thing, but a hacker’s gotta use what he’s got. He’s clocking 190 seconds for a full rotation, but he still hasn’t posted any scan results from the Android scanner software that he is working on. This one, for sure, doesn’t qualify for a “it’s not a hack” comment.

Add A Slide Show To Your Fish Tank

Once in a way we get a hack that makes us wonder – why didn’t we think of that ? [hydronics] tore apart an old LCD monitor and built a fish tank around it. Not sure if the fish notice that they are swimming on the Moon, but it sure makes for an interesting fish tank display.

He starts by ripping apart an old 19″ LCD monitor and built an acrylic fish tank around the display. The backlight of the panel is fixed at the rear side of the fish tank, along with the rest of the electronics from the old monitor.

For an earlier version, he built his own back light, but the second version with the original back light turned out much better. The fish tank pieces were joined together using acrylic glue and left over night to dry, although he still needed to use some silicone to plug leaks.

A Raspberry Pi connected to the monitor’s HDMI input provides the background slide show. [Tony Rieker] helped add bubble animations via some OpenCV code running on the Pi. A live feed of the fish is overlaid on the slide show, adding a level of inception to this tricked up fish tank. The project was recently shown off at the Portland Winter Light Festival.

Continue reading “Add A Slide Show To Your Fish Tank”

555 Teardown And Analysis

If you are even remotely interested in electronics, chances are the number ‘555’ is immediately recognizable. It is, after all, one of the most popular IC’s ever built, with billions of units sold to date. Designed way back in 1970 by Hans Camenzind, it is still widely available and frequently used for various applications. [Ken Shirriff] does a teardown and analysis of a 555 and gives us a look at the internal structure of this oldie.

A metal can package allowed him to just chop off the top and get access to the die, which was way safer and easier than to etch out the black epoxy of a DIP package. He starts by giving us a quick run down on how the chip works, showing us the two comparators, the output flip-flop and the capacitor discharge circuitry that make up most of the chip. He then puts the die under a metallurgical microscope, and starts identifying the various sections of the chip. Combining pictures of individual elements with cross-sectional diagrams, he identifies the construction of the transistors and resistors, the use of a current mirror to replace bulky resistors, and the differential pair that makes up the comparators.

He wraps it up by providing an interactive map of the die and the schematic, where you can click on various parts and the corresponding component is highlighted along with an explanation of what it does. There’s some interesting trivia about how a redesigned, improved version – the ZSCT1555 – couldn’t survive the popularity and success of the 555. He wraps it up with a useful list of notes and references. While de-capping blog posts are interesting on their own, [Ken] does a great job by giving us a detailed look at the internals.

Thanks [Vikas] for sending in this tip.

DIY Shapeoko 3 Enclosure

Setting up a desktop CNC brings along two additional problems that need to be resolved – noise and dust. [Nick] upgraded from a Shapeoko2 to the Shapeoko3 and decided to build a fresh dust and noise proof enclosure for his CNC , and it turned out way better than he had anticipated.

When trying to build something like this, aluminium extrusions seem like the obvious choice for the structure. Instead, he opted for low-cost steel frame shelving units. The 3mm thick steel frame results in a nice rigid structure. The top and bottom were lined with 18mm thick MDF panels. For the two sides and back, he choose 60mm noise dampening polyurethane foam lined with 6mm MDF on both sides, and held together with spray adhesive and tight friction fit in the frame.

The frame was a tad shallower and caused the spindle of the Shapeoko3 to stick out the front. To take care of this, he installed an additional aluminium frame to increase the depth of the enclosure. This also gave him a nice front surface on which to mount the 10mm thick polycarbonate doors. The doors have magnetic latches to hold them close, and an intentional gap at the top allows air to enter inside the enclosure. A 3D printed outlet port was fixed to the side wall, where he can attach the vacuum hose for dust collection. The final step was to add a pair of industrial door handles and a bank of blue LED strip lights inside the enclosure for illumination.

It’s a simple build, but well executed and something that is essential to keep the shop clean and dampen noise.

Nerf Turret Controlled By Slack

What happens when you give a former Navy weapons engineer some development boards and ask him to build “something cool”? What happens when you give a kid finger paints? [Seb] obviously built an IoT Nerf Turret Gun controlled via a team communication app.

The weapon was a Nerf Stampede which was hacked so it could be fired electronically. The safety switch was bypassed and a relay provided the firing signal. The electronics stack consists of an Intel Galileo, a motor shield and a relay shield. The turret assembly was built using off the shelf structural parts from Actobotics. Stepper motors provide motion to the turret. The fun begins with how the software is implemented. An iBeacon network detects where people sit at in the office. So when you type in the name of your target in a messaging app, it knows where they’re sitting, aims at them, and pops a nerf dart at them.

The lessons learned are what makes such projects worth their while. For example, USB is a standard. And the standard says that USB cables be not more than 1.8 m long. [Seb] was reminded of this when his electronics worked on his workbench, but refused to work when placed in-situ and connected via a 3m long cable – the serial link just wouldn’t work.

Mounting the gun such that it was nicely balanced was another challenge. Eventually, he had to use a couple of AA cells taped to the front of the gun to get it right. This could be useful though, since he plans to replace the dead weights with a sighting camera. One last hack was to zip tie heat sinks to the motor drivers, and he had a good reason to do that. Read more about it in his blog. And check out the video as someone takes aim and shoots a target via SLACK, the team messaging application.

Continue reading “Nerf Turret Controlled By Slack”