USB2Serial Adapter As An I/O Device

There was a time when computers had parallel ports. For the hacker types, this meant an eight bit data port, and nine additional pins which could be interfaced with the real world via the 25 pin connector. This is no longer the case, although USB does help with suitable hardware. [Jabi] was working on a project that required controlling one relay to switch a strip of LED’s. His solution was to use a USB to Serial Adapter as an I/O device (Spanish, translated here).

He wrote a short C program, SioFus (Simple Input Output from USB2SERIAL), that converts a simple USB to Serial Port Adapter into an I/O device with 4 inputs and 2 outputs. It’s simple and gets the job done. The code uses ioctl and allows DCD, DSR, CTS and RI to act as inputs while DTR and RTS act as outputs. These pins then likely control transistors that switch the relays. The SioFus code is available on github and there are a couple of to-do’s on [Jabi]’s list if you would like to chip in.

The video after the break supposedly shows the hack in action. Seems like some kind of photo booth which then spits out a QR code, possibly a URL to the picture (post in the comments if you figure out what it does).

If you are looking for a more dedicated hardware, check out the Tiny Bit Dingus – a microcontroller stuffed into a USB plug with a few controllable pins.

Continue reading “USB2Serial Adapter As An I/O Device”

IR Remote For Smartphone Via Bluetooth Adapter

Quite often, the raison d’être for building a project is to learn and hone one’s skills. In which case it doesn’t matter if the end use seems a bit frivolous. [indiantinker] built BlueIR, a device to control Bluetooth A2DP devices using an archaic IR Remote using a BT-Aux Adapter.

Sounds convoluted? Let’s try again. He uses an old IR remote to send data to a MSP430-series  microcontroller, which is connected over serial to a USB Bluetooth Receiver Adapter, which in turn is connected to a set of wired speakers. The Bluetooth adapter is paired with his phone. The IR remote allows him to control the audio player commands on his phone from a far greater distance compared to the bluetooth adapter.

He begins by breaking open the BT adapter to find that the markings on the chip have been erased. What he did find instead, were two pads promisingly marked as TX and RX, but he still did not know the baud rate or the command set. Digging around the Internet, he figured out that the chip used was the OVC3860 Bluetooth 2.0 + EDR Stereo Audio Processor and found its list of AT Commands. After some tests using a serial console he figured out that it worked at 115600 baud. Soon enough, he had it hooked up to the MSP430 Launchpad and was able to communicate. Next up, he built a small PCB, using the toner transfer method. The board consists of the MSP430G2553 micro controller, IR receiver, LED, some decoupling capacitors and a few pull up resistors. He leached power from the 3.3V regulator on the host BT adapter. The assembled PCB is piggy backed on top of the BT adapter for the time being, and a 3d printed housing is on his to-do list. His code is available at the BlueIR Github repo and the video below shows it in action.

Continue reading “IR Remote For Smartphone Via Bluetooth Adapter”

Cheap, Easy To Build Robot For Beginners

Robotics kits are a great way to get folks , young and old, interested in hacking and learning the basics. Quite often, the cost puts them off – it’s no fun if you mess things up while learning how to put an expensive kit together. Many kits are too polished and that leads to beginners feeling that they’ll never be able to build something complex like a robot. The Shonkbot is what the team at Bristol Hackspace came up with for a robot that is obvious in its working and encouragingly easy to build, even for kids (with supervision).  To that effect, they completely avoided custom PCBs and laser cut bits. The Shonkbot is built from easily available parts and some commonly available materials. They aimed to build it for £5, but managed £15. With proper planning and time, they guess it can be brought down to £10.

The Shonkbot is built using an Arduino Nano, two stepper motors with their drivers, a 3xAA battery box and some bits and bobs. Assembly takes about an hour for a 10-year-old and then they can reprogram it in another workshop or at home. The “frame” of the Shonkbot is an old CD-ROM or DVD disk. Everything is hot glued to this frame. At the centre of the disk, a Sharpie is inserted and the Arduino code then allows the robot to draw on paper. Upgrades include adding an IR LED, a photo transistor and a buzzer to allow the Shonkbot to detect objects, or communicate with other Shonkbots. Build instructions are detailed in this document, and the code is available from the Github repository. Here is a photo album from their first build workshop which was held recently.

Thanks to [Matthew Venn] from the Bristol Hackspace for sending in this tip. Check the robot in action in the video below.

Continue reading “Cheap, Easy To Build Robot For Beginners”

The Live Still Life

Here’s a project that brings together artist [Justus Bruns] and engineers [Rishi Bhatnagar] and [Michel Jansen] to collaborate on an interactive work of Art. The Live Still Life is a classic still life, streamed live from India to anywhere in the world. It is the first step towards the creation of an art factory, where hundreds of these works will be made, preserved and streamed.

The Live Still Life is a physical composition of fresh fruit and vegetables displayed on a table with flatware, cutlery and other still objects. This is located in a wooden box in Bangalore. Every minute a photo is taken and the image is streamed, live, accessible instantly from anywhere in the world. Les Oiseaux de Merde’s Indian curator is on call to replace the fruit the minute it starts to rot so as to maintain the integrity of the image. In this way, while the image remains the same, the fight against decay is always present. The live stream can be viewed at this link.

The hardware is quite minimal. An internet connected Raspberry Pi model B,  Raspberry Pi camera module, a desk lamp for illumination and a wooden enclosure to house it all including the artwork. Getting the camera to work was just a few lines of code in Python. Live streaming the camera pictures took quite a bit more work than they expected. The server was written using a module called Exprestify written on top of Express JS to facilitate easier RESTful functions. For something that looks straightforward, the team had to overcome several coding challenges, so if you’d like to dig in to the code, some of it is hosted on Github or you can ask [Rishi] since he still needs to clean it up quite a bit.

Hacking A Wireless AC Power Outlet

It’s always nice to see hackers pick up stuff headed for the landfill and put it back in action with a quick repair and upgrade. [Septillion] found a wireless remote controlled AC outlet in the junk bin and decided to do just that. A nice spin-off of such hacks is that we end up learning a lot about how things work.

His initial tests showed that the AC outlet and its remote could be revived, so he set about exploring its guts. These remote AC outlets consist of an encoder chip on the remote and a corresponding decoder chip on the outlet, working at 433MHz.  Since the various brands in use have a slightly different logic, it needed some rework to make them compatible. The transmit remote was a quick fix – changing the DIP switch selected address bits from being pulled low to high and swapping the On and Off buttons to make it compatible with the other outlets.

Working on the AC outlet requires far more care and safety. The 230V AC is dropped down using a series capacitor, so the circuit is “hot” to touch. Working on it when it is powered up requires extreme caution. A quick fix would have been to make the changes to the address bits and the On/Off buttons to reflect the changes already made in the remote transmitter. Instead, he breadboarded a small circuit around the PIC12F629 microcontroller to take care of the data and address control. Besides, he wanted to be able to manually switch the AC outlet. The relay control from the decoder was routed via the microcontroller. This allowed either the decoder or the local manual switch from controlling the relay. Adding the PIC also allowed him to program in a few additional modes of operation, including one which doubled the number of outlets he could switch with one remote.

DIY ESP8266 Development Board

Those small, super-cheap, ESP8266 modules are being installed everywhere, creating all sorts of frivolous internet connected thingamajigs. But consider this period as a training ground of sorts, as hackers smarten their chops on figuring out how to get the best out of this IoT gravy train. Right now, getting the ESP8266 to work requires a fair amount of work and to make things easier, [Abdulgafur] built a ESP8266 development board.

The dev board lets the user connect the ESP8266 to a PIC micro controller as well as to a host PC. In addition, it hosts several peripherals such as a 2×16 LCD display, 4 push buttons, couple of indicator LEDs and some GPIO’s broken out to a header. PC communication is via a FT232RL USB-UART converter over a Mini-USB connector. There’s also a few bi-directional level converters to translate between 5V and 3.3V and pull-up resistors for the ESP8266.

As of now, the dev board only supports the ESP8266-01 module. A nice upgrade would be to add support for other ESP8266 modules too. Maybe a separate, 3d printed, pogo pinned, test fixture for the other modules. If you plan to build you own version, [Abdulgafur] has the schematic, PCB and BoM available for download, although we couldn’t spot the PIC code, so you might have to ask for that. And it would be a good idea to remove the GND copper pour from under the ESP8266 footprint.

Hacking The IM-ME To Open Garages

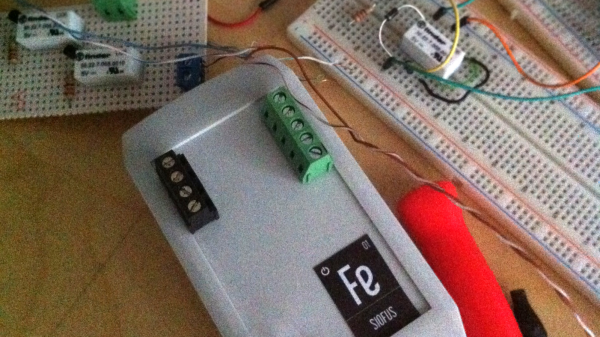
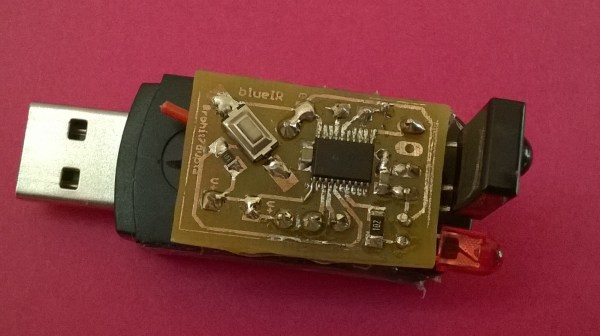
If you have a wireless controlled garage door, a child’s toy can wirelessly open it in a few seconds. [Samy Kamkar] is a security researcher who likes to”think bad, do good”. He’s built OpenSesame, a device that can wirelessly open virtually any fixed-code garage door in seconds, exploiting a new attack he’s discovered in wireless fixed-pin devices, using the Mattel IM-ME toy.

The exploit works only on a gate or garage which uses “fixed codes”. To prevent this type of attack, all you need to do is to upgrade to a system which uses rolling codes, hopping codes, Security+ or Intellicode. These are not foolproof from attack, but do prevent the OpenSesame attack along with other traditional brute forcing attacks. It seems there are at least a couple of vendors who still have such vulnerable products, as well as several more whose older versions are affected too.

Before you read further, a caveat – the code released by [Samy] is intentionally bricked to prevent it from being abused. It might work, but just not quite. If you are an expert in RF and microcontrollers, you could fix it, but then you wouldn’t need his help in the first place, would you?

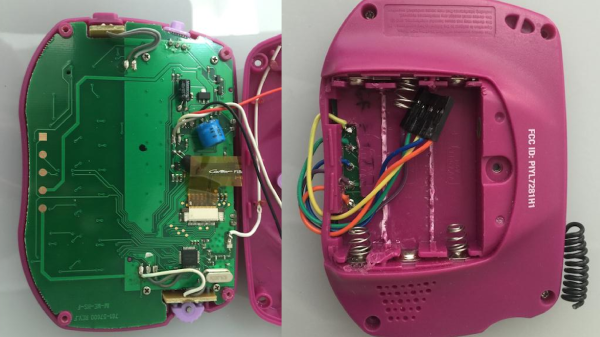
The IM-ME is a defunct toy and Mattel no longer produces it, but it can be snagged from Amazon or eBay if you’re lucky. The Radica Girltech IM-ME texting toy has been extensively hacked and documented. Not surprising, since it sports a TI CC1110 sub-GHz RF chip, an LCD display, keyboard, backlight, and more.  A good start point is the GoodFET open-source JTAG adapter, followed by the work of [Travis Godspeed] , [Dave] and [Michael Ossmann].

One issue with fixed code systems is their limited key space. For example, a remote with 12 binary dip switches supports 12 bits of possible combinations. Since its binary and 12 bits long, that’s 2^12, which is 4096 possible combinations. With a bit of math, [Samy] shows that it takes 29 minutes to open an (8-12)-bit garage, assuming you know the frequency and baud rate, both of which are pretty common. If you have to attempt a few different frequencies and baud rates, then the time it takes is a multiple of 29 minutes. If you don’t transmit the codes multiple times, and remove the pauses in between codes, the whole exercise can be completed in 3 minutes.

The weak link in the hardware is how the shift registers which decode the received codes work. Each bit is loaded in the register sequentially, gradually moving as additional bits come in and push the previous ones. This, and using an algorithm [Samy] wrote based on the De Bruijn sequence, the whole brute force attack can be completed in just over 8 seconds. OpenSesame implements this algorithm to produce every possible overlapping sequence of 8-12 bits in the least amount of time.

You can take a look at understanding how the code works by checking it out on Github. [Samy] loves doing such investigative work – check out his combo lock code breaker we featured recently, the scary, keyboard sniffing wall wart and the SkyJack – a drone to hack all drones.

Continue reading “Hacking The IM-ME To Open Garages”