A Blissful Microwave

[Tim] had a problem with his microwave. The buzzer was exceptionally annoying, and once his hot pockets or pizza rolls were done, the buzzer wouldn’t shut off. A two-kilohertz tone infected his soul. It was the only sound echoing in a Boschian nightmare of reheated frozen food.

Unlike an existential ennui, an annoying buzzer in a microwave is something anyone can fix. [Tim] just took a pair of pliers to the buzzer and ripped it off the PCB. This left him with another problem — how to tell when his food was done. This was solved by putting the Windows XP startup sound in his microwave.

With the buzzer out of the way, [Tim] took an Arduino nano and loaded it up with the Windows XP startup sound. There isn’t much Flash on the Arduino, but it could hold an 18kB sample, enough to play the startup sound at 8kHz. The sound itself is PCM audio and easily stuffed into a sketch.

The Arduino listens for the 2kHz tone generated by the microwave and sends the XP startup sound through a tiny class D amplifier. After mounting a speaker inside the microwave, [Tim] has a very vaporwavemicrowave.

Continue reading “A Blissful Microwave”

Correct Horse Battery Staple: The Book

XKCD 936, the comic that introduced the phrase, ‘correct horse battery staple’ into both the lexicon and password dictionaries, is the best way to generate a password. Your passwords should be random phrases of random words, hopefully with a few random numbers or symbols sprinkled about. It’s the most entropy you can get that’s also easy to remember.

However, generating your own ‘correct horse’ password is generally a bad idea. Humans are terrible at coming up with random bits of information. Thankfully, the EFF has come up with a wordlist containing 7,776 random words (65, or five rolls of a six-sided die.) ready for the next time you reset a password.

[m145mcc] thought the EFF’s word list should be a book, so he made it a book. With the clever application of a laser printer, glue, thread, and some card stock, [m145mcc] has a handy password generator that fits in his pocket. All that’s needed to build a password is a single die, a pen, and some patience.

The EFF’s random passphrase list is based off [Arnold Reinhold]’s Diceware list from 1995, but has a few changes to make the list easier to use and more palatable for the audience they’re going for. Most significantly, vulgar words were removed from the Diceware list, as the netsec crowd doesn’t swear as a rule. Additionally, numbers were removed, along with rare and unusual words. The passwords generated by the EFF’s list are longer, but they are arguably more memorable.

Despite the idea of a random dice-based password list being around for two decades, there are few if any examples of this list in dead tree format. The idea of a bound version of this list is a great idea, and we’re glad [m145mcc] could bring it to the table.

Adding IceZero To The Raspberry Pi

[Kevinhub] noticed there were quite a few FPGA hats for the Raspberry Pi. Instead going out and buying one of these boards like a filthy commoner, he decided to spin up his own FPGA Pi accessory. This IceZero FPGA board combines the best features from other FPiGA boards, and does it in a form factor that fits right on top of the minuscule Pi Zero.

If you think slapping a Lattice FPGA onto a Pi has been done before, you’re right. Here’s a hat for the Pi using an iCE5LP4K-SG48, an FPGA with 3520 LUTs. The CAT Board from Xess has a slightly bigger FPGA with 7680 logic cells, and the FleaOhm has a monster FPGA on board that costs about $70 USD.

[Kevin]’s IceZero is at the lower end of these Raspberry Pi FPGA hats, using a Lattice ICE40HX4K. That’s only 3520 logic cells, but it only costs about $7 USD in quantity one. The board design is a standard two layer board that shouldn’t be too terrible for hand soldering. The boards are shared on OSH Park, should you want to test this little guy out.

This Pi Hat is specifically designed to be used with Project IceStorm, the Open toolchain for Lattice’s iCE40 FPGAs. That means there’s already a few projects out in the wild that can be easily ported to this platform, and already [Kevin] has a logic SUMP example going on his board.

Friday Hack Chat: Making And Breaking Hardware With Bunnie

bunnie03-01This Friday, February 10th, at 9am PST, Hackaday.io will be graced with one of the greatest hardware creators in recent memory. [Bunnie Huang] will be talking about making and breaking hardware in the Hackaday.io Hack Chat.

[Bunnie] is a nearly peerless hardware hacker. He literally wrote the book on hacking the XBox, developed the Chumby, and developed the Novena, an open source Laptop. He’s torn down the Form 2 3D printer, explored the iPhone’s hackability with [Edward Snowden], wrote the book you want to have on your carryon when flying into Hong Kong, and recently released The Hardware Hacker, a retelling of his adventures in hardware hacking. He’s now working on the Love to Code platform.

[Bunnie] is a bridge across worlds. There is no one else so deeply embedded in the world of electronics manufacturing that is also willing to tell the world about what he’s found. If you want to learn about electronics, the Bunnie Studios blog is a mandatory read.

For this week’s Hack Chat, [Bunnie] will be taking questions from the Hackaday.io community. If you’ve ever wanted to know what it takes to build a few thousand things, this is the guy to ask.

Having trouble figuring out when 09:00 PST is in your local time zone? Here’s a countdown timer!

Here’s How To Take Part:

Buttons to join the project and enter the Hack Chat

Our Hack Chats are live community events on Hackaday.io Hack Chat group messaging. Log into Hackaday.io, visit that page, and look for the ‘Join this Project’ Button. Once you’re part of the project, the button will change to ‘Team Messaging’, which takes you directly to the Hack Chat.

You don’t have to wait until Friday; join whenever you want and you can see what the community is talking about.

Upcoming Hack Chats

These Hack Chats are a weekly thing, and we have a few more on the books. Next week, we’ll be covering RF design with [Jenny List], and later going over mechanical manufacturing with Fictiv. You can check out all the upcoming Hack Chats on this project.

DIY Thermal Camera That’s Better And Cheaper Than A FLIR

A few years ago, FLIR unleashed a new line of handheld thermal imagers upon the world. In a manufacturing triumph, the cheapest of these thermal imaging cameras contained the same circuitry as the one that cost six times as much. Much hacking ensued. Once FLIR figured out the people who would be most likely to own a thermal imaging camera can figure out how to upload firmware, the party was over. That doesn’t mean we’re stuck with crippled thermal imaging cameras, though: we can build our own, with better specs than what the big boys are selling.

[Max] has been working on his DIY thermal imager for a while now. We first saw it about a year ago, and the results were impressive. This thermal camera is built around the FLIR Lepton sensor, providing thermal images with a resolution of 60 by 80 pixels. These thermal images were combined with a VGA resolution camera to produce the very cool enhanced imagery the commercial unit will get you. There’s also a 1/4-20 threaded insert on the bottom of [Max]’s version, making it far more useful in any experimental setup.

Now [Max] has unleashed his DIY Thermocam on the world of Open Hardware, and anyone can build their own for about €400 (about $425). The components required for this build include a FLIR Lepton sensor easily sourced from the Digikey or GroupGets, an Arducam Mini, a Teensy 3.6, and a mishmash of components that are probably kicking around your parts drawers.

If you want an overview of this project before digging in, [Max] has a project overview (PDF warning) going over the build. This is one of the better DIY projects we’ve seen recently, and the documentation is fantastic. If you’re thinking about buying one of those fancy thermal imaging cameras, here you go — this one is just as good and half off.

A Six-Voice Synth Built On The Raspberry Pi

Over the last few decades, audio synthesizers have been less and less real hardware and more and more emulations in software. Now that we have tiny powerful computers that merely sip down the watts, what’s the obvious conclusion? A six-voice polyphonic synthesizer built around the Raspberry Pi.

The exquisitely named ‘S³-6R’ synthesizer is a six-voice phase modulation synthesizer that outputs very high resolution (24-bit and 96 kHz) audio. It’s the product of R-MONO Lab, who have displayed interesting musical devices such as a recorder-based pipe organ in the past. This build is a bit more complex, offering up some amazing sounds, all generated on a Raspberry Pi 3.

While talk of oscillators and filters is great, what’s really interesting here is the keyboard itself. The S³-6R is using the Roland K-25m, a tiny MIDI keyboard meant to serve as a ‘dock’ of sorts for Roland’s recent re-releases of the classic Jupiter and Juno synths. Building a MIDI keyboard is not easy by any stretch of the imagination, and using this little keyboard dock is a cheap way to pipe MIDI notes into any project without a lot of fuss.

Below, you can check out the audio demos of the S³-6R. It’s a real synth and sounds great. We can only hope the software will be uploaded somewhere eventually.

Continue reading “A Six-Voice Synth Built On The Raspberry Pi”

Bringing The Best Laptop Ever Made Back To Life

Eight or nine years ago, Apple was on top of the world. The iPhone just revolutionized phones, Apple was still making computers, and these computers were actually repairable. Of the late 2008/early 2009 MacBook Pro, iFixit said, “What an incredible machine. We are very impressed by the ease with which the new MacBook Pro came apart. This machine should be a joy to work on”. Apple has come a long way since then.

macbook-reflow-shield
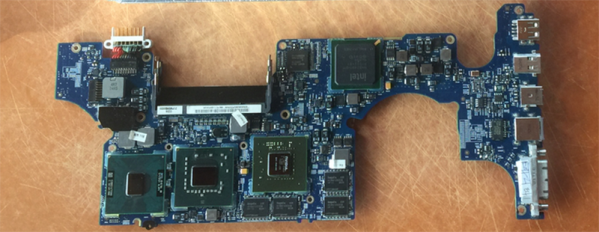
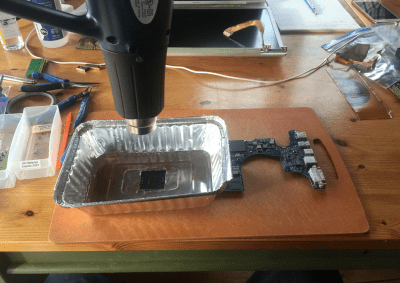
[DocDawning] has a bit of a Mac hoarding problem, and frequently pays $20 for broken laptops of this vintage. Most of the time, the fix is simple: the RAM needs to be reseated, or something like that. Rarely, he comes across a machine that isn’t fixed so easily. The solution, in this case, is a deep dive into heat guns and thermal management. How do you bring a laptop back from the dead? [Dawning] shows you how.

Like the old XBox towel hack, the first thing to look for in dead electronics is broken solder balls. Of course, actually looking at broken solder balls is pretty hard, so you might as well just get out a heat gun and go at it. That’s exactly what [Dawning] did. With the clever application of an aluminum takeout tray to direct the heat flow, he blasted each of these chips with enough heat to hopefully melt all the balls.

With that, a working MacBook Pro was just a liberal application of thermal paste away. From $20 at the scrap heap to a working computer, [Dawning] did it. He successfully resuscitated a broken computer.