Steel-Reinforced 3D Prints

Continuing on the never-ending adventure of how to make a 3D print stronger, [Brauns CNC] is coming at us with a new technique that involves steel-reinforced 3D printed parts.

We’ve seen plenty of methods to create stronger 3D prints, from using carbon fiber filament to simply printing the part in a way that the layers of the print are orthogonal to the direction of force. We’ve even seen casting carbon fiber bars into 3D prints, but of course that will only work with straight parts. [Brauns]’ technique uses steel wire, embedded into the print itself, and from some testing there’s about a 50% increase in strength of the part.

The process of embedding a steel cable into a 3D printed part is simply taking apart the model and putting a channel in for the cable. At a specific layer height, the printer is stopped, the steel cable is embedded with the help of a soldering iron, and the printer continues doing its thing.

There’s a slight amount of Gcode hacking to make this happen, and the process of embedding a steel cable into a print is a bit finicky. Still, if you want stronger 3D prints, there are worse ways to do it, and certainly less effective ways of doing it. You can check out the video for this technique below.

Continue reading “Steel-Reinforced 3D Prints”

Video Mangler For All Your Video Mangling Needs

Back in the ’70s and ’80s, before we had computers that could do this sort of thing, there were fully analog video effects. These effects could posterize or invert the colors of a video signal, but for the best example of what these machines could do just go find some old music videos from Top of The Pops or Beat Club. Stuff gets weird, man. Unfortunately, all those analog broadcasting studios ended up in storage a few years ago, so if you want some sweet analog effects, you’re going to have to build your own. That’s exactly what [Julien]’s Video Mangler does. It rips up NTSC and PAL signals, does some weird crazy effects, and spits it right back out.

The inspiration for this build comes from an old ’80s magazine project called the ‘video palette’ that had a few circuits that blurred the image, turned everything negative, and could, if you were clever enough, become the basis for a chroma key. You can have a lot of fun when you split a video signal into its component parts, but for more lo-finess [Julien] is adding a microcontroller and a 12-bit DAC to generate signals that can be mixed in with the video signals. Yes, all of this can still be made now, even though analog TV died a decade ago.

The current status of this project is a big ‘ol board with lots of obscure chips, and as with everything that can be described as circuit bending, there’s going to be a big panel with lots of dials and switches, probably stuffed into a laser-cut enclosure. There’s a mic input for blurring the TV with audio, and enough video effects to make any grizzled broadcast engineer happy.

Hackaday Links Column Banner

Hackaday Links: April 21, 2019

A Russian company has developed a drone with a very interesting control scheme. It’s a VTOL fixed wing, that takes off like a bicopter, transitions to use wings for lift, flies around for half an hour or so, and then lands on its tail. This is a big ‘un; the reported weight is 50 pounds. Although the available footage really doesn’t give any sense of scale, we would estimate the wingspan as somewhere between four and five feet. Fixed-wing VTOLs are close to the holy grail of current drone science — wings actually generate lift, and VTOL means Uber can deliver McDonalds to your driveway.

What happens when you give an idiot a USB killer? $60,000 in damages. A former student at the College of St. Rose killed 59 computers with a USB killer, basically a charge pump that dumps a hundred or so volts back into a USB port, destroying the computer. Yes, you can just buy USB killers on the Internet, and yes you can film yourself zapping computers and posting the videos on social media. Both are dumb ideas.

This week was huge for the preservation of our digital culture. The source for the original Infocom games, such as Zork and Hitchhiker’s Guide to the Galaxy have been archived and released. This is a rather interesting development, as these games were written in Zork Implementation Lanugage (ZIL), a language that is used by no one and there’s almost zero documentation. Yes, we have the source, but not a compiler. It’s Lisp-ish, and there are people working to make new games in this language. Also this week is the release of the source for Leisure Suit Larry. Hackaday readers will be familiar with Leisure Suit Larry as the protagonist is a 38-year-old loser who lives in his mother’s basement. This game goes off the rails when the protagonist decides to leave the basement, but it was written a long time ago, and I guess Al Lowe didn’t foresee the Internet or something. Tip of the very fancy hat to @textfiles here.

You in Jersey? The Vintage Computer Festival East is May 3-5th, and it’s bound to be a grand time. Keynotes are by Steve Bellovin, co-inventor of USENET, Ken Thompson (!), co-inventor of UNIX, and Joe Decuir, co-inventor of the Atari VCS, Atari 800, and the Commodore Amiga. There’s also a Software Store (new this year), which we can only hope is like walking into Babbage’s. Protip: while you’re there, go up to Asbury Park and visit the Silverball Museum. It’s a whole lot of pinball.

For easier production and assembly of circuit boards, you should only place your components on one side. Doing so means you don’t have to flip the board and run it through the pick and place again, and you don’t have to worry about glue. This is a single-sided circuit board. There’s only one side. It’s a Mobius PCB, the flex-circuit version of a handmade circuit board made with a conductive pen.

A Breadboard Power Supply That’s More Universal Than Most

A favorite project of ours is the humble breadboard power supply. Yes, you can still prototype on breadboards, no, you don’t need an entire bench power supply to prototype on one, and every breadboard made in the last forty years has had the same pattern of holes. There’s plenty of opportunity to improve the breadboard power supply.

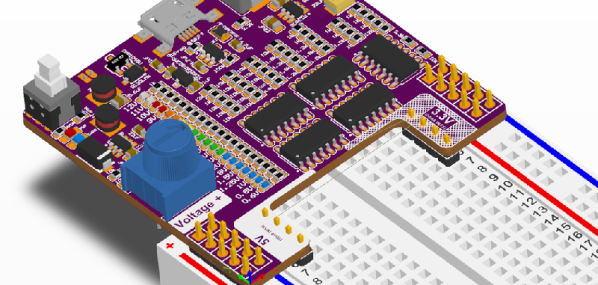
One of the best ones we’ve seen yet comes from [John Loeffler]. It’s a simple, constant voltage power supply that’s variable from 0.6 V all the way up to 12 V. It’s powered through a micro USB port, and you get 3.3 V and 5 V rails automagically. There’s even voltage indication.

The mechanical design of this power supply is simple enough, with pins that plug into the detachable power rails on either side of the breadboard. Where it gets interesting is the voltage indication. There’s a resistor ladder and a series of LEDs to indicate the voltage on the variable side of this power supply. Add in some modern switched mode power supply based on the MIC5225 series of chips (a popular regulator that’s very nice for the price) and you have a completely functional power supply hanging off a breadboard.

While it’s not a really nice rack mounted bench power supply that weighs a lot, or even one of the cheapo bench supplies, this does fulfill a need. Sometimes you just need a simple power supply for a breadboard, and this is one of the best ones we’ve seen yet.

Cast Aluminium Becomes A Machine Tool

Shaper tools were, at one time, a necessary tool for any machine shop. With a shaper and a lathe, you can rebuild or manufacture almost anything. At the very least, you can make the tool to manufacture anything. For the last few months, [Makercise] has been working on building his own homemade shaper, and now it’s making chips. (YouTube, also embedded below.)

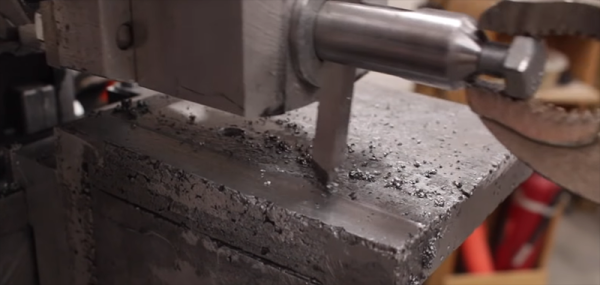
First off, what exactly is a metal shaper? It’s not commonly seen in machine shops these days, but at the turn of the last century, these were popular and practical machines to cut keyways into a piece of stock. Effectively, it’s kind of like a jigsaw, in that it cuts with a reciprocating action and is able to plane the entire surface of a metal plate. Today, if you want to surface a piece of stock, you would just throw it onto the Bridgeport, but there are still some use cases for a metal shaper.

The design of this shaper comes directly from the Gingery series of books, the famous series of books that are step-by-step instructions on how to build a machine shop starting from the technology of rubbing two sticks together. [Makercise] has built one of these machines before, the metal lathe, and the second in the Gingery series of books after a foundry, and the next book is instructions on how to build a mill.

Sure, [Makercise] is using modern tools and modern techniques to build this shaper. There’s a CNC machine involved, and nobody is going to Greenland to make aluminum anymore. Still, this is a flat piece of metal made from scratch, an a great example of how far you can take home machining in a post-apocalyptic scenario.

Continue reading “Cast Aluminium Becomes A Machine Tool”

Manufacturing SimCity For The NES

Late last year, news broke of impossibly rare artifact from the age of the Nintendo Entertainment System. SimCity was the classic simulation game for PC and just about every other console, and it was written for the NES but never released. Now one guy finally got around to digging out his copy, which was dumped at the Portland Retro Gaming Expos and finally put on the Internet. It’s an unfinished game but it’s mostly playable, even if it is a bit more primitive than the PC version.

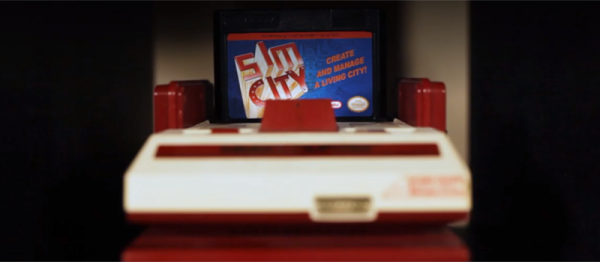
[Matt] wanted to build his own copy of SimCity for the NES, so that’s what he did. It’s a project that took months of work and a ton of research, but finally there’s a professional-looking cartridge version of SimCity.

With the ROM for SimCity loose on the Internet, that part of the build was relatively easy. You can still get EPROMs or EEPROMs, UV erasers, and a good programmer will run you fifty bucks through the usual vendors. There are even places on the Internet that will split up the emulator-compatible ROM file into two files for the character and program ROM in each NES cartridge. The trick here is finding the right cartridge with the right mapper. It turns out there are only four games that you can simply drop SimCity ROM chips into and expect everything to work. All of these games cost a small fortune, but their Famicom versions are cheap.

After carefully desoldering the Famicom game, soldering in the new chips, and applying a fancy professional label, [Matt] had his cartridge version of SimCity for the NES. It’s for a Famicom, though, but you can get adapters for that. Check out the video below.

Continue reading “Manufacturing SimCity For The NES”

Thirty Six Frets For A 3D Printed Guitar

Only 80s kids will remember actual hair metal with the meedley-mees way up high on the fret board, and in the 80s, fret boards got longer. Twenty one or twenty two frets on a guitar weren’t good enough, and you needed the full two octaves of twenty four frets. As with anything, more is better, so [Said Too Much] decided to add frets to his guitar. Yes, you can do that, and it actually doesn’t sound too bad, all things considering.

A few things to cover before going over this build. This did not start out as an experiment to extend the fretboard of a guitar. This started out as a soprano guitar build; this would be the inverse of a baritone guitar — instead of an extended scale length and heavier strings to play a fourth or fifth below a regular guitar, this soprano guitar would have a shorter scale length and lighter gauge strings to play a fourth or fifth above a regular guitar. After a few calculations and some calls to companies that make very, very thin guitar strings, this project morphed into a 3/4 scale guitar (a 23″ scale length, although I question that scale length being actually 3/4 scale) and a set of strings that used 0.07″ strings.

Since a soprano guitar is pretty much just like a normal guitar with more frets, this project also got an extended, 3D printed fretboard. Why? Because. The stock pick guard was modeled and printed out in PLA, removing the neck and middle pickups. Then, an ‘extended fret board adapter’ of sorts was slotted in behind the strings. This gives the guitar 38 frets, a full third of them being printed in PLA.

The burning question: does a 3D printed fret board work? Yes, kind of. If you can get your fingers in between the frets, you can absolutely play the 36th fret on this guitar. It’s not for everybody, obviously, and PLA printed frets will never be as good as polished metal frets. But it is an interesting experimental technique for stringed instruments we haven’t seen before. Check out the video below.

Continue reading “Thirty Six Frets For A 3D Printed Guitar”