For the last three and a half Billion years, evolution has built sensors. The nerves on your fingertips are just as good as any electronic touch sensor, a retina is able to detect a single photon, and the human ear is more finely tuned than the best microphones.
At the 2016 Hackaday SuperConference, Dr. Christal Gordon, educator and engineer, talked about the hardware behind our wetware. While AI researchers are still wondering if they have to define consciousness, there’s still a lot that medicine, psychology, and neuroscience can teach us about building better hardware with simple tools, just like nature has been doing for Billions of years.
Ben Krasnow is one of those people no one has a bad opinion of. He’s part of the team at Verily (Google’s Life Science Alphabit), where he’s busy curing cancer. He co-founded Valve’s hardware division and his YouTube channel, Applied Science, is an exploration of building very high-tech tools very quickly and on a very low budget. Ben has built everything from an electron microscope to a liquid nitrogen generator to a robot that makes individual chocolate chip cookies with ingredients in different proportions. He’s curing cancer and finding the perfect chocolate chip cookie recipe.
The focus of Ben’s talk at this year’s Hackaday SuperConference is building low-cost scientific apparatus quickly. From Applied Science, Ben has cemented his position as a wizard who can find anything either on eBay or at a surplus store. The real trick, Ben tells us, is getting his boss and accounting to understand this rapid prototyping mindset.
Anything can be a remote controlled airplane, and ‘copters – quad or not – simply beat the air into submission. Remote controlled cars are easy, and RC tanks can even shoot their guns. One type of vehicle has eluded remote control hobbyists to a large extent; building a remote control submarine is hard. Not only do you have buoyancy to worry about, but you also need a way to keep the dry parts dry, all while operating in an environment where radio doesn’t really work well.
[Ivan] has already built RC planes, but wanted to tackle a new challenge. He built an RC submarine, and he did it using the simplest household materials.
Nadya Peek is one of the hackers that should require no introduction for the regular Hackaday reader. She is a postdoc at the Center for Bits and Atoms at the MIT Media Lab. She’s responsible for Popfab, a CNC machine that fits in a suitcase and one of the first implementations of a Core XY stage we’ve seen. Nadya has joined the ranks of Rudolf Diesel, Nikola Tesla, Mikhail Kalashnikov, and George W.G. Ferris by having a very tiny piece of the Novena laptop bear her name. She’s built cardboard CNC machines, and taken the idea of simple, easy to build printers, routers, and drawbots worldwide. She just defended her thesis, the gist of which is, ‘How to rapidly prototype rapid prototyping machines.’ She’s also one of this year’s Hackaday Prize judges, for which we have the utmost appreciation.
This year, the organizers of the Fab 12 conference on digital fabrication in Shenzhen turned to Nadya and her team to bring their amazing experience to conference attendees. A workshop was in order, but Nadya didn’t have time to organize the logistics. The conference organizers made a deal: the Center for Bits and Atoms would teach a workshop, but getting all the materials and electronics was the responsibility of the organizers.
Upon arriving at the Shenzhen Sheridan, Nadya found the organizers didn’t hold up their end of the bargain. The cardboard, motors, electronics, and glue were nowhere to be found. A “rider” doesn’t quite translate from English, it seems. This is Shenzhen, though, where you can buy all the cardboard, motors, electronics, and iPhone clones you could imagine. What was the solution to this problem? Founding a company in Shenzhen for eight days.
Half a tourist’s guide to Shenzhen and half a deconstruction of what goes into cardboard CNC, Nadya’s talk for the 2016 Hackaday SuperConference covers what happens when you have a week to build a company that will build machines that build machines.
Slack is great, but there are a few small problems with the current implementations. There isn’t a client for Palm, there isn’t a client for the Newton, and there isn’t a client for the Commodore 64. The last of these severe oversights was recently fixed by [Jeff Harris]. He built a native Slack client in 6502 assembly for the Commodore 64.
When dealing with network applications and the C64, the first question that comes to mind is how to talk to the outside world. There are C64 NICs, and ESP dongles, but for this build [Jeff] turned to the C64 Userport. This card edge combination of a serial and parallel port allows the C64 to talk to anything with RS-232, and with a simple adapter, [Jeff] got his old computer talking to a Raspberry Pi connected to the Internet.
The C64 Slack client itself is written in 6502 assembly, and features everything you would expect. The Pi is required to talk to the Slack API, though, and uses a NodeJS app to translate the bits from the C64 to something the API can understand.
Does it work? Of course it does. Slack is just text, after all, and there doesn’t seem to be any PETSCII weirdness here. You can check out a video of the build in action below.
The RISC-V ISA has seen an uptick in popularity as of late — almost as if there’s a conference going on right now — thanks to the fact that this instruction set is big-O Open. This openness allows anyone to build their own software and hardware. Of course, getting your hands on a RISC-V chip has until now, been a bit difficult. You could always go over to opencores, grab some VHDL, and run a RISC-V chip on an FPGA. Last week, OnChip released the RISC-V Open-V in real, tangible silicon.
Choice is always a good thing, and now SiFive, a fabless semiconductor company, has released the HiFive1 as a crowdfunding campaign on CrowdSupply. It’s a RISC-V microcontroller, completely open source, and packaged in the ever so convenient Arduino form factor.
The heart of the HiFive1 is SiFive’s FE310 SoC, a 32-bit RISC-V core running at 320+ MHz. As far as peripherals go, the HiFive1 features 19 digital IO pins, one SPI controller, 9 PWM pins, an external 128Megabit Flash, and five volt IO. Performance-wise, the HiFive1 is significantly faster than the Intel Curie-powered Arduino 101, or the ARM Cortex M0+ powered Arduino Zero. According to the crowdfunding campaign, support for the Arduino IDE is included. A single HiFive1 is available for $59 USD.
Since this is an Open Source chip, you would expect everything about it to be available. SiFive has everything from the SDK to the RTL available on GitHub. This is an impressive development in the ecosystem of Open Hardware, and something we’re going to take a look at when these chips make it out into the world.
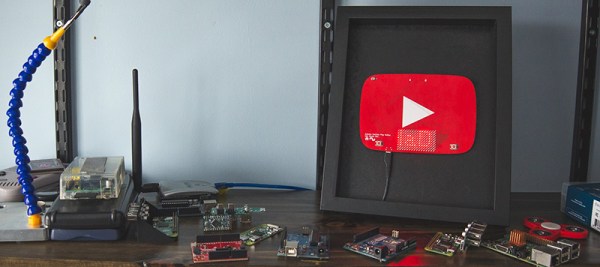
The only thing that matters in this world is the likes you get on social media platforms. To that end, YouTube has been sending out silver and gold play buttons to their most valuable creators. [Sean] hasn’t screamed into a microphone while playing Minecraft long enough to earn one of these play buttons, so he decided to build his own.
This play button isn’t just a bit of pot metal ensconced in a frame brought to you by Audible dot com; this YouTube play button actually does something useful. It’s a PCB with 144 LEDs working together as a display. There’s an Atmel SAMD21 microcontroller on board to drive the LEDs, and an ESP8266 to pull data down from the Internet. What data is worthy enough to go on an Arduinofied YouTube play button? The subscriber count for [Sean]’s channel, of course. Go subscribe, it might crash his Play button.
Admittedly, there were a few problems with this Play button PCB. Firstly, the ESP8266 can’t directly communicate with the YouTube API to pull down the subscriber count. That problem was fixed with a Raspberry Pi that could connect to the API, and programming the ESP to pull the data from the Pi. Second, this was [Sean]’s first experiment with double-sided SMD boards reflowed in a toaster oven. The first side to be assembled was easy, but to get the second side on, [Sean] turned to low-temp bismuth solder paste. Except for a small error in assembling the board, everything worked as planned.
It’s a great project, and if you want to check out what the better parts of YouTube look like, check out [Sean]’s video below. Don’t forget to rate, comment, like, unlike, or subscribe.