Hackaday Links: December 13, 2015

So you’ve been rocking a tin foil hat for years now, and people have finally gotten used to your attire and claims that fluoridated water is a government mind control experiment. This holiday, how about something a little more stylish? Yes, it’s a Kickstarter for the World’s First Signal Proof Headwear. This fashionable beanie or cap protects you from harmful electromagnetic rays. Next time you shoot an eighteen minute long YouTube video of a wheezing rant about chemtrails, look fashionable with Shield – the world’s first stylish signal proof hat.

That last tip came to us from a Crowdfunding marketing agency. That means money was exchanged for the purposes of marketing a modern tin foil hat.

[Mike] has an old IBM 5155, the ‘luggable’ computer with design cues taken from the first Compaq. With an Ethernet adapter and a little inspiration, He was able to get this old computer to load the Hackaday retro edition.

[gyrovague] has a Chromecast that’s a bit janky. When it comes to electronics, strangeness means heat. The solution? A heat sink for the Chromecast. You don’t even need a proper heat sink for this one – just epoxy a big ‘ol transformer to the aluminum plate in the Chromecast.

This year, Keysight gave away a pile of test and measurement gear to the i3Detroit hackerspace. Keysight is doing it again, with a grand prize of around $60,000. Entries close on the 15th. Protip: you, personally, don’t want to win this for tax reasons. A non-profit does.

The Internet recently caught wind of a satellite modem being sold by Sparkfun. It’s $250 for the module, with a $12/month line rental, and each 340 byte message costs $0.18 to receive. Yes, it’s cool, and yes, it’s expensive. If you ever need to send a message from the north pole, there you go.

Need to remove the waterproof coating from LED strips? Don’t use a knife, use a Dremel and a wire brush.
Decoupling Lego Trains Automatically

Lego train sets were introduced almost 50 years ago, and since then, one thing has been constant: the trains connected with magnets. While this is a supremely simple means of connecting locomotives to rolling stock, there is one big disadvantage. Building decouplers – devices that will separate one car from another – is difficult.

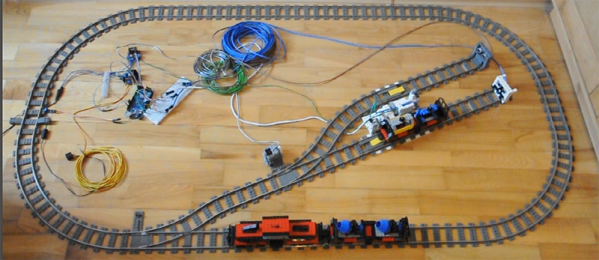
Now, with a clever combination of racks, gears, and wedges, trains can disassemble themselves. They can even do it with an Arduino.

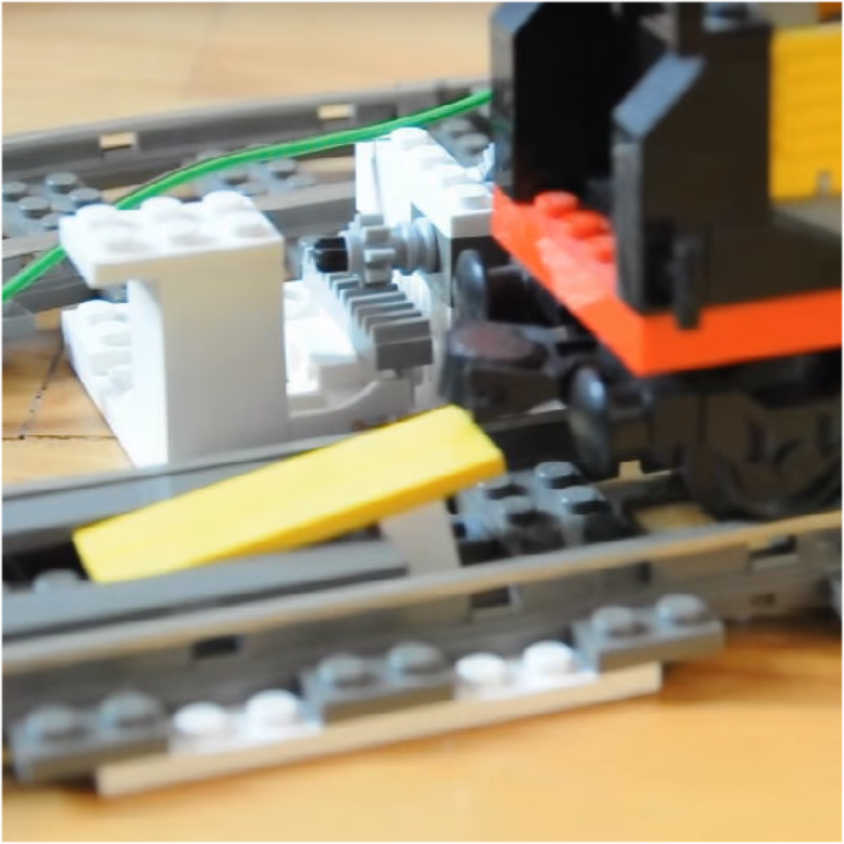
wedgeThis decoupler works by effectively wedging cars apart from each other. With a motor from an old Lego Technic set, a few gears, shafts, and a rack, a device can be constructed that fits between the rails of a track that raises into the undercarriage of rolling stock.

Because this rolling stock is moved around with a locomotive, all that’s needed to separate two halves of a train is to move the locomotive forward. Yes, it does mean that the connection with the weakest magnet is disengaged – not necessarily the connection you want to decouple. However, with only one car and a locomotive, there’s only one connection to break. Simple enough.

This Lego decoupler can be further improved with an Arduino, a few ultrasonic sensors, and an IR detector to make a fully automatic decoupling siding for a Lego train layout. You can see all this below operating with a full state machine that perpetually switches rolling stock behind a locomotive.

A great use for Legos.

Continue reading “Decoupling Lego Trains Automatically”

Turning A Pi Into A PDP

There’s no better way to learn how to program a computer than assembly, and there’s no better way to do assembly than with a bunch of blinkenlights and switches. Therefore, the best way to learn programming is with a PDP-11. It’s a shame these machines are locked up in museums and the garages of very cool people, but you can build your own PDP-11 with a Raspberry Pi and just a few extra components.

[jonatron] built his own simulated version of the PDP-11 with a lot of LEDs, a ton of switches, and a few 16-bit serial to parallel ICs. Of course the coolest part of any blinkenlight simulator are the front panel graphics, and here [jonatron] didn’t skimp. He put those switches and LEDs on a piece of laser cut acrylic with a handsome PDP11 decal. The software comes with a load of compiler warnings and doesn’t run anything except for very simple machine code programs. That’s really all you can do with a bunch of toggle switches and lights, though.

If this project looks familiar, your memory does not deceive you. The PiDP-8/I was an entry in this year’s Hackaday Prize and ended up being one of the top projects in the Best Product category. We ran into [Oscar], the creator of the PiDP-8, a few times this year. The most recent was at the Hackaday SuperConferece where he gave a talk. He’s currently working on a replica of the king of PDPs, the PDP-11/70.

Video below.

Continue reading “Turning A Pi Into A PDP”

Solder More USB Ports To The Raspberry Pi Zero

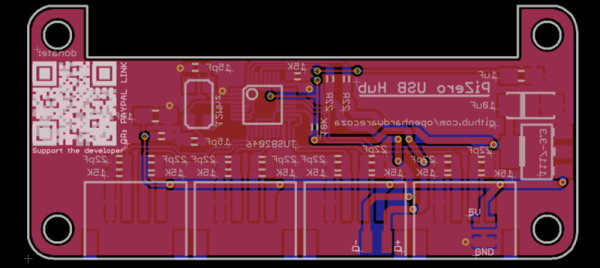
Slowly, Raspberry Pi Zeros are falling into the hands of everyone who wants one. Quickly, though, it was realized that one USB port wasn’t enough, and having a single USB OTG port was only just the most economical solution. The Pi Zero does have a lot of test points exposed on the back, and [Peter van der Walt] is clever enough to come up with a 4-port hub you can solder directly to the Pi Zero.

[Peter] has a bit of experience with USB ports on the Pi, and the test points available on the bottom of this cheap and wonderful board provide everything you need to break out the single USB OTG port to a USB hub. We’ve seen this done before with a few tenuous solder connections between the Zero and an off-the-shelf USB hub. [Peter]’s build does it by soldering a USB hub directly to the Pi through these test points. It’s the first purpose built bit of hardware designed for the express purpose of giving the Pi four USB ports while only making it a sliver thicker.

The chip [Peter] is using for the build is the TI TUSB2046B, a device that turns a single USB port into a 4-port hub. This is a part that only costs about $2 in quantity, and the USB connectors themselves are only about $0.60 if you want to build a thousand of these solderable USB hubs. Now you see why the Pi Foundation didn’t include a whole host of ports on the Pi Zero, but it does mean you should be able to pick this board up for under $10 when it’s inevitably cloned in China.

[Peter] doesn’t have this board working yet. In fact, he’s only just sent the Gerbers off to the PCB fab. There will be an update once [Peter] gets the boards back and solders up the tiny but tolerable 0603 parts.

Measuring Capacitance Against Voltage

Ceramic capacitors are pretty much the pixie dust of the electronics world. If you sprinkle enough of them on a circuit, everything will work. These ceramic capacitors aren’t the newest and latest technology, though: you can find them in radios from the 1930s, and they have one annoying property: their capacitance changes in relation to voltage.

This is a problem if you’re relying on ceramic caps in an RC filter or a power supply. What you need is a device that will graph capacitance against voltage, and [limpkin] is here to show you how to do it.

Of course capacitance is usually measured by timing how long it takes to charge and discharge a cap through an RC oscillator. This requires at least one known value – in this case a 0.1% resistor – by measuring the time it takes for this circuit to oscillate, an unknown capacitance can be calculated.

That’s all well and good, but how do you measure capacitance against a bias voltage? EDN comes to save the day with a simple circuit built around an op-amp. This op-amp is just a comparator, with the rest of the circuit providing a voltage directly proportional to the percentage of charge in the capacitor.

This little project is something [limpkin] has turned into a Kickstarter, and it’s something we’ve seen before. That said, measuring capacitance against a voltage isn’t something any ‘ol meter can do, and we’re glad [limpkin] could put together an easy to use tool that measures this phenomenon.

Vinduino: Full Irrigation With 25% Less Water

Irrigation is a fairly crude practice. Sure, there are timers, and rain sensors, but all in all we’re basically dumping water on the ground and guessing at the right amount. [Reinier van der Lee] wanted a better way to ensure the plants in his vineyard are getting the right amount of water. And this is Goldilocks’ version of “right”, not too little but also not too much. Southern California is in an extreme/exceptional drought. Water costs a lot of money, but it is also scarce and conservation has a wider impact than merely the bottom line.

His solution is the Vinduino project. It’s a set of moisture sensors that work in conjunction with a handheld device to measure the effect of irrigation. Multiple moisture sensors are buried at different depths: near the surface, at root level, and below root level. This lets you know when the water is getting to the root system, and when it has penetrated further than needed. The project was recognized as the Best Product in the 2015 Hackaday Prize, and [Reinier] presented the project during his talk at the Hackaday SuperConference. Check out the video of that talk below, and join us after the break for a look at the development of this impressive product.

Continue reading “Vinduino: Full Irrigation With 25% Less Water”

First Plasma In The World’s Largest Stellerator

If you’re looking for the future of humanity, look no further than the first plasma generated in the Wendelstein 7-X Stellerator at the Max Planck Institute for Plasma Physics. It turned on for the first time yesterday, and while this isn’t the first fusion power plant, nor will it ever be, it is a preview of what may become the invention that will save humanity.

A glimpse of plasma in side the Stellerator

For a very long time, it was believed the only way to turn isotopes of hydrogen into helium for the efficient recovery of power was the Tokamak. This device, basically a hollow torus lined with coils of wire, compresses plasma into a thin circular string. With the right pressures and temperatures, this plasma will transmute the elements and produce power.

Tokamaks have not seen much success, though, and this is a consequence of two key problems with the Tokamak design. First, we’ve been building them too small, although the ITER reactor currently being built in southern France may be an exception. ITER should be able to produce more energy than is used to initiate fusion after it comes online in the 2020s. Tokamaks also have another problem: they cannot operate continuously without a lot of extraneous equipment. While the Wendelstein 7-X Stellerator is too small to produce a net excess of power, it will demonstrate continuous operation of a fusion device. [Elliot Williams] wrote a great explanation of this Stellerator last month which is well worth a look.

While this Stellerator is just a testbed and will never be used to generate power, it is by no means the only other possible means of creating a sun on Earth. The Polywell – a device that fuses hydrogen inside a containment vessel made of electromagnets arranged like the faces of a cube – is getting funding from the US Navy. Additionally, Lockheed Martin’s Skunk Works claims they can put a 100 Megawatt fusion reactor on the back of a truck within a few years.

The creation of a fusion power plant will be the most important invention of all time, and will earn the researchers behind it the Nobel prize in physics and peace. While the Wendelstein 7-X Stellarator is not the first fusion power plant, it might be a step in the right direction.