A 16-voice Homebrew Polyphonic Synth

Homebrew synths – generating a waveform in a microcontroller, adding a MIDI interface, and sending everything out to a speaker – are great projects that will teach you a ton about how much you can do with a tiny, low power uC. [Mark] created what is probably the most powerful homebrew synth we’ve seen, all while using a relatively low-power microcontroller.

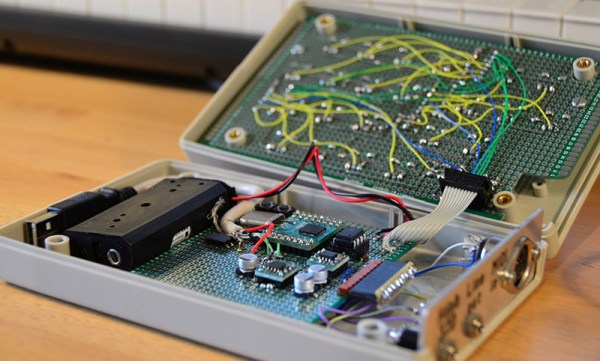
The hardware for this project is an LPC1311 ARM Cortex M3 running at 72 MHz. Turning digital audio into something a speaker can understand is handled by a Wolfson WM8762, a stereo 24-bit DAC. Both of these chips can be bought for under one pound in quantity one, something you can’t say about the chips used in olde-tyme synths.

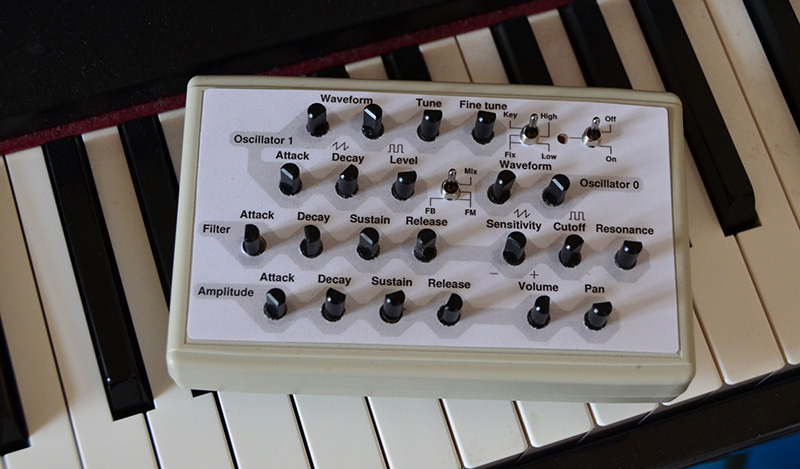
The front panel, shown below, uses 22 pots and two switches to control the waveform, ADSR, filter, volume, and pan. To save pins on the microcontroller, [Mark] used a few analog multiplexers. As far as circuitry goes, it’s a fairly simple setup, with the only truly weird component being the optocoupler for the MIDI input.
goom2

The software for the synth is written mostly in assembly. In a previous version where most of the code was written in C, everything was a factor of two slower. Doing all the voice generation in assembly allowed for twice as many simultaneous voices.

It’s a great project, and compared to some of the other synth builds we’ve seen before, [Mark]’s project is at the top of its class. A quick search of the archives says this is probably the most polyphonic homebrew synth we’ve seen, and listening to the sound sample on the project page, it sounds pretty good, to boot.
Anthropomorphizing Microprocessors

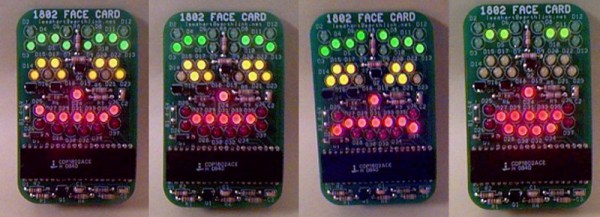
Vintage microprocessors usually do something, be it just sitting in an idle loop, calculating something, or simply looking cool in a collector’s cabinet. [Lee] has come up with a vastly cooler use for an old microprocessor: he’s anthropomorphized it by wiring LEDs up to the address lines and arranged those LEDs into a face. After wiring up the right circuit, the face of LEDs slowly changes expressions, making this tiny little board react to random electronic fluctuations.

The CPU used for this project is the RCA 1802, best known for being the smarts in the COSMAC Elf, a very early microprocessor training computer, but still capable of teaching the basics of computing today, albeit on a processor that isn’t made any more with an instruction set that is barely supported by anything modern.

[Lee] apparently has a lot of these 1802s, and to show off how simple a microcomputer can get, he created the strangest use for a CPU we’ve ever seen. You can’t program this face of LEDs; the data bus is left floating so random values are ‘displayed’ on the face. Only one of the data lines is pulled high. This prevents the data bus from ever being 0x00, the HALT instruction.

If you’re looking for something a little more useful to do with an RCA 1802 MPU, [Lee] also has a COSMAC Elf membership card. It’s a reproduction of the famous COSMAC Elf, repackaged into a board the size of an Altoid tin. It has the 1802 onboard, a few switches and blinkenlights,  and a parallel port for interacting with peripherals.

Turkey Sous Vide

It’s time once again for Americans to gorge themselves on hormone-laced meats covered in several sauces and gravies, all of which inexplicably contain corn syrup. It’s also Thanksgiving this Thursday, so there’s that, too. If you have a turkey defrosting somewhere, you’ve probably gone over all your cooking options – the oven, a giant propane-heated pot of peanut oil, and yes, even sous vide. [Trey] over at TI came up with a great sous vide controller using a few LaunchPad Booster packs, and surprisingly, he can even cook a turkey.

The basic idea of sous vide is to vacuum pack your protein, put it in a closely-controlled water bath, and cook it so the inside is always the same temperature as the outside. It’s delicious, and it takes a long time. We can automate that, though.

[Trey] is using a USB LaunchPad and a thermocouple BoosterPack to monitor the temperature of a water bath. A custom SSR board is wired right into the heater, and a CC3100 provides a network connection to monitor the bird. While the network may seem a bit superfluous, it’s actually a great idea; sous vide takes hours, and you really don’t dote on your warm tub of water. Being able to receive SMS alerts from a sous vide controller is actually a great idea.

With everything wired up, [Trey] tried out his recipe for deep-fried turkey porchetta. From the pictures, it looks great and according to [Trey] it was the juiciest turkey he’s ever had.

Open Sourcing Satellite Telemetry

Launched in 1978, the International Sun/Earth Explorer 3 was sent on a mission to explore the Earth’s interaction with the sun. Several years later, the spacecraft changed its name to the International Cometary Explorer, sent off to explore orbiting ice balls, and return to Earth earlier this year. Talking to that spacecraft was a huge undertaking, with crowdfunding campaigns, excursions to Arecibo, and mountains of work from a team spanning the globe. Commanding the thrusters onboard the satellite didn’t work – there was no pressure in the tanks – but still the ICE mission continues, and one of the lead radio gurus on the team has put up the telemetry parser/display crafted for the reboot project up on Github.

The guy behind the backend for the ICE/ISEE reboot project should be well-known to Hackaday readers. He’s the guy who came up with a Software Defined Radio source block for a cheap USB TV tuner, waking everyone up to the SDR game. He’s also played air traffic controller by sitting out near an airport with a laptop, and has given talks at Black Hat and DEFCON.

The ICE/ISEE-3 telemetry parser/display allows anyone to listen to the recorded telemetry frames from the satellite, check out what was actually going on, and learn how to communicate with a device without a computer that’s rapidly approaching from millions of miles away. He’s even put some telemetry recordings up on the Internet to practice.

Although the ICE/ISEE-3 reboot project will have to wait another decade or two until the probe makes its way back to our neck of the woods, [Balint] is taking it in stride an organizing a few Software Defined Radio meetups in the San Fransisco area. He just had the first meetup (Video below) where talks ranging from creating a stereo FM transmitter in GNU radio, a visual introduction to DSP for SDR and SETI signals from the Allen Telescope Array were discussed. There will be another meetup in a few weeks at Noisbridge, with some very cool subjects on the roster.

Continue reading “Open Sourcing Satellite Telemetry”

Better SPI Bus Design

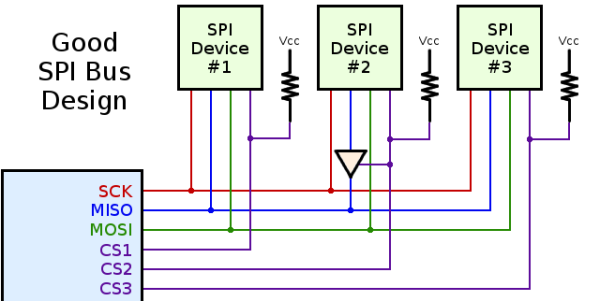
Quick, how do you wire up an SPI bus between a microcontroller and a peripheral? SCK goes to SCK, MISO goes to MISO, and MOSI goes to MOSI, right? Yeah. You’ll need to throw in a chip select pin, but that’s pretty much it. Just wires, and it’ll most likely work. Now add a second device. The naïve solution found in thousands of Arduino tutorials do the same thing; just wires, and it’ll probably work. It’s not that simple, and Mr. Teensy himself, [Paul Stoffregen] is here to show you why.

When using multiple SPI devices, a pullup resistor on the chip select lines are a really great idea. Without a pullup, devices will work great when used alone, but will inexplicably fail when used together. It’s not magic; both devices are listening to the bus when only one should be. Putting a pullup on the CS lines keeps everything at the right logic level until a device is actually needed.

How about the MISO line? Most peripherals will disconnect their pins when the chip select signal is active, but there are exceptions. Good luck finding them. There is an easy way to check, though: just connect two resistors so the MISO line floats to a non-logic level when the CS pin is high, and check with a voltmeter. If MISO is driven high or low, you should put a small tri-state buffer in there.

That just covers hardware, and there are a few things you can do in software to reduce the number of conflicts when using more than one SPI device. One of these methods is transactions, or defining the clock rate, setting MSB or LSB first, and the polarity of the clock. Newer versions of the Arduino SPI library support transactions and the setup is very easy. In fact, transaction support in the Arduino library is something [Paul] worked on himself, and gets around the problem of having SPI-related code happening in both the main loop of a program and whenever an interrupt hits. Awesome work, and a boon to the Arduino makers around the world.

A UV Lightbox For Curing Prints

With resin printers slowly making their way to hackerspaces and garages the world over, there is a growing need for a place to cure these UV resin prints. No, they don’t come out of the machine fully cured, they come out fully solid. And no, we’re not just leaving them in the sun, because that’s not how we do things around here.

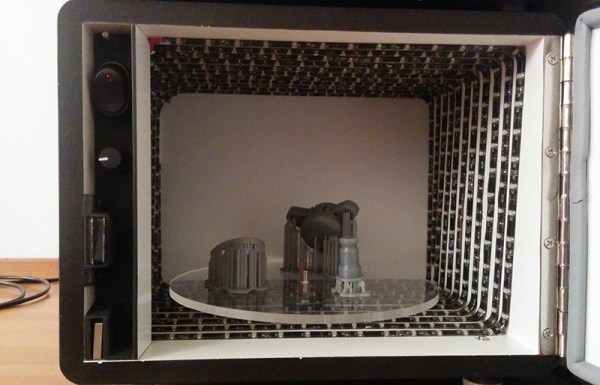
[Christopher] whipped up a post-cure lightbox meant to sit underneath his Form 1 printer. It’s made of 1/2″ MDF, with adjustable feet (something the Form 1 lacks), a safety switch to keep the lights off when the door is open, and a motor to rotate the parts around the enclosure.

The light source for this lightbox is 10 meters of ultraviolet LED strips. The LEDs shine somewhere between 395-405nm, the same wavelength as the laser diode found in the Form 1 printer. Other than a bit of wiring for the LEDs, the only complicated part of the build was the motor; [Christopher] bought a 2rpm motor but was sent a 36rpm motor. The vendor was out of 2rpm motors, so a PWM controller was added.

It’s a beautiful build that shows off [Christopher]’s ability to work with MDF. It also looks great sitting underneath his printer, and all his parts are rock solid now.

Central European Computer Collecting

During Hackaday’s short trip to Czech, we were lucky enough to run into someone who had recently had one of his projects featured on Hackaday. It’s [Martin]’s multi-target IDE for 8-bit CPUs, written entirely in JavaScript, and a full development suite for anything with a 6502, 6800, 6809, Z80, 8080, and 8085. [Martin] was kind enough to sit down and give us the scoop on why he’s interested in old computers, and why he developed his 8-bit IDE project, ASM80.

[Martin] grew up in the days of computer magazines, and originally wanted to build his own computer. That plan didn’t work out, but his parents did get him a Speccy in 1986, but the love of old hardware is still there. Over the years, this evolved into computer collecting, with the old ZX Spectrum, an Commodore 64, ORICs, and Acorns rounding out his collection. As we learned at the Computeum, there the middle of Europe had computers that just aren’t seen on the English-speaking Internet, and [Martin]’s collection is no exception.

In addition to doing some very cool stuff for some very old computers, [Martin] also donated something to the Hackaday Hackaspace. It’s a PMI-80, a single board computer made for university computer science students, and basically a KIM-1, but based on a Czechoslovak clone of the Intel 8080 made by Tesla. There is 1k of RAM and 1k of ROM on this board, a calculator keypad, and a few seven segment displays. For the time, it was a great ‘student’ computer, and not really rare in Europe, but this is the first one I’ve seen on my side of the Atlantic.

You can see some pics of the PMI-80 below with [Martin]’s interview. [Martin] also promised to write-up a short history of classic central european computers, a subject there isn’t much written about in the anglosphere. We’ll post a link to that when he finishes that up.

Continue reading “Central European Computer Collecting”