A Six Part CNC Machine

CNC

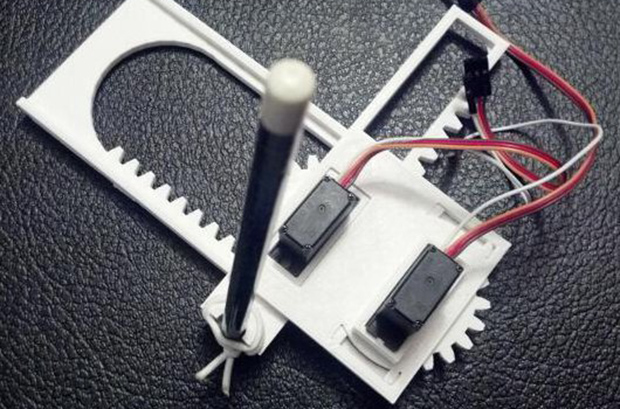
CNC machines are impressive pieces of kit. We’re all for seeing the big, burly, impressive machines, but there’s something to be said about seeing how small they can get. [Jay] has what is probably the most minimal CNC plotter we’ve ever seen, built from only six 3D printed parts.

[Jay]’s plotter is based on the Piccolo, an exceedingly small-scale CNC platform that can be built for $70 with laser-cut parts. This version, though, uses only six parts that can be downloaded from Thingiverse. Powered by an Arduino and two micro servos, this CNC plotter would be a great introduction to CNC for any robotics club or hackerspace tutorial series.

[Jay] has been doing some awesome work with CNC plotters; we saw his large format Plotterbot earlier this month, and his giant plotted HaD logo with HaD infill poster was a great submission to our Trinket contest.

Video of [Jay]’s plotter in action available after the break.

Continue reading “A Six Part CNC Machine”

Beautiful Touch-Sensitive Furniture

lamp

It’s taken over a year, but [tinkering techie] has finally completed his touch sensitive nightstand. At first glance, it looks like any normal piece of furniture. With the addition of an Arduino, some copper clad board, and a few LEDs, he’s turned it into a very elegant, electronic home furnishing.

The nightstand is built out of a few very nice pieces of mahogany. Underneath the top of the nightstand, three Kapton-covered copper clad boards are inset along the front and side edges. These capacitive sensing boards are connected to an Arduino Fio that reads the capacitance of these sensors and turns on a small LED under the drawer or the mains powered lamp.

The electronics are powered by a small USB charger with a battery backup all hidden underneath the top of the nightstand. Inside the drawer, a magnetic reed switch turns on an RGB LED whenever the drawer is opened.

While the nightstand itself is a wonderful piece of woodworking, we need to tip our hat for a remarkably seamless integration of fine furniture and electronics. The electronic furniture modifications we usually see are Ikea cruft, but this wonderful homemade nightstand should last decades or centuries.

Video of [techie] going over his build below

Continue reading “Beautiful Touch-Sensitive Furniture”

Raspis And Arduinos For FM Broadcast Streaming

radio

The biggest Internet provider in Portugal needed a system to turn FM broadcast stations in Angola, Cabo Verde, and Mozambique into a web stream. Like every good project, the people in charge of the engineering turned to Hackaday staples – Raspberry Pis, Arduinos, and TP-Link routers, all stuffed into an awesome modular rackmount cabinet

Each module in this gigantic rackmount system includes an Arduino, a Raspberry Pi, a Silicon Labs Si4705 FM receiver chip, and a TI USB audio capture chip that allows the Pi to turn the audio out from the radio receiver into an audio stream. All the Pis are connected to a 24 port Ethernet switch and to a separate master Raspi that converts data received from each module into an icecast stream.

The engineering behind each module is pretty impressive – they’re all hot swappable, have remote shutdown capability, and have voltage divider on the backplane to detect where in the rack it’s placed. It’s a very cool piece of engineering and a very cool example of using off-the-shelf hardware to do something that could be much, much harder.

Making Logic With Inductors

NOR

We’ve seen NAND and NOR logic gates – the building blocks of everything digital – made out of everything from marbles to Minecraft redstone. [kos] has outdone himself this time with a logic circuit we’ve never seen before. It’s based on magnets and induction, making a NOR gate out of nothing but a ferrite core, some wire, and a diode.

The theory of operations for this magnetic NOR gate goes as follows: If two of the input windings around the core have current passing in different directions, the fields cancel out. This could either be done by positive or negative voltages, or by simply changing the phase of the winding. To keep things simple, [kos] chose the latter. The truth table for a simple two-input, one-output gate gets pretty complicated (or exceedingly cool if you’d like to build a trinary computer), so to get absolute values of 1 and 0, a separate ‘clock’ winding was also added to the core.

One thing to note about [kos]’ gate is its innovation on techniques described in the relevant literature. Previously, these kinds of magnetic gates were built with square ferrites, while this version can work with any magnetic core.

While this isn’t a very practical approach towards building anything more complex than a memory cell, it is an exercise of what could have been in an alternate universe where tube technology and the transistor just didn’t happen.

3D Printering: Wherein ABS Is Dangerous

printering

A lot of the ‘prosumer’ – for as much as I hate that word – 3D printers out there like the Makerbot Replicator and countless other Kickstarter projects only officially support PLA filament. This has a few advantages from a product development standpoint, namely not necessitating the use of a heated build plate. There are other reasons for not supporting ABS and other filaments, as one of the Kickstarter updates for the Buccaneer printer elucidates (update available to backers only, here’s a mirror from somebody on reddit).

The main crux of the Buccaneer team’s decision not to support ABS is as follows:

We spoke to our legal counsel about it and they told us that if we officially support a certain “material” type then our printer has to go through massive certification to prove that it is totally safe to use or we will/can get sued badly.

Despite the Buccaneer team’s best efforts, we’re sure, their lawyers were actually able to find some studies that showed ABS could affect a person’s health. The issue isn’t with the ABS itself – LEGO are made of ABS and kids chew on blocks all the time. The issue comes from the decomposition of ABS when it is heated.

Continue reading “3D Printering: Wherein ABS Is Dangerous”

Wireless SNES Controller For Logitech Receiver

SNES

A while back, Logitech introduced their version of a wireless interface for keyboards, mice, and other human-oriented peripherals. Yes, they could have used Bluetooth, but that’s neither here nor there. What we do know, though, is that it’s now possible to stuff one of these Logitech transmitters into a Super Nintendo controller, allowing it to operate with your fancy-schmancy wireless keyboards and mice.

[Warrior_Rocker] wanted to retain as much of the stock appearance of the original controller as possible. To do this, he salvaged the Logitech transmitter from an old handheld Logitech keyboard/touchpad combo. The membrane of the keyboard connected directly to the transmitter, meaning tracing out the connections of the membrane to each pin was required to get a button mapping that made sense.

Once the lines of the SNES controller were wired up to the transmitter, [Warrior] needed a way to power his new wireless controller. The old keyboard used a pair of AA cells wired in parallel. With two AA cells, the keyboard had about a year of battery life, so with a single AAA cell, [Warrior]’s SNES controller should last a few months or more.

Except for a switch and a missing cable, [Warrior]’s wireless controller looks exactly like a stock controller. Pretty impressive, given this build is the product of stuff he just had lying around.

An Awesome Wireless Motion Sensor

Wireless sensor networks are nothing new to Hackaday, but [Felix]’s wireless PIR sensor node is something else entirely. Rarely do we see something so well put together that’s also so well designed for mass production.

For his sensor, [Felix] is using a Moteino, a very tiny Arduino compatible board with solder pads for an RFM12B and RFM69 radio transceivers. These very inexpensive radios – about $4 each – are able to transmit about half a kilometer at 38.4 kbps, an impressive amount of bandwidth and an exceptional range for a very inexpensive system.

The important bit on this wireless sensor, the PIR sensor, connects with three pins – power, ground, and out. When the PIR sensor sees something it transmits a code the base station where the ‘motion’ alert message is displayed.

The entire device is powered by a 9V battery and stuffed inside a beautiful acrylic case. With everything, each sensor node should cost about $15; very cheap for something that if built by a proper security system company would cost much, much more.