Mixing Video For Old School Effects

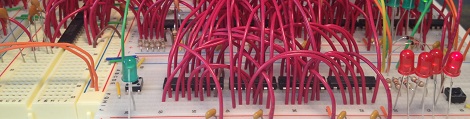
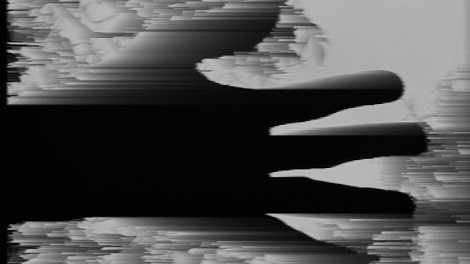
For all the high production values Final Cut Pro and Adobe Premier have released upon the world, there’s still a cinematographic aesthetic only possible with analog video, linear editing, and video feedback. [gijs] just sent in a video mixer he’s been working on to allow crossfading between two video signals and introducing some very cool analog video distortion effects.

[gijs]’ mixer uses the LM1881 video sync separator also found in the Arduino video experimenter shield. Because two different video feeds are unlikely to send their sync signal at exactly the same time, the selected video will stay still on the screen while the second video feed will slowly scroll horizontally across the screen.

This isn’t the first analog video hack [gijs] has come up with; last year he released an Arduino video sampler capable of recording about a second of video and playing it back forward, reverse, looped, or inverted.

We’re sure combing both the video mixer and sampler would produce an aesthetic similar to the experimentation seen on 80s-era public access or our time in AV club. Either way, a very cool build that just can’t be done digitally.

Video of the mixer after the break.

Continue reading “Mixing Video For Old School Effects”

Putting 300 Watts Of LEDs On An RC Plane

Being a member of the FPVlab forums, [HugeOne] is really in to strapping a video camera to RC airplanes and flying around by the seat of his pants. He’s also in to flying his plane at night. Combine these two interests, and you’ve got 300 watts of LEDs flying around at night, most likely causing a spike in UFO reports in [HugeOne]’s native Quebec.

The main issue with putting 16 CREE XM-L LEDs in such a confined space is the issue of heat; even though these LEDs are amazingly efficient, they still produce a good amount of heat. [HugeOne] solved this problem by soldering these LEDs to a piece of copper pipe and connecting two radiators to his plane for liquid cooling.

The result is a small, lightweight LED array capable of producing more than 20,000 lumens flying around the wilds of Quebec. This greatly improves [HugeOne]’s night flying ability (video after the break), and has surely annoyed the local police department with an increase in UFO reports.

Does anyone know how bright the nav and landing lights on single-engine passenger airplanes are?

Continue reading “Putting 300 Watts Of LEDs On An RC Plane”

Programming A Propeller On An ARM

[Stefan] uses a small ARM-powered netbook for his development work, so when he tried to play around with the Parallax Propeller he ran into a few problems. The official tools from Parallax are Windows only, and the available 3rd party dev tools are only compiled for x86. After a lot of futzing about, [Stefan] was able to develop on his ARM netbook and wrote in to tell us how it’s done.

Luckily, Parallax released a GCC port for the Propeller, but unfortunately isn’t completely portable to ARM. The Propeller loader for this architecture ambivalent build uses a little bit of SPIN code, which can only be compiled on Intel machines.

To get around this problem, [Stefan] wrote an installer script to gather all the necessary bits of code to his computer. His ARM/Linux toolchain consists of the Propeller GCC, an open source SPIN compiler, and a Python script used to load code [Stefan] found on the Propeller forums.

Now that [Stefan] has a complete toolchain for programming the Propeller on an ARM device, it’s possible to develop for this very cool multi-core microcontroller on his netbook or even the Raspberry Pi.

Hackaday Links: September 7, 2012

MakerSlide, European edition

We’re all familiar with the MakerSlide, right? The linear bearing system that has been turned into everything from motorized camera mounts to 3D printers is apparently very hard to source in Europe. A few folks from the ShapeOko forum have teamed up to produce the MakerSlide in the UK. They’re running a crowdsourced project on Ulule, and the prices for the rewards seem very reasonable; €65/£73 for enough extrusion, v-wheels, and spacers to make an awesome CNC router.

Kerf bending and math

A few days ago, I made an offhand remark asking for an engineering analysis of kerf bending. [Patrick Fenner] of the Liverpool hackerspace DoES already had a blog post covering this, and goes over the theory, equations, and practical examples of bending acrylic with a laser cutter. Thanks for finding this [Adrian].

276 hours well spent

[Dave Langkamp] got his hands on a Makerbot Replicator, one thing led to another, and now he has a 1/6 scale model electric car made nearly entirely out of 3D printed parts. No, the batteries don’t hold a charge, and the motor doesn’t have any metal in it, but we’ve got to admire the dedication that went in to this project.

It was thiiiiiiis big

If you’ve ever tried to demonstrate the size of an object with a photograph, you’ve probably placed a coin of other standard object in the frame. Here’s something a little more useful created by [Phil]. His International Object Sizing Tool is the size of a credit card, has inch and cm markings, as well as pictures of a US quarter, a British pound coin, and a one Euro coin. If you want to print one-off for yourself, here’s the PDF.

Want some documentation on your TV tuner SDR?

The full documentation for the E4000/RTL2832U chipset found in those USB TV tuner dongles is up on reddit. Even though these chips are now out of production (if you haven’t bought a proper tuner dongle yet, you might want to…), maybe a someone looking to replicate this really cool device will find it useful.

Mess Of Wires Is Actually A One Instruction Computer

If you’re going to build your own computer, it probably wouldn’t do you well to exactly emulate the computer you’re looking at right now. The modern x86 and x64 chips that power your desktop or laptop contain hundreds of individual instructions, and the supposed RISC CPUs found in ARM-powered devices contain nearly as many. No, if you’re going to build your own computer you should make it easy on yourself, just as [Jack Eisenmann] did  when he built the DUO Compact, a one-instruction set computer made on a breadboard.

Instead of dozens or hundreds of individual instructions, a one instruction computer has – like its name implies – only one way of manipulating bits. For the DUO Compact, [Jack] chose a NOR and fork conditionally instruction. Each line of assembly written for the DUO Compact has four memory instructions: a source address, destination address, skip address 1, and skip address 2. [Jack] explains exactly how this operation can allow him to compute everything:

Three steps occur when executing the instruction:

  1. Load the byte at the first and second address. NOR these bytes together.
  2. Store the result of step 1 in the second address.
  3. If the result of step 1 was zero, then skip to the instruction at the fourth address; otherwise, skip to the instruction at the third address.

As if designing a one instruction computer built using only basic logic and memory chips wasn’t impressive enough, [Jack] went as far as writing an emulator for his system, a compiler, an operating system, and even a few programs such as a square root calculator and a text-based adventure game.

By any measure, [Jack] has finished an amazing build, but we’re blown away by the sheer amount of documentation he’s made available. He’s even gone so far as to write a tutorial for building your own DUO Compact.

You can check out a few videos of the DUO Compact after the break. Of course, if you’re looking for a project to tackle, you’re more than welcome to design a PCB from the DUO Compact schematic. We’d certainly buy one.

Continue reading “Mess Of Wires Is Actually A One Instruction Computer”

Winning A No Holds Barred Pinewood Derby

Every year, [ilektronx] and a few other guys get together and compete in a ‘no holds barred’ pinewood derby for kids of all ages. Of course this results in an immense amount of engineering to push a wooden block with wheels down a track, and [ilektronx]’s car is no exception. He won the competition with electronics from a remote control airplane bolted on to a piece of wood.

The electronics for [ilektronix]’s build are pretty much what you’d find in any small electric RC plane: a cheap transmitter / receiver combo sends commands to an ESC which powers a small brushless motor with a small LiPo battery.

Like all good pinewood derby cars, the success of [ilektronix]’s entry relied on the overall design. The wooden chassis cleverly hugs the raised guide in the track, and the slight downward angle of the propeller keeps the car from popping a wheelie when it is released from the starting line.

You can check out a video summary of the pinewood derby competition after the break. Also shown are a few of the other derby cars, including an amazing futuristic tank entry built by [Ken Cook]. [Ken] spent the better part of a year on his build, and the amazing detail of making his own tank treads by hand made him a shoe-in for the winner of the ‘style’ competition.

Continue reading “Winning A No Holds Barred Pinewood Derby”

Meet The Teensy 3.0

[Paul Stoffregen], the brains behind the popular and very capable Arduino-compatible Teensy development board, has offered his contribution to the explosion of ARM-powered boards with the Teensy 3.0.

The original Teensy is an AVR-based development board that goes far beyond the official Arduino offerings. The new and improved Teensy 3.0 improves upon an already wonderful platform with a 32 bit ARM Cortex-M4 microcontroller running at 48 MHz. There’s also a lot of pins available for whatever project you have in mind: the Teensy 3.0 supports 14 analog inputs, 10 PWM outputs, a USB host mode, and an I2S audio interface that will be very useful when accessing the microcontroller’s DSP functions.

There are a couple neat features on the Teensy 3.0 [Paul] somehow managed to work in. In addition to supporting a real-time clock, there are also a few extra IO pins in the middle of the board. [Paul] says the extra pins are due to Kinetis not releasing a 48 pin version of the microcontroller in time for production. It may not be what [Paul] originally had in mind, but we’ll take the upgraded board just the same.

Of course the Teensy 3.0 will be compatible with the Teensyduino Arduino IDE add-on, so if you’d like to run your Arduino sketches on a very powerful piece of hardware, this will be the board to use.