Dial 1 To Get Siri As Your Operator

Back in the days of yore when hats were fashionable and color TV didn’t exist, there were real life people who would answer the phone if you dialed 0. These operators would provide directory assistance, and connect you to another number (such as KL5-8635). Apple’s Siri is a lot like an olde-timey phone operator, so [davis] decided to put Siri in an old rotary telephone.

The build started off with a very inexpensive Bluetooth headset and very old rotary phone. The single button on the Bluetooth headset was wired to a contact of the dial – in this case, the number 1. Dialing 1 shorts two contacts in the phone and the Bluetooth headset turns on.

[davis] came up with a very easy build but dialing 1 just isn’t the same as dialing 0. Connecting the Bluetooth button to 0 closes the button for too long. He says ‘0 for operator’ could be implemented with an ATtiny or similar, but we’re wondering if [davis] could make due with a dial-less candlestick phone.


Continue reading “Dial 1 To Get Siri As Your Operator”

Building The Ocarina Of Time With An FPGA

[Joe] and [Evan] wanted to have some fun with their FPGA course at Cornell. When faced with what to do at the beginning of the semester, they figured additive synthesis was a worthy pursuit. They ended up building the Ocarina of Time for their final project.

The guys started by recording a real ocarina and figuring out the relative power levels of each harmonic. Because any sound can be synthesized from a bunch of sine waves, having their Altera FPGA board replicate those frequencies produces a nice ocarina sound

[Joe] and [Evan]’s ocarina has a ‘mouthpiece’ that is just a small microphone. This mic is hooked up to the FPGA board and controls the volume. Sadly, the guys didn’t have time to take apart an N64 controller so 6 red buttons serve as the finger holes.

From the video after the break, [Joe] and [Evan] really pulled together something that sounds like Link’s Ocarina. Great work, guys.

Continue reading “Building The Ocarina Of Time With An FPGA”

Sphere Morphing Hexabot Is A Mechanical Jellyfish

Once again, we’re wowed over [Zenta]’s robotic skill. A few months ago, [Zenta] posted a video of his MorpHex hexapod spherebot that left us awed. After a few long months, more bits of MorpHex have made it onto the chassis. [Zenta] says his project isn’t done but it’s still enough to knock our socks off.

Going through the [Zenta] archives, there’s a little more to go on this time around. The MorpHex will be made up of two hemispheres, but only the bottom one will be able to walk. That’s really not that bad because [Zenta] gave the upper panels 1 degree of freedom. Just enough to scare off predators, we’re sure.

The chassis and the legs are amazing little pieces of engineering. Despite all the work [Zenta] has put into his MorpHex, there’s still work to be done. He hasn’t gotten the sphere to roll on command yet. We’ll be sure to post a video of the robot dancing to some lo-fi. Check that out after the jump.

Continue reading “Sphere Morphing Hexabot Is A Mechanical Jellyfish”

A Clock Made Out Of Some Very Weird Tubes

If you’re like [Richard], you’ve got a few really rare components lying around. Maybe it’s a very weird micro or a really tiny CRT, but eventually you’ve got to build something with these parts. When [Richard] decided to put some ITS1A neon display tubes to use, he fell back to the old standby – a really awesome clock.

Unlike the lowly Nixie tube, the ITS1A tube is weird. It’s a neon seven-segment display that can be controlled directly from the pins of a microcontroller. It does this with the help of seven tiny thyratrons in each segment. Even though this tube has neon, the display isn’t the familiar neon orange-red. The tube emits a lovely green with the help of a phosphor coating.

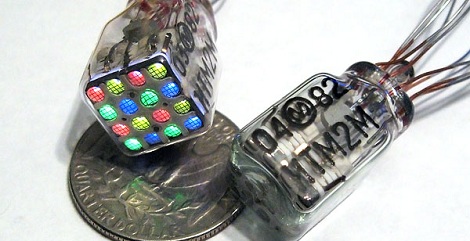
With a single digit already incorporated into [Richard]’s clock, he needed four indicators for the hours and minutes. After a failed experiment with a crazy 4-color, 16-pixel Melz ITM2-M display, he moved on to a simpler MTX90 thyratron indicator.

Using the same control scheme as his earlier numitron clock, Richard had a PCB made and wired everything up. The seven-segment tube indicates the value, and the indicator tubes indicates the position of the digit in the XX:XX standard. A very cool  build with parts you don’t see coming around often.

Dimming AC Lights The Hard Way

It’s that time of year again where the thermometer drops, the sun sets earlier, and we try to warm our hearts with the solstice festival that is common in our own respective cultures. Of course we all need a few strings of lights, but wouldn’t it be great if we had PWM controlled dimmable lights?

When he started out on his PWM-controlled, AC-powered light box, [Waterbury] immediately realized that relays were not going to be an optimal solution. The best way out of the mess he dug himself into would be via zero crossing. After getting a transformer wired up to a transistor for the detection circuit, a short bit of code was written in the wee hours of the morning and a proof of concept was had.

With the control box complete, [Waterbury] hacked up a quick VB app and piped the output of a WinAmp visualizer into the lights via serial. The Inception demo was great, but finer-grain control was needed. After seeing a Hack a Day post on a nice equalizer chip, the seven band output on IC were converted to UART.

[Waterbury] took his seven-band AC-controlled light box to a Halloween party with his synth and the results looked awesome. You can check that out after the break, but we’re really waiting to see his Christmas decorations this year.

Continue reading “Dimming AC Lights The Hard Way”

R/C Blimp Uses A Party Balloon For Lift

Here’s a really tiny r/c blimp that doesn’t need several cubic feet of Helium to get off the ground.

Instructables user [masynmachien] has been building r/c blimps for over a decade now, and this latest build is meant to have the same specs as this nanoblimp. The build is based on an 11-inch party balloon that can provide about 11 grams of lift. This doesn’t allow for much leeway in terms of weight, so [masymachien] used hacked-up servos for the motors.

The blimp is an exercise in saving weight – just about every component that can be removed from the build is thrown away. The results are pretty impressive. The entire blimp weighs about 10 grams on the ground. [masynmachien] also tried a 14-inch balloon with an 808 key fob camera with very good results.

The blimp looks pretty good when flying around a room. [masymachien] seems to have a lot of control from a minimal component count. You can check out the party blimp in action after the break.

Continue reading “R/C Blimp Uses A Party Balloon For Lift”

Rebuilding Dried Out Capacitors

If you’ve ever torn into very old equipment for a little refurbishment, you’ve seen ancient capacitors among tube sockets and carbon resistors. These caps are long past their life expectancy and are dried out. Putting a brand-new metal can cap in a piece of equipment from the 40s just seems wrong, though. Luckily, [unixslave] posted a nice cap rebuilding tutorial on the Hack a Day forum.

To get inside, [unixslave] melted the resin and wax plug at the base of an old cap with a soldering iron. After cleaning out 70-year-old goo with the tip of a flathead screwdriver, he drilled a hole through the core of the cap.

[unixslave] took the old wax-pressed tube of the old cap and put some modern electrolytics inside. The result reminds us of a shady practice happening in a cap factory somewhere, but [unixslave] is keeping everything on the level. The repaired cap has the same value as what’s on the label, just enough to get that old tube amp working.