
Roland 808 Synced To MIDI

Reading this week’s ATtiny-themed builds, [Thomas] was reminded one of his coolest builds. His midi808 project used an ATtiny2313 to sync a vintage Roland 808 drum machine to his Logic workstation.

Even though MIDI had been around for a few years when 808s were being made, the CPU in the 808 isn’t exactly up to the task of handling MIDI. Instead, the 808 used an interface known as DIN Sync that was designed to keep 808s, 707s, and 303s in time with each other. MIDI to DIN Sync boxes do did exist, but even the auxiliary equipment to use an 808 is getting hard to find.

The build takes a MIDI signal and passes it through an opto-isolator per the MIDI spec. The microcontroller reads the MIDI signal and passes it out through the DIN Sync port. The DIN Sync protocol is only 24 pulses per quarter note output with TTL voltages, and the project code is easy enough to follow. It’s a nice build for one of the greatest drum machines ever made. Listen to a track [Thomas] made with his new setup after the break.
Continue reading “Roland 808 Synced To MIDI”

3D-printable Laser Cutter

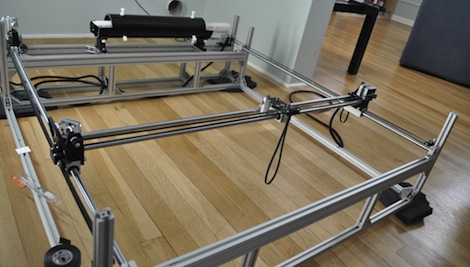
[peter] send in a reprappable laser cutter that he’s been working on. Even though he’s still having some problems with the accuracy of the beam over the entire square meter bed, it’s still an amazing build.

The build started off with a bunch of t-slot aluminum extrusions. After taking delivery of an absurdly large package containing a CO2 laser tube, [peter] started working on attaching motors to the axes. The optics travel the solid rods on pillow block bearings driven by the age-old stepper motor & timing belt drive.

The 1-square-meter of cut area on this machine is enormous for a homebrew laser cutter. [peter] discovered that once the necessary components are in place, it’s really how much aluminum you’d like to buy that becomes the limiting factor for the cut area. [peter] put the files for the 3D-printed carriages, brackets and mounts up on Thingiverse in the hopes his design can be improved by others.

Using Classic Game Controllers With A Wii

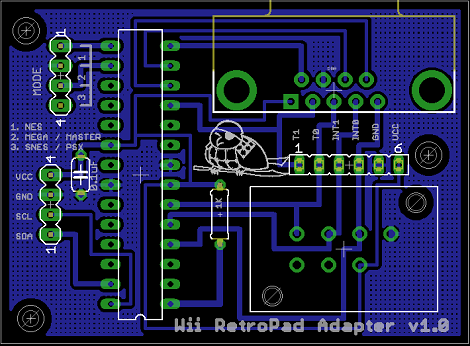
[Bruno]’s Wii RetroPad Adapter was sent into the tip line, and we’re loving the possibility of using Playstation 2, Genesis, NES and SNES controllers with our Wii.

While there are commercial solutions that connect an NES or SNES controller to a Wii, everything connects to the GameCube port and there is no adapter for Sega or Playstation controllers. For his build, [Bruno] used an ATmega168 to read data from the classic controllers and translate that to the Wiimote I2C bus. Think of it as a new classic controller with the same form factor your 8-year-old self knew and loved.

The schematic for the build is very simple and [Bruno] has all the software out in the open. Even the PCB is single sided and looks like it would be a great candidate for a homebrew PCB. There’s no indication [Bruno] is trying to monetize his creation, so he’s either doing right, or so very wrong. Check out the Dualshock 2/Mario 3 demo of this board after the break.

Continue reading “Using Classic Game Controllers With A Wii”

Toaster Oven Forgoes Pop-Tarts, Reflows Solder

For SMD work, solder paste and a heat gun is great. Heat guns aren’t the cheapest thing, so [Karel] decided to make cheap reflow oven out of a toaster oven. With a PCB taken from a laminator temperature control board, the build was fairly successful, so [Karel] decided to add a thermistor to his oven.

There was a problem with placing this thermistor near the board: solder melts in a reflow oven, so [Karel] needed to figure how to connect the thermistor to the control board outside the oven. The solution was crimping thin copper tubing to the thermistor leads and passing that tube through the wall of the oven. Epoxy was used to avoid an electrical short. A low tech solution, but very effective. After applying some solder paste and going in the oven, this board looks very clean. There are a few solder bridges, but nothing a wick can’t take care of.

[Karel] is now working on an update to the temperature controller that controls the oven over a serial connection. Check out the video of a few temperature cycles after the break.

Continue reading “Toaster Oven Forgoes Pop-Tarts, Reflows Solder”

Robotic Disco Floor Is A Mobile Party

[Chris Williamson] designed the Rave Rover, a mobile disco floor with integrated stripper pole for this year’s DragonCon.

[Chris] started building combat robots back in 2000 for Battlebots and Robot Wars and cofounded the South Eastern Combat Robot league. He’s a lover and not a fighter, so for the DragonCon robotics track [Chris] built his mobile dance party. He put up an Instructable of his build and some of the features are really clever. Whenever the dance floor is being ‘used’, pneumatic cylinders lower the disco floor so it rests directly on the ground. A good idea, especially considering what we imagine happens on the Rave Rover.

For the light-up disco floor, [Chris] cut black ABS sheets on a CNC router and installed RGB LED modules controlled by an Arduino. The floor can display low-res animations, but random patterns look just a cool.

The Rave Rover was designed and built over a one month span to get ready in time for DragonCon. The build was a little hurried but the quality is still there. Check out video of the Rave Rover at DragonCon after the break.

Continue reading “Robotic Disco Floor Is A Mobile Party”

Swap-O-Matic: An Automat With Recycling In Mind

The Swap-O-Matic is vending machine built for recycling, not consuming. Instead of feeding money into the machine, you can get an item out of the machine by swapping it for something you don’t need anymore. It’s a great concept with a great retro design, probably influenced by the age of the automat.

[Lina Fenequito] and [Rick Cassidy] built the Swap-O-Matic around the time [Lina] was getting her MFA. The build was in Wired in 2005, but the project has been updated since then and has a new home at LaunchPad in Brooklyn, NY. The first version used a separate computer next to the machine that gave out combinations to locks on the doors. It looks like the new version has been improved with an integrated touchscreen and computer-activated locks leaving [Lina] and [Rick] with a very clean build.

It’s a great idea if you have a relatively homogeneous population with similar interests, so we expect to see some of these popping up at a few hackerspaces. Check out the Swap-O-Matic promo video after the break.

Continue reading “Swap-O-Matic: An Automat With Recycling In Mind”

ATtiny Hacks: Roll 2d6 With An ATtiny

A pair of 6-sided electric dice (original in Dutch, here’s the Google Translate link) was sent in on the tip line for our ATtiny hacks theme. We really appreciate the simplicity of the circuit; it really shows how the complexity of discrete components can be cut down with a simple microcontroller.

The circuit is very simple – An ATtiny26 serves as the core of the project. Fourteen LEDs are connected to fourteen pins on the micro. The tiny26 might be a bit overkill. With Charlieplexing, we suspect this build could have been completed with an 8-pin micro like an ATtiny25. The code for the build (written in BASIC with BASCOM-AVR), board files and schematics have all been posted.

We’ve seen a few electronic dice builds before. this build uses an ATmega328 in a hugely overwrought circuit. Compared to what can be done with a 555, the ATtiny26 build provides a very nice middle ground.

Thanks [Roeland] for sending this in.