A Standing Desk On The Cheap

A programmer forced to work from home during the pandemic, [MrAkpla] was having back pains from sitting in front of the computer all day. He considered buying a standing desk, but all the various options didn’t fit with either his desk or his budget. Not to be deterred, he devised one of the simplest standing desk implementations that we’ve seen. It clearly works for him, because he’s been using it for one year now with great success. [MrAkpla] espouses three main benefits of his approach:

  • Cheap as heck
  • Five minute set up time
  • Uses your existing desk

These goals were accomplished. You can see in the video below that transition from sitting to standing is indeed as quick as he claims, is clearly inexpensive, and indeed it doesn’t require any modifications to his desk or furniture.

This design centers on a having an 80 cm long monitor arm, which is quite a range of adjustment. He’s using a monitor arm pole mount from UK manufacturer Duronic. Although they are having delivery problems these days because of Brexit issues, [MrAkpla] was able to get one delivered from existing inventory outside of the UK.

Admittedly, this is a crude design — in effect two trash bins and a board. But even if this doesn’t fit well with your office decor, its a great way to try out the concept of a standing desk without the up-front investment. By the way, [MrAkpla] is on the lookout for similar monitor mounting poles from non-UK manufacturers. If you have any recommendations, put them in the comments below. If you’re interested in a DIY standing desk that is on the opposite side of the complexity spectrum, check out this beauty that we covered back in the pre-pandemic era.

Continue reading “A Standing Desk On The Cheap”

Disgusting Apple II Monitors Live Again

[The 8-Bit Guy] recently went to check out a stash of old Apple II Color monitors which had been sitting outside in a trash pile for 20 years, and decided to bring one home to restore. As you can see from the lead photo, they were dirty — really dirty. Surprisingly, the team of volunteers who discovered these monitors had fired them up, and every one of them works to some extent or another.

Check out the video below as he cleans up this filthy monitor and starts troubleshooting. You’ll chuckle aloud when he turns the circuit board over to desolder a mysterious diode, and when he flips the board back over, the diode has disappeared (it actually disintegrated into dust on his lab bench). For the curious, one commenter on YouTube found that it was a glass passivated and encapsulated fast recovery diode called a V19. There’s going to be a part 2, and we have every confidence that [The 8-Bit Guy] will succeed and soon add a shiny, like-new monitor to his collection.

If you’re a collector of old monitors, this demonstrates that they can survive quite a bit of abuse and exposure. We’re not sure that rummaging through your local landfill is the best idea, but if you run into an old monitor that has been exposed to the elements, don’t be so quick to dismiss it as a lost cause. Do you have any gems that you’ve restored from the trash? Let us know in the comments.

Continue reading “Disgusting Apple II Monitors Live Again”

Rodriguez — IV Curve Tracer On The Cheap

In response to an online discussion on the Electrical Engineering Stack Exchange, [Joseph Eoff] decided to prove his point by slapping together a bare-bones IV curve tracer using an Arduino Nano and a handful of passives. But he continued to tinker with the circuit, seeing just how much improvement was possible out of this simple setup. He squeezes a bit of extra resolution out of the PWM DAC circuit by using the Timer1 library to obtain 1024 instead of 256 steps. For reading voltages, he implements oversampling (and in some cases oversampling again) to eke out a few extra bits of resolution from the 10-bit ADC of the Nano. The whole thing is controlled by a Python / Qt script to generate the desired plots.

While it works and gives him the IV curves, this simplicity comes at a price. It’s slow — [Joseph] reports that it takes several minutes to trace out five different values of base current on a transistor. It was this lack of speed that inspired him to name the project after cartoon character Speedy Gonzales’s cousin,  Slowpoke Rodriguez, AKA “the slowest mouse in all of Mexico”. In addition to being painstakingly slow, the tracer is limited to 5 volts and currents under 5 milliamps.

[Joseph] documents the whole design and build process over on his blog, and has made the source code available on GitHub should you want to try this yourself. We covered another interesting IV curve tracer build on cardboard ten years ago, but that one is much bigger than the Rodriguez.

Repurpose A Monitor Arm As Microscope Mount

Being a bit shocked at the prices of articulating arm microscope mounts, not to mention the shipping fees to the UK, [CapTec] realized they looked substantially similar to your typical computer monitor arm mount. Thinking he could adapt a monitor arm for much less money, he fired up FreeCAD and started designing.

[CapTec] is using this to support his Amscope / Eakins camera-equipped trinocular microscope, but notes that the same mechanical bracket / focus rack interface is found on binocular ‘scopes as well. He observes that the mount is no more stable than your desk or lab bench, so keep that in mind.

Ultimately the monitor arm set him back less than $40, and all told he reckons the whole thing was under $55. Based on prices he’s been researching online, this represents a savings of well over $200. In his calculations, the shipping fee comprised quite a hefty percentage of the total cost. We wonder if they are artificially high due to coronavirus — if so, the make / buy price comparison might yield different results in the future.

This type of project is a perfect use-case for a home 3D printer — making your own parts when the normal supply channels are unavailable or overpriced. Are articulating arms that are purpose-built for microscopes significantly different than those designed for big computer monitors? If you know, please comment down below.

Continue reading “Repurpose A Monitor Arm As Microscope Mount”

Vintage HP-25 Calculator Gets Wireless Charging

[Jan Rychter] really likes his multiple HP-25C calculators, but the original battery pack design is crude and outdated. No problem — he whips up a replacement using Fusion 360 to design an enclosure, prints a few on his SLS 3D printer, and packs them with LiPo batteries and Qi/WPC wireless charging circuits.

In his blog post, he explains the goals and various design decisions and compromises that he made along the way. We like [Jan]’s frank honesty as he remarks on something we have all been guilty of at one time or another:

In the end, I went with design decisions which might not be optimal, but in this case (with low power requirements) provide acceptable performance. In other words, I winged it.

One problem which proved difficult to solve was how to provide a low battery indicator. Since low voltage on a LiPo is different from the original HP-25’s NiCad cells, it wasn’t straightforward, especially since [Jan] challenged himself to build this without using a microcontroller. He discovered that the HP-25’s internal low battery circuit was triggered by a voltage of 2.1 volts or lower.

In a really clever hack, [Jan] came up with the idea of using an MCU reset supervisor chip with a low voltage threshold of 3.0 volts, which corresponds with the low voltage threshold of the LiPo battery he is using. The reset signal from the supervisor chip then drives one of the pins of the TPS62740 programmable buck converter, changing its output from 2.5 volts to 2.1 volts.

This project is interesting on several levels — extending the life of a useful but end-of-life calculator, improving the original battery design and introducing new charging techniques not available in the early 1970s, and it is something that a hobbyist can afford to do in a home electronics lab. We do wonder, could such a modification could turn an HP-25 into an HP-25C?

We’ve written about battery pack replacement project before, including one for the Sony Discman and another for an electric drill. Let us know if you have any battery pack replacement success (or failure) stories in the comments below.

Spacewar! On PDP-11 Restoration

If you want to play the original Spacewar! but you don’t have a PDP-1 nearby, then you’re in luck — assuming you have a PDP-11, that is. [Mattis Lind] has successfully restored a PDP-11 port of the game from PDF scans of the source code, which was thought to have been lost to the trash bins of DECUS (Digital Equipment Computer Users’ Society). Fortunately, [Mattis] learned that [Bill Seiler], one of the original authors, had saved a printout of the assembly language. 
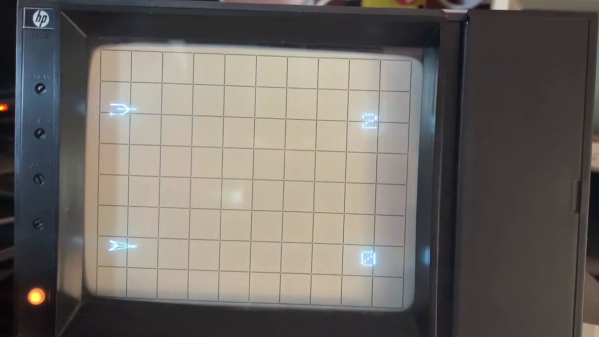
Using a combination of OCR and manual transcription to retrieve the code, [Mattis] took a deep dive into cleaning up the errors and solving a whole lot of system library and linking issues. Adding to the difficulty is that his PDP-11 is slightly different from the one used in 1974 when this port was written.

The project was not all software — [Mattis] also needed to make a pair of joysticks, which he made from a handful of items found on AliExpress. As you can see in the video below, he indeed got it all working. [Mattis] is no stranger to the PDP-11 world. We wrote about his PDP-11 restoration project back in 2015, a quest that took over 18 months.

Continue reading “Spacewar! On PDP-11 Restoration”

Simple GUI Menus In Micropython

Love ’em or hate ’em, sometimes your embedded project needs a menu system. Rather than reimplement things each and every time, [sgall17a] put together a simple GUI menu system in Micropython that can be reused in all sorts of projects. The approach uses tables to define the menus and actions, and the demo program comes with a pretty good assortment of examples. Getting up to speed using this module should be fairly easy.

The hardware that [sgall17a] chose to demonstrate the concept couldn’t have been much smaller — it’s a Raspberry Pi Pico development board, an OLED 128 x 64 pixel display, and a rotary encoder with built-in push-button switch (it’s also been tested on ESP32 and ESP8266 boards). The widget under control is one of the commonly available Neopixel development boards. The program is hosted on GitHub, but beware that it’s under development so there may be frequent updates.

This is a good approach to making menus, but is often rejected or not even considered because of the overhead cost of developing the infrastructure. Well, [sgall17a] has done the hard work already — if you have an embedded project requiring local user setup, check out this module.