Vintage HP-25 Calculator Gets Wireless Charging

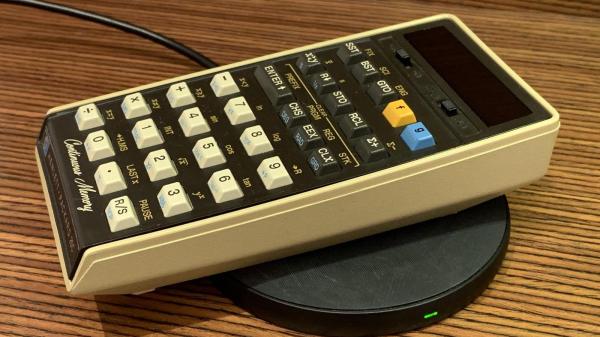
[Jan Rychter] really likes his multiple HP-25C calculators, but the original battery pack design is crude and outdated. No problem — he whips up a replacement using Fusion 360 to design an enclosure, prints a few on his SLS 3D printer, and packs them with LiPo batteries and Qi/WPC wireless charging circuits.

In his blog post, he explains the goals and various design decisions and compromises that he made along the way. We like [Jan]’s frank honesty as he remarks on something we have all been guilty of at one time or another:

In the end, I went with design decisions which might not be optimal, but in this case (with low power requirements) provide acceptable performance. In other words, I winged it.

One problem which proved difficult to solve was how to provide a low battery indicator. Since low voltage on a LiPo is different from the original HP-25’s NiCad cells, it wasn’t straightforward, especially since [Jan] challenged himself to build this without using a microcontroller. He discovered that the HP-25’s internal low battery circuit was triggered by a voltage of 2.1 volts or lower.

In a really clever hack, [Jan] came up with the idea of using an MCU reset supervisor chip with a low voltage threshold of 3.0 volts, which corresponds with the low voltage threshold of the LiPo battery he is using. The reset signal from the supervisor chip then drives one of the pins of the TPS62740 programmable buck converter, changing its output from 2.5 volts to 2.1 volts.

This project is interesting on several levels — extending the life of a useful but end-of-life calculator, improving the original battery design and introducing new charging techniques not available in the early 1970s, and it is something that a hobbyist can afford to do in a home electronics lab. We do wonder, could such a modification could turn an HP-25 into an HP-25C?

We’ve written about battery pack replacement project before, including one for the Sony Discman and another for an electric drill. Let us know if you have any battery pack replacement success (or failure) stories in the comments below.

Robotic Bartender Built With Industrial-Grade Hardware

Robotic bartenders are a popular project around these parts. If there’s one thing hackers love, after all, it’s automating tasks – as much for the challenge as for the actual time saved. This build from a group of [Teknic Servo] engineers is an impressive example of what can be done with some industrial-grade hardware.

The bartender is built as a demo project for the ClearCore controller, [Teknic’s] industrial-grade device capable of interfacing with a whole bunch of servomotors and sensors to get the job done. The controller is hooked up to a bunch of ClearPath servomotors that handle spinning the bottle carousel, muddling or stirring the beverage, or transporting the drinking glass through the machine. There’s also several interlocks to avoid the patron coming into contact with the bartender’s moving parts while it’s working, and a standard bar-style mixer dispenser actuated with solenoids to keep things simple. Drink selection and control is via a touch screen, with sliders for selecting preferences such as alcohol content and sweetness.

The bartender is certainly capable of producing a neat drink (pun intended), and serves as a great example of how easily a project can be put together with industrial-grade hardware. If you’ve got the budget, you might find using an industrial plug-and-play components quicker than assembling development boards, motor controller shields and other accessories on breakout boards. There’s always more than one way to get the job done, after all.

We’ve seen some great barbots over the years, from builds relying on robotic arms to those focused on ultimate speed. Video after the break.

Continue reading “Robotic Bartender Built With Industrial-Grade Hardware”

A Phased-Array Ultrasonic 3D Scanner From Scratch

Who wouldn’t want an autonomous drone to deliver cans of fizzy drink fresh from the fridge? [Alex Toussaint] did, and in thinking how such a machine might work he embarked on a path that eventually led him to create a fully functional ultrasonic 3D scanner. In writing it up he’s produced a straightforward description of how the system works, which should also be of interest to anyone curious about phased array radar. He starts with an easy-to-understand explanation of the principle behind phased array beam forming, and there follows his journey into electronics as he uses this ambitious project to learn the art from scratch. That he succeeded is testament to his ability as well as his sheer tenacity.

He finally arrived at a grid of 100 ultrasonic emitters controlled from an Arduino through a series of shift register boards. Using this he can steer his ultrasonic beam horizontally as well as vertically, and receive echoes from objects in three-dimensional space. The ornamental bird example he uses for his scanning tests doesn’t quite emerge in startling clarity, but it is still clear that an object of its size and rough shape is visible enough for the drone in his original idea to detect it. If you would like to experiment with the same techniques and array then all the resources can be found in a GitHub repository, meanwhile we’re still impressed with the progress from relative electronics novice to this. We hope the ideas within it will be developed further.

We’ve seen ultrasonic arrays before, but mainly used in levitation experiments.

3D Printing Espresso Parts

Virtually any hobby has an endless series of rabbit holes to fall into, with new details to learn around every corner. This is true for beekeeping, microcontrollers, bicycles, and gardening (just to name a few), but those involved in the intricate world of coffee roasting and brewing turn this detail dial up to the max. There are countless methods of making coffee, all with devout followers and detractors alike, and each with its unique set of equipment. To explore one of those methods and brew a perfect espresso, [Eric] turned to his trusted 3D printer and some compressed gas cylinders.

An espresso machine uses high pressure to force hot water through finely ground coffee. This pressure is often developed with an electric pump, but there are manual espresso machines as well. These require expensive parts which can withstand high forces, so rather than build a heavy-duty machine with levers, [Eric] turned to compressed CO2 to deliver the high pressure needed.

To build the pressure/brew chamber, he 3D printed most of the parts with the exception of the metal basked which holds the coffee. The 3D printed cap needs to withstand around nine atmospheres of pressure so it’s reasonably thick, held down with four large bolts, and holds a small CO2 canister, relief valve, and pressure gauge.

To [Eric]’s fine tastes, the contraption makes an excellent cup of coffee at minimal cost compared to a traditional espresso machine. The expendable CO2 cartridges only add $0.15 to the total cost of the cup and for it’s simplicity and small size this is an excellent trade-off. He plans to improve on the design over time, and we can’t wait to see what he discovers. In the meantime, we’ll focus on making sure that our beans are of the highest quality so they’re ready for that next espresso.

Continue reading “3D Printing Espresso Parts”

Reverse-Engineering An Unknown Microcontroller In E Ink Displays

For a monochrome display where refresh rate isn’t particularly important, there’s almost no better option than an E Ink display. They’re available in plenty of sizes and at various price points, but there’s almost no option cheaper than repurposing something mass-produced and widely available like an E Ink (sometime also called eInk or ePaper) price tag. At least, once all of the reverse engineering is complete.

[Dmitry Grinberg] has been making his way through a ton of different E Ink modules, unlocking their secrets as he goes. In this case he set about reverse engineering the unknown microcontroller on the small, cheap display show here. Initial research showed an obscure chip from the ZBS24x family, packaged with a SSD1623L2 E Ink controller. From there, he was able to solder to the communications wires and start talking to the device over ISP.

This endeavor is an impressive deep dive into the world of microcontrollers, from probing various registers to unlocking features one by one. It’s running an 8051 core so [Dmitry] gives a bit of background to help us all follow along, though it’s still a pretty impressive slog to fully take control of the system.

If you happen to have one of these price tags on hand it’s an invaluable resource to have to reprogram it, but it’s a great read in general as well. On the other hand, if you’re more interested in reverse-engineering various displays, take a look at this art installation which spans 50 years of working display technologies.

Should I Automate This?

The short answer to the question posed in the headline: yes.

For the long answer, you have to do a little math. How much total time you will save by automating, over some reasonable horizon? It’s a simple product of how much time per occurrence, times how many times per day it happens, times the number of days in your horizon. Or skip out on the math because there’s an XKCD for that.

What’s fun about this table is that it’s kind of a Rorschach test that gives you insight into how much you suffer from automatitis. I always thought that Randall was trying to convince himself not to undertake (fun) automation projects, because that was my condition at the time. Looking at it from my current perspective, it’s a little bit shocking that something that’ll save you five seconds, five times a day, is worth spending twelve hours on. I’ve got some automating to do.

To whit: I use pass as my password manager because it’s ultimately flexible, simple, and failsafe. It stores passwords on my hard drive, and my backup server, encrypted with a GPG key that I have printed out on paper in a fireproof safe. Because I practice good cookie hygiene, I end up re-entering my passwords daily. Because I keep my passwords separate from my browser, that means entering username and password by cut-and-paste. There’s your five seconds, five times per day. Maybe two seconds, ten times, but it’s all the same. It shouldn’t take me even as long as twenty minutes to whip up a script that puts username and password into selection and clipboard for one-click pasting. Why haven’t I done this yet? I’m going to get on it as soon as I’m done with this newsletter.

But the this begs the question. If you spend up to twelve hours on every possible 25-second-per-day savings, when will you ever get your real work done? Again, math gives us the answer. One eight-hour workday * 25 seconds * 12 hours (pessimistically) of labor = 1.58 years before everything that needs automating will be. Next week’s newsletter might be a little bit delayed.

What do you see in the XKCD “Is it worth the time” table? Automate more, or step back from the cliff edge?

Putting 3D Printed Chain Through Its Paces

One of the more frustrating things facing makers in decades past was the problem of power transmission. Finding things like belts, pulleys, sprockets, and chain for your projects could be difficult, particularly if you lived far from the shipping radius of suppliers like McMaster-Carr. These days, there’s no need to fuss, because you can simply 3D print whatever you need,  as [Let’s Print] demonstrates by whipping up some chains.

The chains are a mixed design, combining plastic inner and outer links with bolts and nuts to fasten them together. [Let’s Print] tries out several combinations of ABS, PLA, and PETG, running them on 3D printed sprockets and determining that they are all functional, albeit at minimum load. The chains are also put through tensile testing by attaching a heavy brake disc to a length of chain and dropping the weight to see at which point the chains snap.

We’d love to see more 3D-printed chains; all-plastic snap-together designs, or even those that print pre-assembled are particularly tantalizing ideas. We’d also enjoy more testing done with the chain under some proper torque loads, rather than just spinning freely.

We’ve seen work from [Let’s Print] before, too – in the case of this awesome water pump. Video after the break.

Continue reading “Putting 3D Printed Chain Through Its Paces”