Manned Electric Helicopter With 7 Tail Rotors

One of the best things to come from the growing drone industry is the development of compact and powerful brushless motors. We’ve seen several multi-rotors capable of carrying a human, but electric helicopters are rare. [OskarRDA] decided to experiment with this, converting his single-seat ultralight helicopter to electric power and giving it seven tail rotors in the process. Flight footage after the break.

The helicopter in question started life as a Mosquito Air, a bare-bones kit helicopter originally powered by a two-stroke engine. The engine and gearbox were replaced with an EMRAX 228 109 kW brushless motor. Initially, he used the conventional drive-shaft powered tail rotor but wanted to experiment with multiple smaller rotors powered by separate motors, which has several advantages. He only really needed four of the 5008 or 5010 size motors with 18″ props to get comparable thrust, but he added more for redundancy. The new setup was also lighter, even with its independent batteries, at 7.5 kg compared to the 8.1 kg of the old tail rotor assembly.

One of the major advantages of a conventional helicopter over a multirotor is the ability to autorotate safely to the ground if the engine fails. A coupled tail rotor bleeds some energy from the main rotor while autorotating, but since the tail rotor has independent power in this case, it allows all the energy to be used by the main rotor, theoretically decreasing decent speed by 120 feet per second. [OskarRDA] did some engine failure and autorotation test flights, and the results were positive. He likes his new tail rotors enough that he doesn’t plan on going back to a single large rotor.

Power for the main motor is provided by a 7.8 kWh, 40 kg LiPo battery pack mounted beneath the seat. Theoretically, this would allow flight times of up to 27 minutes, but [OskarRDA] has kept most of his flights to 10 minutes or less. He didn’t add any electronic gyro for stabilization, but he did add some electronic coupling between the main motor and tail motors, to reduce the torque correction required by the pilot. Even so, it is clear from the flight footage that [OskarRDA] is a skilled helicopter pilot. Continue reading “Manned Electric Helicopter With 7 Tail Rotors”


DRehmFlight: Customizable Flight Stabilisation For Your Weird Flying Contraptions

The availability of cheap and powerful RC motors and electronics has made it possible for almost anyone to build an RC flying machine. Software is usually the bigger challenge, which has led to the development of open-source packages like BetaFlight and Ardupilot. These packages are very powerful, but not easy to modify if you have unconventional requirements. [Nicholas Rehm] faced this challenge while doing his master’s degree, so he created dRehmFlight, a customizable flight controller for VTOL aircraft. Overview video after the break.

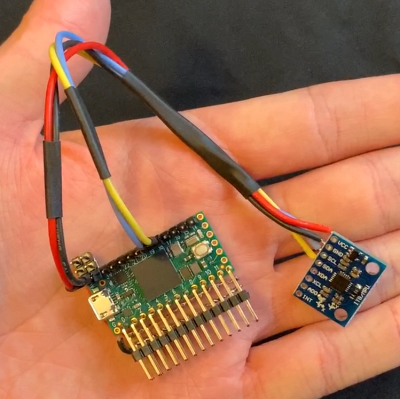
dRehmFlight runs on Teensy 4.0 with a MPU6050 or MPU9250 IMU

[Nicholas] has been building unique VTOL aircraft for close to a decade, and he specifically wanted flight stabilization software that is easy to modify and experiment with. Looking at the dRehmFlight code, we think he was successful. The main flight controller package is a single file of fewer than 1600 lines. It’s well commented and easy to figure out, even for an inexperienced programmer. A detailed PDF manual is also available, with full descriptions for all the functions and important variables, and a couple of tutorials to get you started. Libraries for interfacing with accelerometers and RC gear is also included. It runs on a 600 Mhz Teensy 4.0, and all the programming can be done from the Arduino IDE.

[Nicholas] has repeatedly demonstrated the capabilities of dRehmFlight with several unique aircraft, like the belly floppingĀ RC Starship we covered a while ago, a VTOL quad rotor biplane, VTOL F35, and the cyclocopter seen in the header image. dRehmFlight might not have the racing drone performance of BetaFlight, or advanced autopilot features of Ardupilot, but it’s perfect for getting unconventional aircraft off the ground. Continue reading “DRehmFlight: Customizable Flight Stabilisation For Your Weird Flying Contraptions”

Phishing With Morse Code

All of us have seen our share of phishing emails, but there are a lot more that get caught by secure email gateways and client filters. Threat actors are constantly coming up with new ways to get past these virtual gatekeepers. [BleepingComputer] investigated a new phishing attack that used some old tricks by hiding the malicious script tags as morse code.

The phishing attack targets Microsoft account login credentials with an HTML page posing as an Excel invoice. When opened, it asks the user to re-enter their credentials before viewing the document. Some external scripts are required to render the fake invoice and login window but would be detected if the links were included normally. Instead, the actor encoded the script links using dots and dashes, for example, “.-” equals “a”. A simple function (creatively named “decodeMorse”) is used to decode and inject the scripts when it runs in the victim’s browser.

Of course, this sort of attack is easy to avoid with the basic precautions we are all familiar with, like not opening suspicious attachments and carefully inspecting URLs. The code used in this attack is simple enough to be used in a tutorial on JavaScript arrays, but it was good enough to slip past a few large company’s filters.

Phishing attacks are probably not going to stop anytime soon, so if you’re bored, you could go phishing for phishers, or write some scripts to flood them with fake information.

Upgrading An Old MIG Welder Wire Feeder With Arduino

Older industrial equipment is often a great option if you’re on a budget, and you might even be able to add some premium features yourself. [Brett] from [Theoretically Practical] has done with his old MIG welder, adding premium control features with the help of an Arduino.

The main features [Brett] were after is pre-flow, post-flow, and a spot welding timer. Pre-flow starts the flow of shielding gas a moment before energizing the filler wire, while post-flow keeps the gas going after the weld is complete. This reduces the chances of oxygen contaminating the welds. A spot welding timer automatically limits welding time, enabling consistent and repeatable spot welds.

The Miller S-22A wire feeder can have these features, but it requires an expensive and difficult to find control unit. All it does is time the activation of the relays that control the gas flow, power, and wire feeder, so [Brett] decided to use an Arduino instead. The welders control circuit runs at 24V, so an optoisolator receives the trigger signal, and relays are used for outputs. Potentiometers were added to the original control panel, and all the wiring was neatly fitted behind it. The upgrade worked perfectly and allowed [Brett] to increase the quality of his welds. See the video after the break for the full details.

Inverter welders can be picked up for ridiculously cheap prices, if you’re willing to live with the trade-offs. We’ve also seen some other DIY welder upgrades, on small and large machines.

Serial Studio: Easily Visualise And Log Serial Data

Outputting data from a microcontroller over a serial port is convenient and easy, but formatting, visualizing, and analyzing the data can be tedious and frustrating. [Alex Spataru] knows this all too well, having spent too many hours building and debugging custom dashboards. To save himself and others the same frustration in the future, he created Serial Studio, a tool for quickly building dashboards for serial data.

The only input required for Serial Studio to create a dashboard is a simple JSON structure specifying the data’s format, and how it should be grouped and displayed. Originally Serial Studio required all the JSON data to be sent over serial, which is fine for simple data but quickly becomes cumbersome for more complex applications. To solve this, [Alex] added a feature allowing the JSON document with the format information loaded from the computer, while only the data is sent over serial.

Serial Studio includes several visualization options, including raw line graphs, bar/level indicator, dial indicator, the artificial horizon for IMU data, or a map widget. It can also output the formatted data to a CSV file for further analysis in other software. A console window is also included for viewing raw data or debugging purposes. See the usage demo after the break.

We like Serial Studio’s ease of use and adaptability, and we’ll likely use it for our own projects in the future. It is compatible with Linux, Windows, and Mac thanks to the Qt framework, and the code is open-source and available on GitHub.

If you’ve ever watched one of the BPS.Space model rocket launch videos, you’ll know how critical data logging, visualization and analysis is for [Joe Barnard]’s work. Serial Studio is perfect for such applications, and [Alex] used it extensively for simulated satellite competitions at his university. Continue reading “Serial Studio: Easily Visualise And Log Serial Data”

Scrappy: Drag Racing Bush Plane

We like to feature hacks that are affordable and accessible to the average person, but from time to time it’s fun to dream about the projects we’ll tackle when we’re all grown up and stinking rich. [Mike Patey] appears to fall rather comfortably in the latter category, but thankfully he hasn’t lost his “excited kid with big plans” spirit. A talented and experienced experimental aircraft builder, he’s currently working on Scrappy, a small bush plane built to be a short take-off and landing drag racer.

Scrappy started life as a Carbon Cub, a modernized kit version of the venerable Piper Super Cub. The only thing left of the original plane is a part of the fuselage frame, with almost everything else being custom. The engine is a 780 cubic inch (13 liter) horizontally opposed 8-cylinder, scavenged from one of [Mike]’s racing planes, and fitting it required extensive structural changes to the fuselage. The paddle-like propeller was intended for an airboat, and is designed for high thrust at low speeds. The skin of the aircraft is all carbon fiber, and the suspension almost looks like it’s borrowed from an off-road racing truck. [Mike] also added (and test fired) a ballistic recovery parachute. The cockpit instruments are also over-the-top for an aircraft like this, with seven Garmin multi-function displays.

Scrappy is still missing its wings, which will also be heavily modified. From the oil-cooling system to the door latch and gust-lock for the stick, everything was designed and made by [Mike]. We’re enjoying the in-depth build videos that show how he tackles all the little challenges that pop-up in such an ambitious project.

[Mike] made a name for himself with his previous monster bush plane Draco, which was sadly destroyed during an ill-considered take-off last year. Fortunately nobody was harmed in the incident, and Draco became a part donor for Scrappy. If budget planes are more your style, check out [Peter Sripol]’s latest electric microlight.

Continue reading “Scrappy: Drag Racing Bush Plane”

Fire In The Palm Of Your Hand

For as long as super-heroes have existed, they have inspired hacker projects. For [Everett Bradford], emulating the character Pyro from X-Men has been an on and off project for the last decade. His latest version, Pyro System V4, integrates quite a bit of control electronics to give the rather convincing effect of mind-controlled fire in the palm of his hand. (Video, embedded below.)

The system is a motor-actuated slider strapped to [Everett]’s forearm, which pushes a pivoting end-effector with an integrated butane burner into the palm of his hand. The slider runs on 4 mm linear bearings actuated by a small geared DC motor using cables. The end effector is spring-loaded to push it into the palm and integrates a high voltage ignition arc generator circuit, nozzle, and capacitive activation button.

The butane gas canister and the valve was cannibalized from a small blow torch lighter, and the valve is actuated by another geared DC motor. The valve actuator, slide actuator, and end-effector hinge all integrate position feedback via hall effect sensors and magnets. The sensor in the hinge allows the slide to actively correct for the angle of the user’s wrist, keeping the end effector in the middle of the palm.

The control circuit is split into two parts. One PIC16 microcontroller runs all the motion control and position sensing, while a PIC18 connected to a small touch screen handles user interface, control parameters, and ignition. The touch screen proved especially useful for control parameters during development without needing to connect to a laptop.

Some of [Everett]’s previous version had a much more impressive (and dangerous) flame but was also very bulky. We think this latest version strikes a pretty good balance regarding compactness and achieving convincing illusion.

[Colin Furze] is another name commonly associated with fire-breathing contraptions, but they have a proven history of landing him in hospital.

Continue reading “Fire In The Palm Of Your Hand”