Controlling A Quadcopter With One Dead Motor

Quadcopters have incredible flying abilities, but if one loses just a single motor, it drops like a rock. Researchers from the University of Zurich’s Robotics and Perception Group have proven that this does not need to be the case by keeping a quadcopter flying with only three motors.

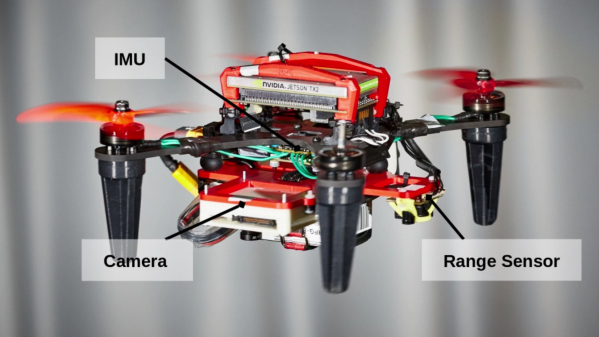
A quadcopter usually has enough thrust to stay aloft with only three motors, but it will spin uncontrollably in the yaw axis. It is impossible to stop a quadcopter from spinning, so the focus for researchers was on keeping the drone controllable while it’s spinning. To achieve this, accurate position and motion estimation is required, so they attached a pair of cameras to the bottom of the craft for visual-inertial odometry (VIO). One is a normal optical camera, while the other is an event camera, which has pixels that can independently respond to changes in light as they occur. This means that it has better low light performance and does not suffer from motion blur.

The feeds from the cameras are analyzed in real-time by an onboard Nvidia Jetson TX2 for state estimation, which is then used with an optical range sensor and onboard IMU to maintain controlled flight, as demonstrated in the video after the break. The research paper is free to read, and all the code is available on GitHub.

New developments in drone control schemes are always fascinating, like this hexacopter with an innovative motor layout to achieve six degrees of freedom, or a conventional helicopter with a virtual swash plate.
Continue reading “Controlling A Quadcopter With One Dead Motor”

Open Source CubeSats Ease The Pain Of Building Your Own

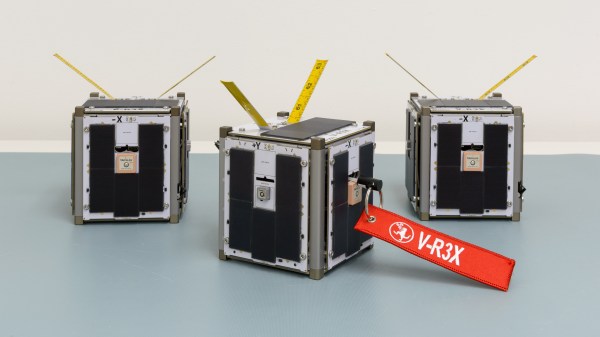
Space is hard, especially if you haven’t done it before. A growing number of CubeSats are launched by small, inexperienced teams every year, and a number of them fail due to missing some small but critical hardware or software problem. Researchers from the Robotic Exploration Lab (REx) at Carnegie Melon University have learned some of these lessons the hard way and created PyCubed, an open-source hardware and software framework for future CubeSats.

Most satellites, including CubeSats, require the same basic building blocks. These include ADCS (Attitude Determination and Control System), TT&C (telemetry, track, and command), C&DH (command and data handling), and an EPS (electrical power system). Each of these building blocks is integrated into a single PC/104 size PCB. The main microcontroller is an ATSAMD51, also used on a couple of Adafruit dev boards, and runs Circuit Python. Communications are handled by a LoRa radio module, and there is also an unpopulated footprint for a second radio. An LSM9DS1 IMU and an optional GPS handle navigation and attitude determination, and a flash chip and micro SD card provide RAM and data storage. The EPS consists of an energy harvester and battery charger, power monitor, and regular, that can connect to external Li-Ion batteries and solar panels. Two power relays and a series of MOSFETs connected to burn wires are used to deploy the CubeSat and its antennas.

On the PCB there are standardized footprints for up to four unique payloads for the specific missions. The hardware and software are documented on GitHub, including testing and a complete document on all the design decisions and their justifications. The PyCubed was also presented at the 2019 AIAA/USU Conference on Small Satellites. The platform has already been flight-tested as part of the Kicksat-2 mission, and will also be used in the upcoming V-R3X, Pandasat, and Pycubed-1 projects.

This is not the first open-source CubeSat we’ve seen, and we expect these platforms to become more common. Tracking a CubeSat is a lot less expensive than sending one to space, and can be done for as little as $25.

Obstacle Climbing Rover Built With The Power Of Lego

When we want to prototype a rover, we’ve developed a tendency to immediately reach for the 3D printer and Arduino or Raspberry Pi. It’s easy to forget the prototyping tool many of us grew up using: LEGO. The [Brick Experiment Channel] has not forgotten, and in the video after the break demonstrates how he used Lego Technic components to prototype an impressive little obstacle climbing robot.

The little Lego rover starts as a simple four-wheeled rover trying to climb on top of a book. Swap in a four-wheel-drive gearbox and grippy tires, and it clears the first obstacle. Add a few books to the stack causes the break-over angle to become an issue, so the rover gets an inverted-V chassis. As the obstacle height increases, batteries are moved around for better weight distribution, but the real improvement comes when an actuating middle joint is added, turning it into a wheeled inchworm. Clearing overhangs suspended beams, and gaps are all just a matter of finding the right technique.

Thanks to Lego’s modularity, all this is possible in an hour or two where a 3D printer and CAD might have stretched it into days. This robot does have the limitation of not being able to turn. Conventional car steering or Mecanum wheels are two options, but how would you do it?

The [Brick Experiment Channel] knows a thing or two about building Lego robots, even for stealing keys. Continue reading “Obstacle Climbing Rover Built With The Power Of Lego”

Keeping An Eye On The Water Heater Pilot Light

[WJCarpenter]’s gas water heater uses a small pilot light that needs to stay burning permanently to ignite the main burners as required. Four or five times a year, the pilot light goes out and needs to be manually lit. This involves an expedition from the upstairs bathroom to the basement, always in the early morning, after having spent a few fruitless minutes waiting for hot water. Having grown tired of this exercise, [WJCarpenter] built Water Watcher, a pilot light monitoring system with some ESPs and a light sensor.

Water Watcher consists of an ESP8266 connected to a light sensor taped to the inspection window of the water heater. It reports the status of the pilot light over MQTT to an ESP32-based M5 Atom Matrix in the main bedroom, which displays it using a 5×5 RGB matrix, as demonstrated after the break. Both ESPs run ESPHome, so programming is as easy as giving it a YAML config file. [WJCarpenter] tested a few different light sensors, until he found the TSL2591, which is sensitive to the right wavelengths and has enough dynamic range for watching a pilot light.

This might not be a complicated hack, but we do not doubt that it reduces frustration a bit on those fateful mornings. Be sure to check out the Water Watcher project page, it’s an entertaining read! Continue reading “Keeping An Eye On The Water Heater Pilot Light”

ExpressLRS: Open Source, Low Latency, Long Range RC Protocol

One of the major choices a newcomer to the RC flying hobby must make is on the RC link protocol. To add the list of choices (or confusion) there is now a new open-source, low latency, and long-range protocol named ExpressLRS.

ExpressLRS’s claim to fame is high packet rates of up to 500 Hz, with plans for 1000 Hz, and latency as low as 5 ms. Long-range testing has pushed it out to 30 km with a flying wing (video below), but this is not unheard of for other protocols. Most modern RC protocols run either in the 2.4 GHz or 915/868 MHz bands, with the latter having a definite advantage in terms of range.

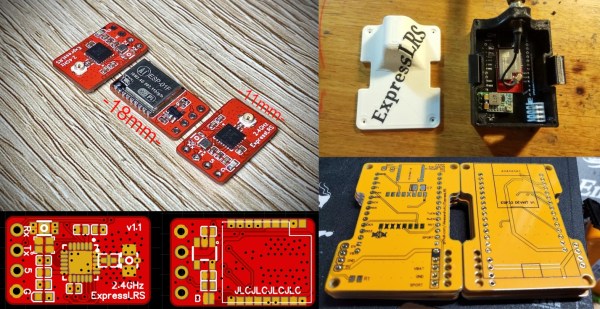
ExpressLRS has options to run on either band, using Semtech SX127x (915/868 MHz) or SX1280 (2.4 GHz) LoRa transceivers, connected to STM32, ESP32, or ESP8285 microcontrollers. The ESP microcontrollers also allow software updates over Wi-Fi.

We’re excited to see an open-source competitor to the proprietary protocols currently dominating the market, but several open-source protocols have come and gone over the years. Hardware availability and compatibility is a deciding factor for a new protocol’s success, and ExpressLRS already has an advantage in this regard. Existing Frsky R9 transmitters and receivers, and Immersion RC Ghost receivers are compatible with the firmware. There are also DIY options available, and the GitHub page claims that several manufacturers are working on official ExpressLRS hardware.

If you’re already into the RC hobby, and you have compatible hardware lying around, be sure to give it a try and give some feedback to the developers! One scenario we would like to see tested is high interference and congested band conditions, like at RC flying events.

All the source code and hardware designs are available on GitHub, and there are active community discussions on Discord. Continue reading “ExpressLRS: Open Source, Low Latency, Long Range RC Protocol”

Retrofitting USB-C To An IPod Nano

Some hacks serve a critical need, while others are just for the challenge or fun of it. We suspect the latter was the real reason [David Buchanan] converted a first generation iPod Nano from its original 30 pin connector to USB-C.

USB-C mounted

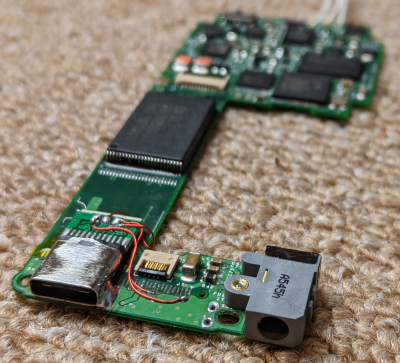
[David] bought the iPod with a dead battery, so when he opened the iPod to get the old battery out, he noticed there was enough space to fit a USB-C connector. The original Apple 30 pin connector runs USB 2.0 through four of the pins, so [David] used the original USB cable and identified the appropriate pins and traces with a continuity tester. The connector was destructively removed with side cutters, ripping off all but one of the pads in the process. A hot air station might have made things easier, but we assume he did not have one on hand. The USB-C connector was scavenged from a cheap USC-C to USB Micro adaptor and mounted by soldering the housing directly to the PCB’s ground plane. The three remaining terminals were soldered to the traces with enamel wire.

With the new battery installed, [David] confirmed that both charging and data transfer worked. The IC that handles the button and scroll pad interfered slightly with the new connector, so he filed away some of the IC’s excess. Any open pads close to the new connector was covered with Kapton tape to avoid shorts. The large hole in the enclosure for the 30 pin connection was partly filled in with five-minute epoxy. The final assembled product looks almost factory produced and works as it’s supposed to, so we call this a win.

Retrofitting USB-C connectors in various electronic devices has become a popular hack over the past two years. We’ve seen it done on everything from Thinkpads to soldering irons. Continue reading “Retrofitting USB-C To An IPod Nano”

Robotic Fish Swarm Together Using Cameras And LEDs

Robotics has advanced in leaps and bounds over the past few decades, but in terms of decentralized coordination in robot swarms, they far behind biological swarms. Researchers from Harvard University’s Weiss Institute are working to close the gap, and have developed Blueswarm, a school of robotic fish that can exhibit swarm behavior without external centralized control.

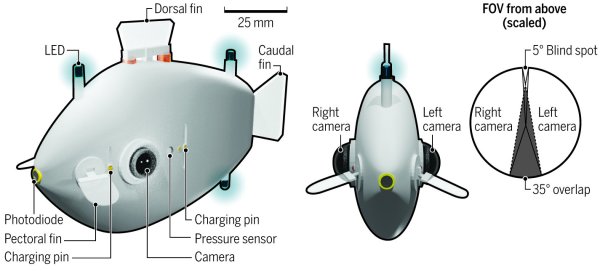
In real fish schools, the movement of an individual fish depends on those around it. To allow each robotic fish to estimate the position of its neighbors, they are equipped with a set of 3 blue LEDs, and a camera on each side of the body. Four oscillating fins, inspired by reef fish, provide 3D control. The actuator for the fins is simply a pivoting magnet inside a coil being fed an alternating current. The onboard computer of each fish is a Raspberry Pi W, and the cameras are Raspberry Pi Camera modules with wide-angle lenses. Using the position information calculated from the cameras, the school can coordinate its movements to spread out, group together, swim in a circle, or find an object and then converge on it. The full academic article is available for free if you are interested in the details.

Communication with light is dependent on the clarity of the medium it’s traveling through, in this case, water — and conditions can quickly become a limiting factor. Submarines have faced the same challenge for a long time. Two current alternative solutions are ELF radio and sound, which are both covered in [Lewin Day]’s excellent article on underwater communications.

Continue reading “Robotic Fish Swarm Together Using Cameras And LEDs”