The Orb Web Desktop

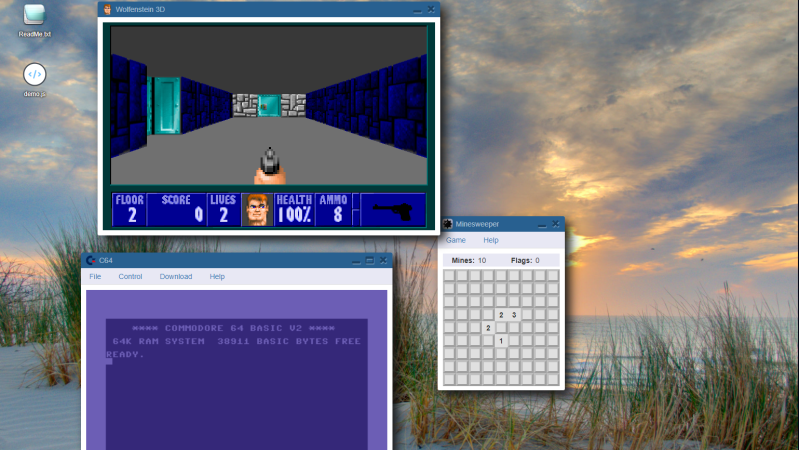
[Hugo Leisink] is a programmer who contributes to Open Source projects. In their spare time, they have been developing a web-browser-based operating system called Orb. It is available for the princely sum of zero cheeseburgers and doesn’t need a high-spec machine to run smoothly. The project is built using PHP and Javascript, which allows it to run efficiently on most desktop devices. There are a number of apps included, which are again written in a combination of PHP and js, together with a few written using webasm.

A few notable examples include a C64 emulator, minesweeper, and even a js port of Wolfenstein 3D so this isn’t just a toy, but actually useful. Ok, for real use cases, there are also the usual file browsers, and document readers as well as a writing application based on CKeditor. There is a kind of Windows 3.1 look and feel simplicity to the experience which is refreshing in the modern era of complex applications with their learning curves. Orb could be very useful in an educational setting, or just for jotting your own notes as you travel. Who knows, because the possibilities are endless if you’re willing to get your hands dirty with a bit of coding.

We’ve seen a few web desktops before, here’s a collection of them we saw last year. If you want to go in the other direction and turn a webpage into a desktop app, then look no further than Gluon.

No Need To Buy A Woodchipper – Build One!

Polish YouTuber WorkshopFromScratch finally got fed up with tripping over piles of garden detritus and decided to have a go at building a woodchipper (Video, embedded below). Since they had a ‘small’ 1.5kW gearmotor just lying idle (as you do) it was an obvious fit for a machine that needs torque rather than supersonic speed. The video is a fabulous 20-minute journey through the workshop showing just about every conceivable metalworking tool being used at some point.

Checkout out the thickness of my blades!

One interesting point is the bottom roller, which sits between a pair of removable guides, which should help the thing self-feed without jamming. Whether that was necessary is not for us to judge, but it can’t hurt. The frame looks like it was constructed from at least 1/4″ thick steel, which is expensive if you don’t happen to have a supply to hand. There’s lots to see, everything from thin sheet metalworking, which was plasma cut, constructing the feed and exhaust guides, to box sections being skilfully welded at some interesting angles to make a cart to move the thing. They tell us the blades were constructed from some seriously thick slabs of C45 grade steel, but currently are not hardened. This is planned for the future, but we suspect not something that is easily achieved in the home workshop!

If this channel is familiar, then you might remember the earlier stump grinder they built. If you are drowning in sawdust, but have a log burner, then you’ll appreciate this sawdust briquette machine.

Continue reading “No Need To Buy A Woodchipper – Build One!”

The Egyptian Coin Box ‘Trick’

[James Stanley] likes to spend time making puzzles and gadgets for escape rooms, and decided for a change to try their hand at a bit of magic. The idea was to construct a ‘magic box’, in which a coin can be placed in one of a number of slots, and then be able to remotely be able to determine the slot by means unseen. Obviously, this is an electronics hack, with a neat package of sensor and radio comms hidden inside a stack of CNC-milled wood. Coin locations are transmitted via Bluetooth to a Bangle.js smartwatch, which vibrates according to the slot occupied, allowing [James] to predict where the coin was placed. Continue reading “The Egyptian Coin Box ‘Trick’”

This Kinetic Art Display Uses A Gin Bottle

[David McDaid] likes gin. So in homage to their favourite tipple, a certain brand of Scottish origin, a kinetic art project was brewed. Tabled as a Rube Goldberg machine — it’s not — but it is a very smart marble run type installation, dripping with 3D printed parts and a sprinkling of blinkenlights.

The write-up shows the degree of pain we go through with building such contraptions, apparently [David] burned through 2.5 kg of PLA filament despite the bill of materials requiring a mere 660 g. Much experimentation, trial and error, and plenty of print-and-reprint-until-good-enough, resulted in a clean looking run with some neat features. We particularly like the use of a stainless steel jigger to add a touch of metallic ting, to the soundscape produced. The whole show was put together in Fusion 360, since all those tight tolerances do not make for a simple construction without a lot of fiddling around with the layout. Once it was a sound, layout was prototyped on a wood board, which was subsequently used a drill template for the final acrylic version.

On the electronics side of things, an Arduino Nano clone is on control duty, reading an IR trip sensor to fire of a simple light effect, illuminating the gin bottle in a slick fashion. These machines need a mechanism to raise the balls against that pesky force of gravity, in this instance a 3D printed custom chain was constructed, driven with a stepper motor in turn driven from a TMC2208. You see, this thing lives in the kitchen, so the aim was to keep all the noise from the mechanics to a minimum so only the noise of LDPE balls rattling around can be heard. They are the star of the show after all! The build looks nice and would certainly be something we’d like to see on the wall. Obviously we’ve seen a few marble runs over the years. Here’s an interesting one that uses an elevator mechanism, and another project that shows how to generate runs procedurally.

Continue reading “This Kinetic Art Display Uses A Gin Bottle”

Teardown Of An Aircraft Video Symbol Generator

[Adrian Smith] recently scored an avionics module taken from a British Aerospace 146 airliner and ripped it open for our viewing pleasure. This particular aircraft was designed in the early 1980s when the electronics used to feed the various displays in the cockpit were very different from modern designs. This particular box is called a ‘symbol generator’ and is used to generate the various real-time video feeds that are sent to the cockpit display units. Various instruments, for example, the weather radar, feed into it, and it then reformats the video if needed, mixing in any required additional display.

Top view of the symbol generator instrument rack

There are many gold-plated chips on these boards, which indicates these may be radiation-hardened versions of familiar devices, most of which are 54xx series logic. 54xx series logic is essentially the same functionally as the corresponding 74xx series, except for the much wider operating temperature range mandated by military and, by extension, commercial aviation needs. The main CPU board appears to be based around the Intel 8086, with some Zilog Z180 compatible processors used on the two video display controller boards. We noted the Zilog Z0853604, which is their counter/timer/GPIO chip. Obviously, there are many custom ASICs produced by Honeywell as well as other special order items that you’ll never find the datasheet for. Now there’s a challenge!

Finally, we note the standard 400 Hz avionics-standard power supply, which, as some may know, is the standard operating frequency for the AC power system used within modern aircraft systems. The higher frequency (compared to 50 or 60 Hz) means the magnetic components can be physically smaller and, therefore, lighter for a given power handling capability.

We see a lot of avionics teardowns, likely because they’re fascinating. Here’s some more British military gear, an interesting RF distance measuring box from the 1970s, and finally, some brave soul building their own avionics gear. What could possibly go wrong?

Continue reading “Teardown Of An Aircraft Video Symbol Generator”

A Simple Guide To Bit Banged I2C On The 6502

We covered [Anders Nielsen]’s 65duino project a short while ago, and now he’s back with an update video showing some more details of bit-banging I2C using plain old 6502 assembly language.

Obviously, with such a simple system, there is no dedicated I2C interface hardware, so the programmer must take care of all the details of the I2C protocol in software, bit-banging it out to the peripheral and reading back the response one bit at a time.

The first detail to concern us will be the I2C addresses of the devices being connected to the bus and how low-level bit manipulation is used to turn the 7-bit I2C address into the byte being bit-banged. As [Anders] shows, setting a bit is simply a logical-OR operation, and resetting a bit is a simple logical-AND operation using the inversion (or one’s complement) bit to reset to form a bitmask. As many will already know, this process is necessary to code for a read or a write I2C operation. A further detail is that I2C uses an open-collector connection scheme, which means that no device on the bus may drive the bus to logical high; instead, they must release the drive by going to the high impedance state, and an external pull-up resistor will pull the bus high. The 6532 RIOT chip (used for I/O on the 65unio) does not have tristate control but instead uses a data direction register (DDR) to allow a pin to be an input. This will do the job just fine, albeit with slightly odd-looking code, until you know what’s going on.

From there, it’s a straightforward matter to write subroutines that generate the I2C start, stop, and NACK conditions that are required to write to the SSD1306-based OLED to get it to do something we can observe. From these basic roots, through higher-level subroutines, a complete OLED library in assembly can be constructed. We shall sit tight and await where [Anders] goes next with this!

We see I2C-connected things all the time, like this neat ATtiny85-based I2C peripheral, and whilst we’re talking about the SSD1306 OLED display controller, here’s a hack that shows just how much you can push your luck with the I2C spec and get some crazy frame rates.

Continue reading “A Simple Guide To Bit Banged I2C On The 6502”